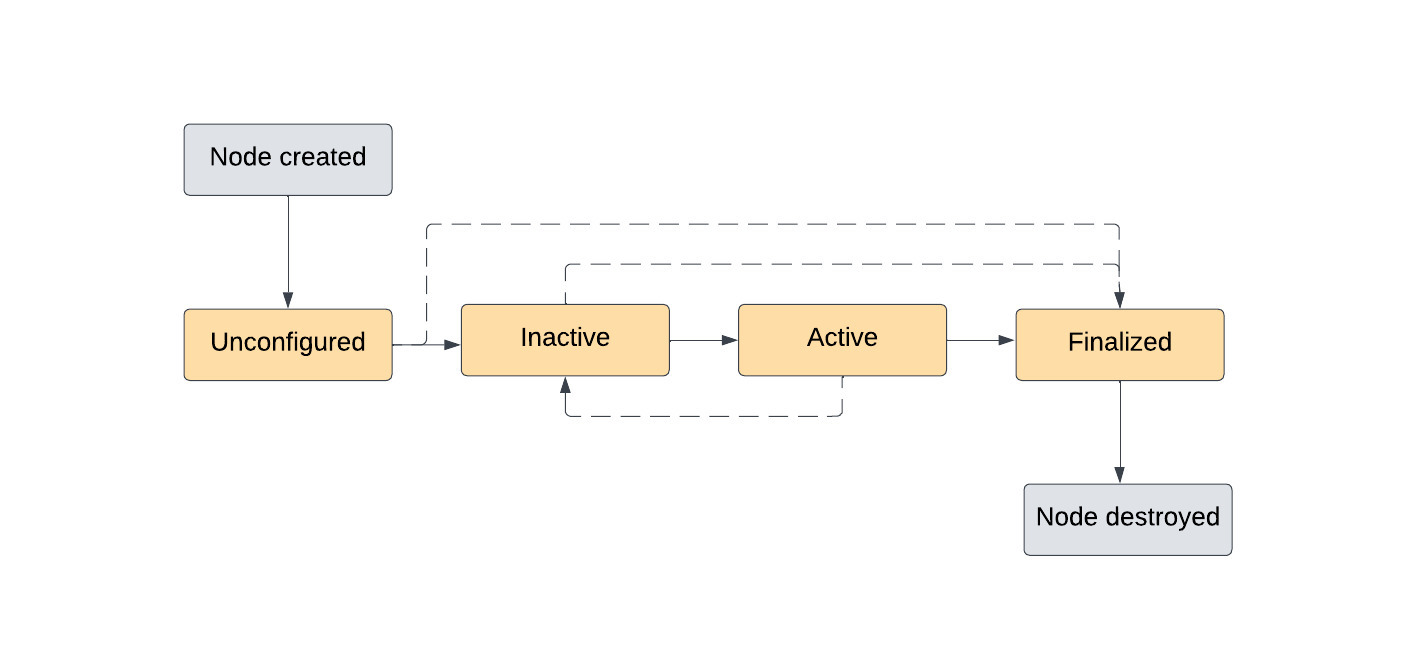

ROS 2 Humble introduced the concept of lifecycle nodes (or “managed nodes”), a new type of node that can be managed through 4 states. Because lifecycle nodes that fail to launch can be reconfigured and reactivated together at runtime, they provide roboticists finer-grained control of their robotics systems.
In this tutorial, we’ll cover the design of lifecycle nodes, understand their use cases, and see them in action with Foxglove visualizations.
Standard vs. lifecycle nodes
In contrast to a regular ROS node – which will simply go from being inactive to active when configured and created successfully – a lifecycle node transitions through 4 primary states: unconfigured, inactive, active, and finalized.
Once initially configured, an unconfigured node transitions to the inactive state – in short, the node is ready to work, but callbacks and publishers are not yet operative. At this stage, you can reconfigure the node – change parameters, add and remove publications and subscriptions, etc. – without altering its behavior while it is actually running.
Once ready to be fully functional, the node can transition to the active state. At this point, it has all the behaviors of a standard ROS node – it responds to service requests, reads and processes data, and produces output.
As a last step, the node transitions to a finalized state. This state is always terminal – the only transition from here is to be destroyed, which subsequently frees up the node’s memory.
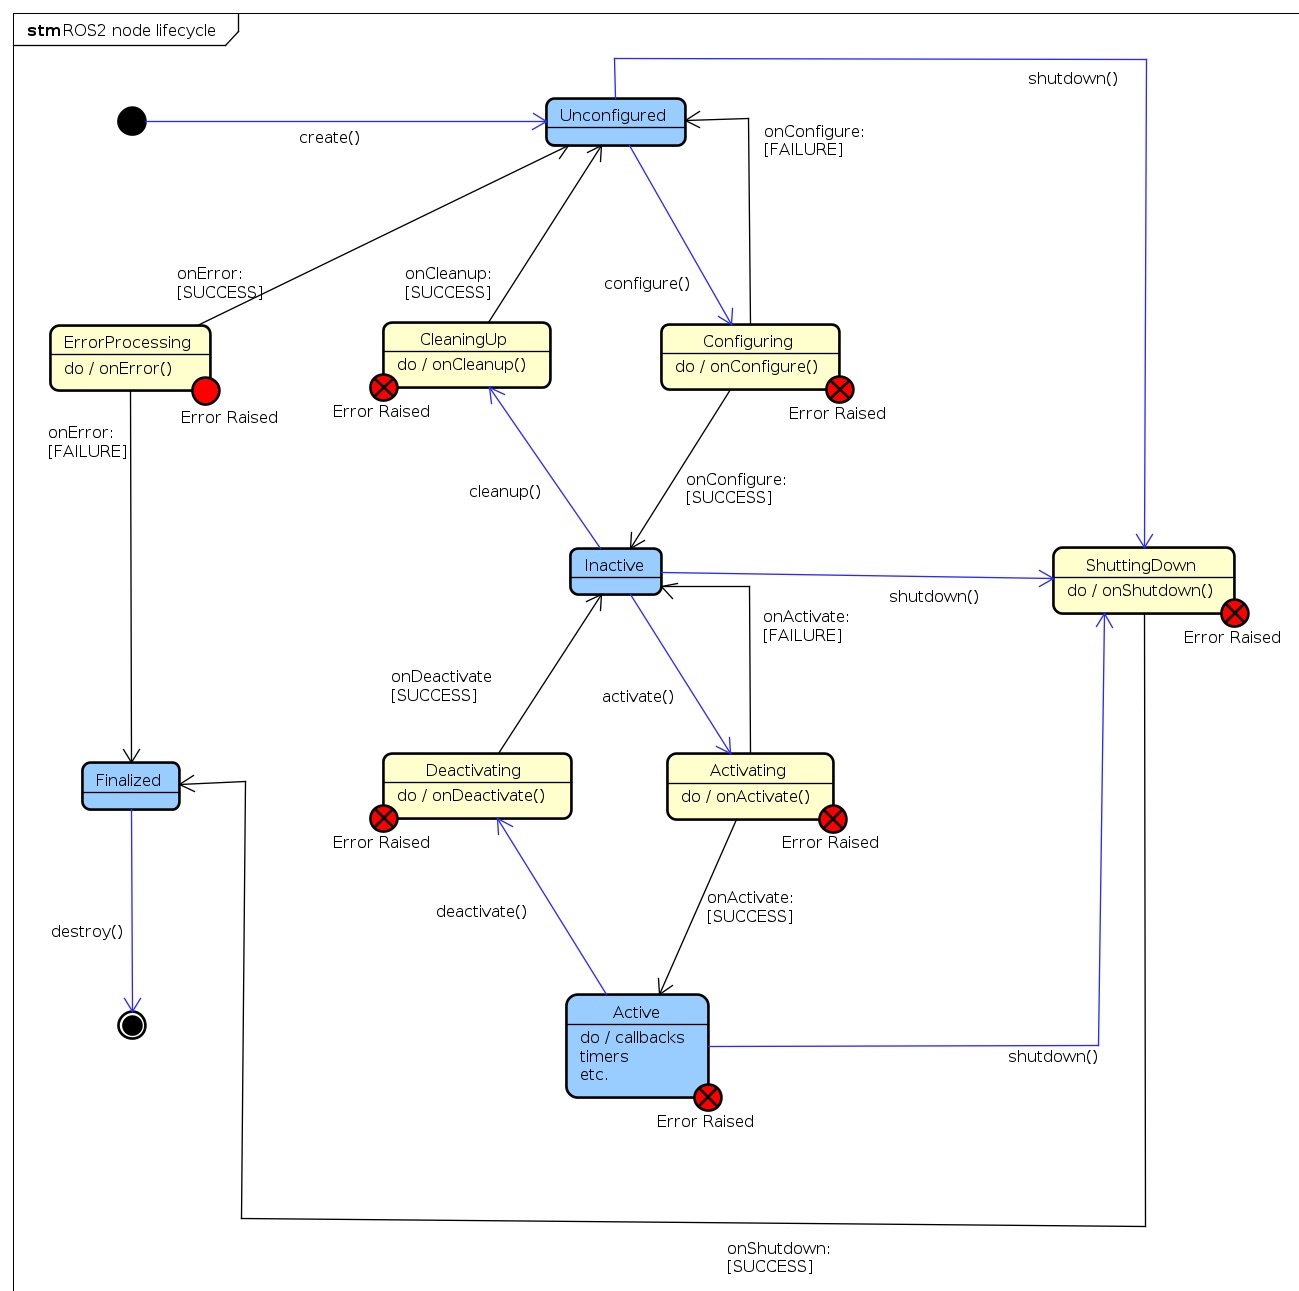
A particular action triggers each transition. Image credit: ROS 2 Design
Nav2, ROS 2’s most famous navigation stack, uses lifecycle nodes to manage transitions and ensure that the stack can successfully execute without missing any nodes. It configures and activates nodes in a particular sequence to start up the stack, then goes in reverse order to bring it back down into a finalized state. Whenever a single node fails to transition to the configured state, other nodes are also blocked from becoming active. It also transitions down all nodes if any connected servers are non-responsive or have crashed.
Configuring and activating nodes correctly in a deterministic way is critical. Nav2’s controller_server is in charge of local obstacle avoidance – if this node fails its activation and isn’t running correctly, the other navigation nodes should not start, as the robot could collide into obstacles while executing its tasks.
To see how nodes activate sequentially, try executing the nav2_bringup launch file:
$ ros2 launch nav2_bringup navigation_launch.py
 [INFO] [launch]: All log files can be found below /home/jose/.ros/log/2023-10-31-18-40-45-449729-jose-hp-41659
 [INFO] [launch]: Default logging verbosity is set to INFO
 [INFO] [controller_server-1]: process started with pid [41661]
 [INFO] [planner_server-2]: process started with pid [41663]
 [INFO] [recoveries_server-3]: process started with pid [41665]
 [INFO] [bt_navigator-4]: process started with pid [41667]
 [INFO] [waypoint_follower-5]: process started with pid [41669]
 [INFO] [lifecycle_manager-6]: process started with pid [41671]
We can see there are five navigation nodes, as well as a final lifecycle_manager node. The lifecycle_manager is responsible for transitioning the navigation nodes through the lifecycle states.
Next, each node launches and waits for its transitions to activate:
bash [lifecycle_manager-6] [INFO] [1698774045.681572479] [lifecycle_manager_navigation]: Creating [waypoint_follower-5] [INFO] [1698774045.683650037] [waypoint_follower]: [waypoint_follower-5] waypoint_follower lifecycle node launched. [waypoint_follower-5] Waiting on external lifecycle transitions to activate … [planner_server-2] [INFO] [1698774045.701944225] [planner_server]: [planner_server-2] planner_server lifecycle node launched. [planner_server-2] Waiting on external lifecycle transitions to activate # Same for bt_navigator, recoveries_server, and controller_server
The lifecycle_manager triggers the transition for the controller_server to configure:
bash [waypoint_follower-5] [INFO] [1698774045.683769148] [waypoint_follower]: Creating [lifecycle_manager-6] [INFO] [1698774045.688698563] [lifecycle_manager_navigation]: Creating and initializing lifecycle service clients [lifecycle_manager-6] [INFO] [1698774045.693168582] [lifecycle_manager_navigation]: Starting managed nodes bringup... [lifecycle_manager-6] [INFO] [1698774045.693206836] [lifecycle_manager_navigation]: Configuring controller_server
Once controller_server is correctly configured, the lifecycle_manager will move on to configuring planner_server and the rest of the nodes:
bash [lifecycle_manager-6] [INFO] [1698774045.783280072] [lifecycle_manager_navigation]: Configuring planner_server [planner_server-2] [INFO] [1698774045.783431196] [planner_server]: Configuring # Same for recoveries_server, bt_navigator, and waypoint_follower
Once all nodes are configured, the lifecycle_manager will transition all of them at once to the active state:
bash [lifecycle_manager-6] [INFO] [1698774045.847399824] [lifecycle_manager_navigation]: Activating controller_server [controller_server-1] [INFO] [1698774045.847541916] [controller_server]: Activating [controller_server-1] [INFO] [1698774045.847573820] [local_costmap.local_costmap]: Activating
Launching these nodes in sequence like this guarantees that the robot’s basic behaviors – like the controller_server’s obstacle avoidance capabilities – are always working.
Create a lifecycle node
Let’s create our own lifecycle node in Python – this is only possible for ROS 2 Humble and onward.
Create a lifecycle_node.py file with the following imports:
import rclpy
from rclpy.lifecycle import State, TransitionCallbackReturn, Node
In this node file, declare a LifecycleNodeExample class that inherits from Node, and declare a method for each of the node’s transitions between its 4 states – each method must return FAILURE or SUCCESS:
class LifecycleNodeExample(Node):
 def __init__(self, node_name,**kwargs) -> None:
   super().__init__(node_name,**kwargs)
 def on_configure(self, state: State) -> TransitionCallbackReturn:
   self.get_logger().info(f"Node '{self.get_name()}' is in state '{state.label}'. Transitioning to 'configure'")
   return TransitionCallbackReturn.SUCCESS
 def on_activate(self, state: State) -> TransitionCallbackReturn:
   self.get_logger().info(f"Node '{self.get_name()}' is in state '{state.label}'. Transitioning to 'activate'")
   return TransitionCallbackReturn.SUCCESS
 def on_deactivate(self, state: State) -> TransitionCallbackReturn:
   self.get_logger().info(f"Node '{self.get_name()}' is in state '{state.label}'. Transitioning to 'deactivate'")
   return TransitionCallbackReturn.SUCCESS
 def on_shutdown(self, state: State) -> TransitionCallbackReturn:
   self.get_logger().info(f"Node '{self.get_name()}' is in state '{state.label}'. Transitioning to 'shutdown'")
   return TransitionCallbackReturn.SUCCESS
Finally, add the main function that instantiates the class and spins the node.
def main(args=None) -> None:
 rclpy.init(args=args)
 lifecycle_node = LifecycleNodeExample("lifecycle_node")
 rclpy.spin(lifecycle_node)
 rclpy.shutdown()
if __name__ == "__main__":
 main()
Add the node in the setup.py file:
'console_scripts': [
 "lifecycle_node=lifecycle_py.lifecycle_node:main"
],
Now, compile the package and run the executable:
$ ros2 run lifecycle_nodeControl the node’s transitions
Open a second Terminal window to control the running node’s transitions.
First, check the available transitions for our lifecycle_node:
$ ros2 lifecycle list /lifecycle_node
 - configure [1]
   Start: unconfigured
   Goal: configuring
 - shutdown [5]
   Start: unconfigured
   Goal: shuttingdown
Trigger configure, so our lifecycle node can transition from an unconfigured to inactive state:
$ ros2 lifecycle set /lifecycle_node configure
 Transitioning successful
Back in the first Terminal window, we see that the node is Transitioning to 'configure':
$ ros2 run lifecycle lifecycle_node
 [INFO] [1697656693.282176622] [lifecycle_node]: Node 'lifecycle_node' is in state 'unconfigured'. Transitioning to 'configure'
Next, trigger activate to transition the node from an inactive to active state:
$ ros2 lifecycle set /lifecycle_node activate
 Transitioning successful
Back in our first Terminal window, we see that Node 'lifecycle_node' is in state 'inactive' and is now Transitioning to 'activate':
$ ros2 run lifecycle lifecycle_node
 [INFO] [1697656693.282176622] [lifecycle_node]: Node 'lifecycle_node' is in state 'unconfigured'. Transitioning to 'configure'
 [INFO] [1697656750.034178081] [lifecycle_node]: Node 'lifecycle_node' is in state 'inactive'. Transitioning to 'activate'
We now have an active lifecycle node!
Trigger and visualize transitions with Foxglove
Let’s use Foxglove to trigger and visualize our node state transitions in real time.
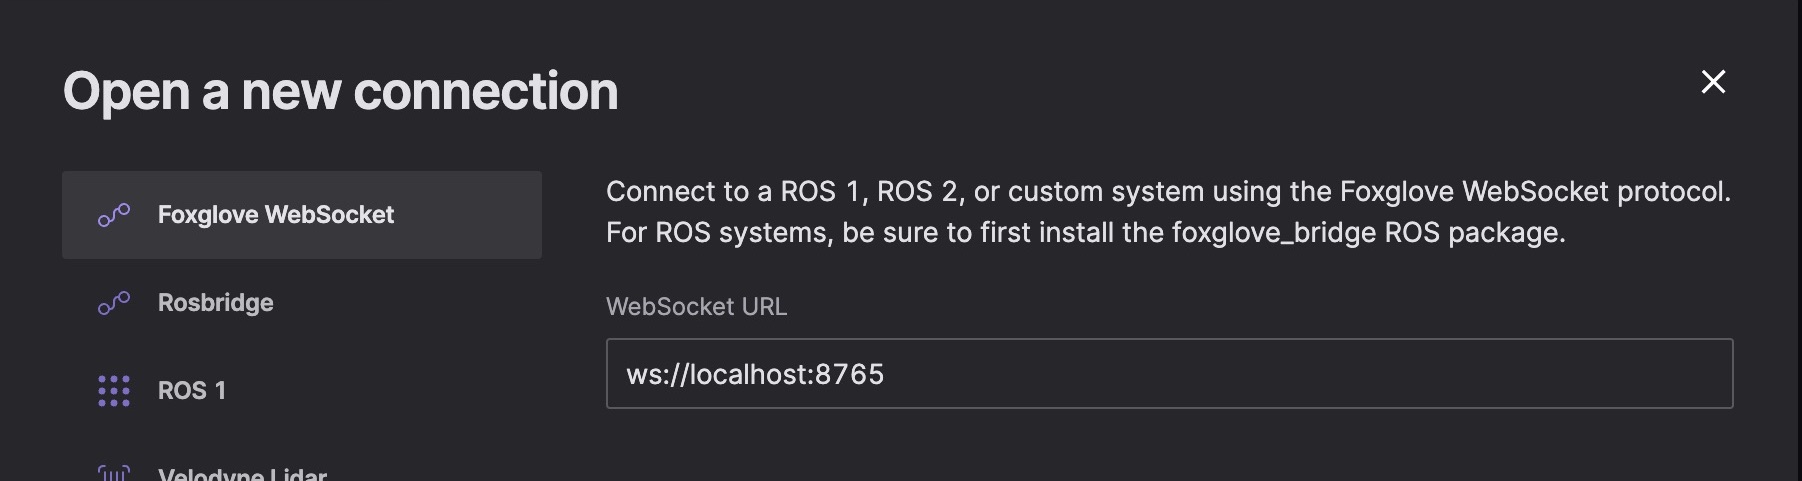
To get started, open either the web or desktop app, and create a new layout. Next, install and launch the foxglove_bridge. Then, open a new “Foxglove Websocket” connection in Foxglove to connect to your live ROS 2 stack:
We kept this exercise simple with ros2 lifecycle CLI commands, but in a real-life scenario, you could trigger transitions with services so that your robot can be fully autonomous. Nav2’s lifecycle_manager uses two services to manage its nodes – ~/get_state to get the current state, and ~/change_state to trigger transitions.
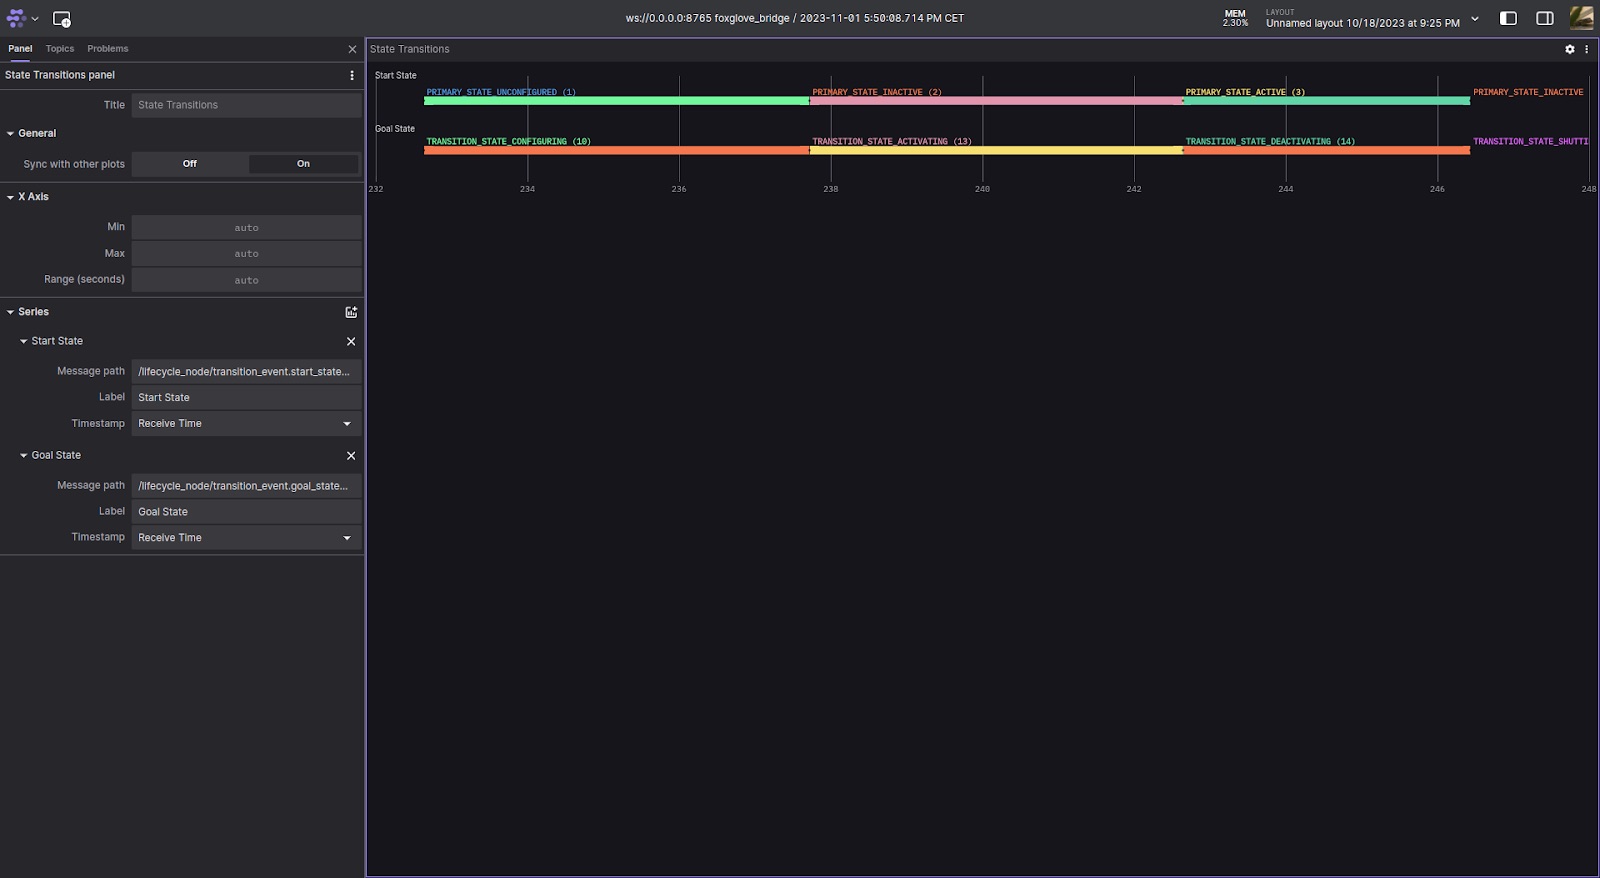
Use Foxglove’s panel list to add a State Transitions panel to your layout. Since lifecycle nodes publish their transitions on a nested ~/transition_event topic (e.g. /lifecycle_node/transition_event), we can configure this panel to visualize the start (/lifecycle_node/transition_event.start_state.id) and goal (/lifecycle_node/transition_event.goal_state.id) of each transition.
Next, add a Call Service panel to your layout. Configure it to call /lifecycle_node/change_state with a lifecycle_msgs/srv/ChangeState request payload:
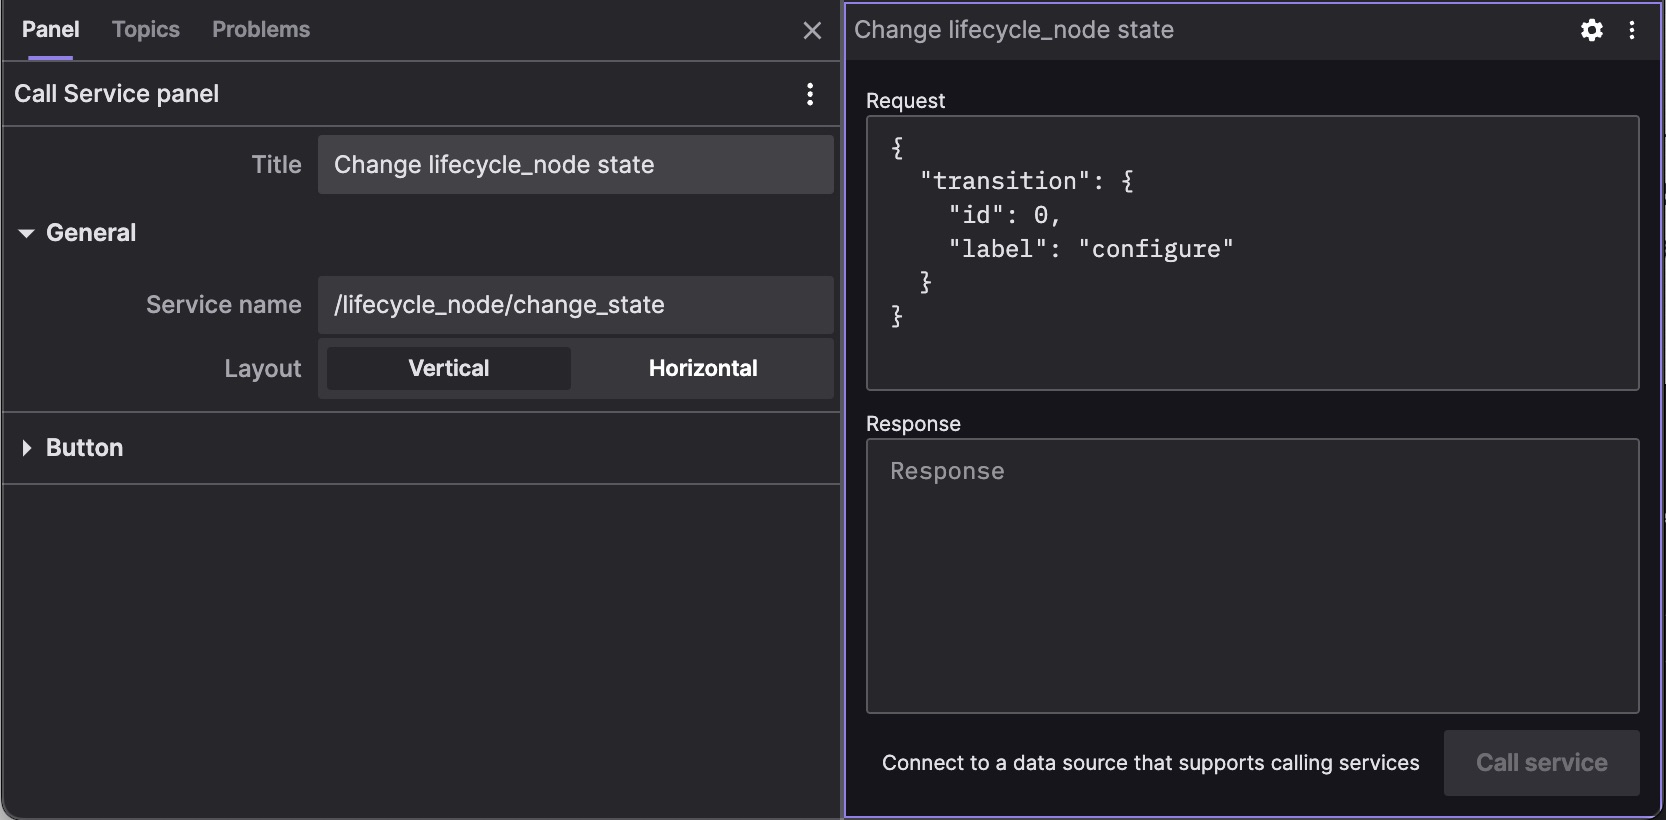
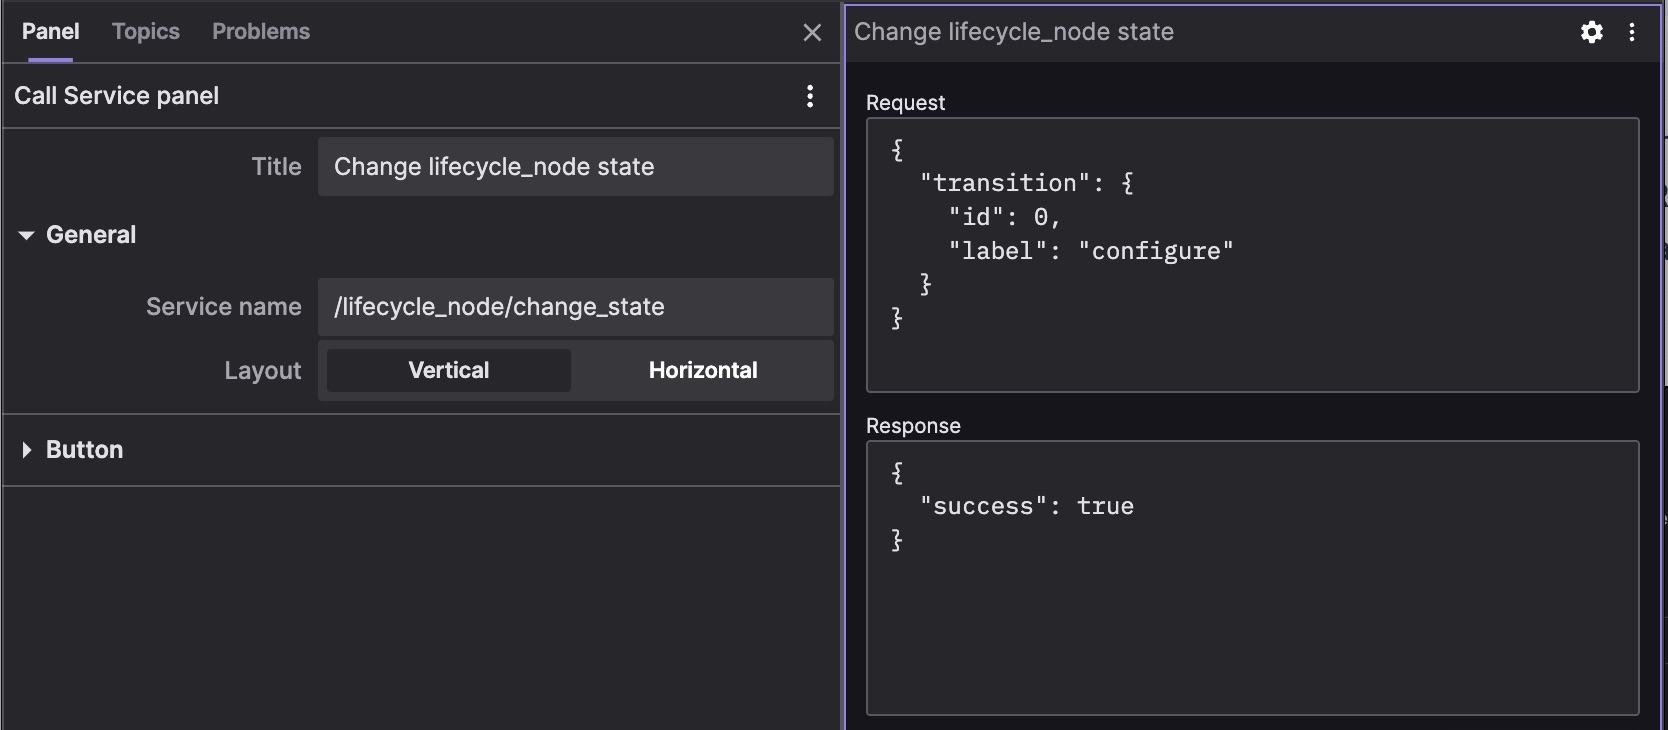
Clicking the “Call service” button should trigger a transition to another state (“configure”) and return a response:
You should also see the corresponding start and goal visualized in the State Transitions panel as well:
Keep learning
ROS 2 managed nodes open new horizons for everyone’s robotics development. By helping developers monitor their ROS nodes and ensure that they are correctly configured and activated, lifecycle nodes can improve the overall predictability and reliability of our robotics systems.
If you have any questions, feel free to reach out in our Discord community. You can also learn more about ROS and Foxglove by checking out our other tutorials.