Using the Foxglove SDK to generate MCAP.

The newest Foxglove SDK helps robotics engineers to generate MCAP files for easy data logging and visualization. Now you can integrate into any code the generation and data capture for your robot.
In this tutorial, we are going to see how to capture images, both depth and RGB, as well as poses and transforms. The code is in Python, but the Foxglove SDK also has APIs for Rust and C++. The dataset used is from TheAirLab, in particular the Japanese Alley.
The code.
First of all, install the Foxglove SDK with pip
pip3 install foxglove-sdkNow create a new folder to work on this dataset. It is recommended to have the following structure.
- japan_alley
- code
- P007 (dataset downloaded)
In the code folder, create a new file called generate_mcap.py.
Imports and folder paths.
Start by importing the necessary modules.
import os

import numpy as np
import cv2

import foxglove
from foxglove.channels import (
    CompressedImageChannel,
    PoseInFrameChannel,
    PosesInFrameChannel,
    FrameTransformChannel
)
from foxglove.schemas import (
    Timestamp,
    CompressedImage,
    PosesInFrame,
    PoseInFrame,
    Pose,
    Vector3,
    Quaternion,
    FrameTransform
)
Let’s also prepare the folders we will be using during the process
ROOT_FOLDER = os.path.abspath(os.path.join(
    os.path.dirname(__file__), '..'))
LEFT_IMGS_FOLDER = os.path.join(ROOT_FOLDER, "P007", "image_left")
RIGHT_IMGS_FOLDER = os.path.join(ROOT_FOLDER, "P007", "image_right")

PNG_FOLDER = os.path.join(ROOT_FOLDER, "png")
if not os.path.exists(PNG_FOLDER):
    os.makedirs(PNG_FOLDER)

OUTPUT_FOLDER = os.path.join(ROOT_FOLDER, "mcap_output")
if not os.path.exists(OUTPUT_FOLDER):
    os.makedirs(OUTPUT_FOLDER)
Images.
Read each image as a file and store the data in the data element of the CompressedImage message. Then, log the message to the created channel. This function can be called for any folder containing png images.
def generate_image_topic_from_folder(folder, topic_name) -> None:
    """
    Generates a CompressedImage topic from a folder of images.
    Args:
        folder (str): Path to the folder containing images.
        topic_name (str): Name of the topic to create.
    """

    # Define the channel for compressed images
    channel = CompressedImageChannel(topic=topic_name)

    # Get names of images and sort
    images = os.listdir(folder)
    images.sort()

    # Timespace initialization
    ts = 0
    total_imgs = len(images)
    # For each image, read it, generate the message and log it
    for i, image in enumerate(images):
        image_path = os.path.join(folder, image)
        with open(image_path, "rb") as file:
            img = file.read()
            data = img

        # Get timest in seconds and convert to nanoseconds
        ns = int(ts*1e9)
        # Create a CompressedImage message
        compressed_image = CompressedImage(
            timestamp=Timestamp(0).from_epoch_secs(ts),
            frame_id=topic_name,
            format="png",
            data=data
        )
        channel.log(
            compressed_image,
            log_time=ns,
        )
        # Increment the timestamp by 1/30 seconds (assuming 30 FPS)
        ts += 1/30
        # Print progress
        print(f"{i}/{total_imgs} | {round(ts, 2)} | {ns}")
For the depth images, we will require an additional step in order to use the previously defined function. Depth images are stored as npy files, which are a type used by numpy . The following function reads each depth image and saves it as a png in a new folder.
def generate_png_from_npy(name) -> str:
    """
    Generates PNG images from .npy files in the specified folder and saves them in a new folder.
    Args:
        name (str): Name (left or right) of the corresponding depth data folder.
    Returns:
        str: Path to the folder containing the generated PNG images.
    """
    # Create the new folder for PNG images if it doesn't exist
    os.makedirs(os.path.join(PNG_FOLDER, name), exist_ok=True)
    folder = os.path.join(ROOT_FOLDER, "P007", f"depth_{name}")
    # For each image, open with OpenCV and save as `png`
    for img in os.listdir(folder):
        img_path = os.path.join(folder, img)
        data = np.load(img_path, allow_pickle=True)
        cv2.imwrite(os.path.join(
            PNG_FOLDER, name, img.replace(".npy", ".png")), data)
    return os.path.join(PNG_FOLDER, name)
Poses, paths and transforms.
The poses at each moment are stored in txt files that can be read with numpy . For each pose, create the elements one by one. This will help with readability and generating different messages. These messages are Pose, PoseInFrame, PosesInFrame and FrameTransform.
def generate_pose_topic(name) -> None:
    """
    Generates PoseInFrame, PosesInFrame, and FrameTransform topics from pose data in a text file.
    Args:
        name (str): Name of the pose data file (left or right).
    """
    # Load the pose data from the text file
    data = np.loadtxt(os.path.join("P007", f"pose_{name}.txt"))

    # Define the channels for pose, poses, and frame transform
    pose_channel = PoseInFrameChannel(f"/{name}_pose")
    poses_channel = PosesInFrameChannel(f"/{name}_poses")
    transform_channel = FrameTransformChannel(f"/{name}_transform")

    # Initialize a list to store poses
    poses = []

    # Initialize the timestamp
    ts = 0
    # Iterate through the pose data and create messages
    for i, data_pose in enumerate(data):

        ns = int(ts*1e9)
        # Create a variable for each element of the pose.
        # This is useful for readability and generating different types of messages.
        position = Vector3(
            x=data_pose[0],
            y=data_pose[1],
            z=data_pose[2]
        )
        orientation = Quaternion(
            x=data_pose[3],
            y=data_pose[4],
            z=data_pose[5],
            w=data_pose[6]
        )
        pose_no_frame = Pose(
            position=position,
            orientation=orientation)
        pose = PoseInFrame(
            timestamp=Timestamp(0).from_epoch_secs(ts),
            frame_id="odom",
            pose=pose_no_frame)

        # Log the pose
        pose_channel.log(pose, log_time=ns)

        # Append the new pose to the list of poses
        poses.append(pose_no_frame)
        path = PosesInFrame(
            timestamp=Timestamp(0).from_epoch_secs(ts),
            frame_id="odom",
            poses=poses)
        # Log the poses
        poses_channel.log(path, log_time=ns)

        # Create a FrameTransform message
        frame_tf = FrameTransform(
            timestamp=Timestamp(0).from_epoch_secs(ts),
            parent_frame_id="odom",
            child_frame_id=name+"_camera",
            translation=position,
            rotation=orientation)

        # Log the frame transform
        transform_channel.log(frame_tf, log_time=ns)

        print(f"{i}/{len(data)} | {round(ts, 2)} | {ns}")
        # Timestamp increment in accordance to the images (assuming 30 FPS)
        ts += 1/30
Main execution.
Finish the code with the main execution. First, define the filename and path of the output mcap file. Then create the writer using the Foxglove SDK and finally call all the functions with the appropriate values. After this execution, an mcap file will appear in the output folder.
if __name__ == "__main__":

    mcap_filename = "japanese_alley.mcap"
    mcap_path = os.path.join(OUTPUT_FOLDER, mcap_filename)
    writer = foxglove.open_mcap(mcap_path, allow_overwrite=True)

    generate_image_topic_from_folder(LEFT_IMGS_FOLDER, "/image_left")
    generate_image_topic_from_folder(RIGHT_IMGS_FOLDER, "/image_right")
    generate_pose_topic("left")
    generate_pose_topic("right")
    left_png_path = generate_png_from_npy("left")
    right_png_path = generate_png_from_npy("right")
    generate_image_topic_from_folder(left_png_path, "/depth_left")
    generate_image_topic_from_folder(right_png_path, "/depth_right")
    writer.close()

    print(f"MCAP file generated at: {mcap_path}")
Foxglove.
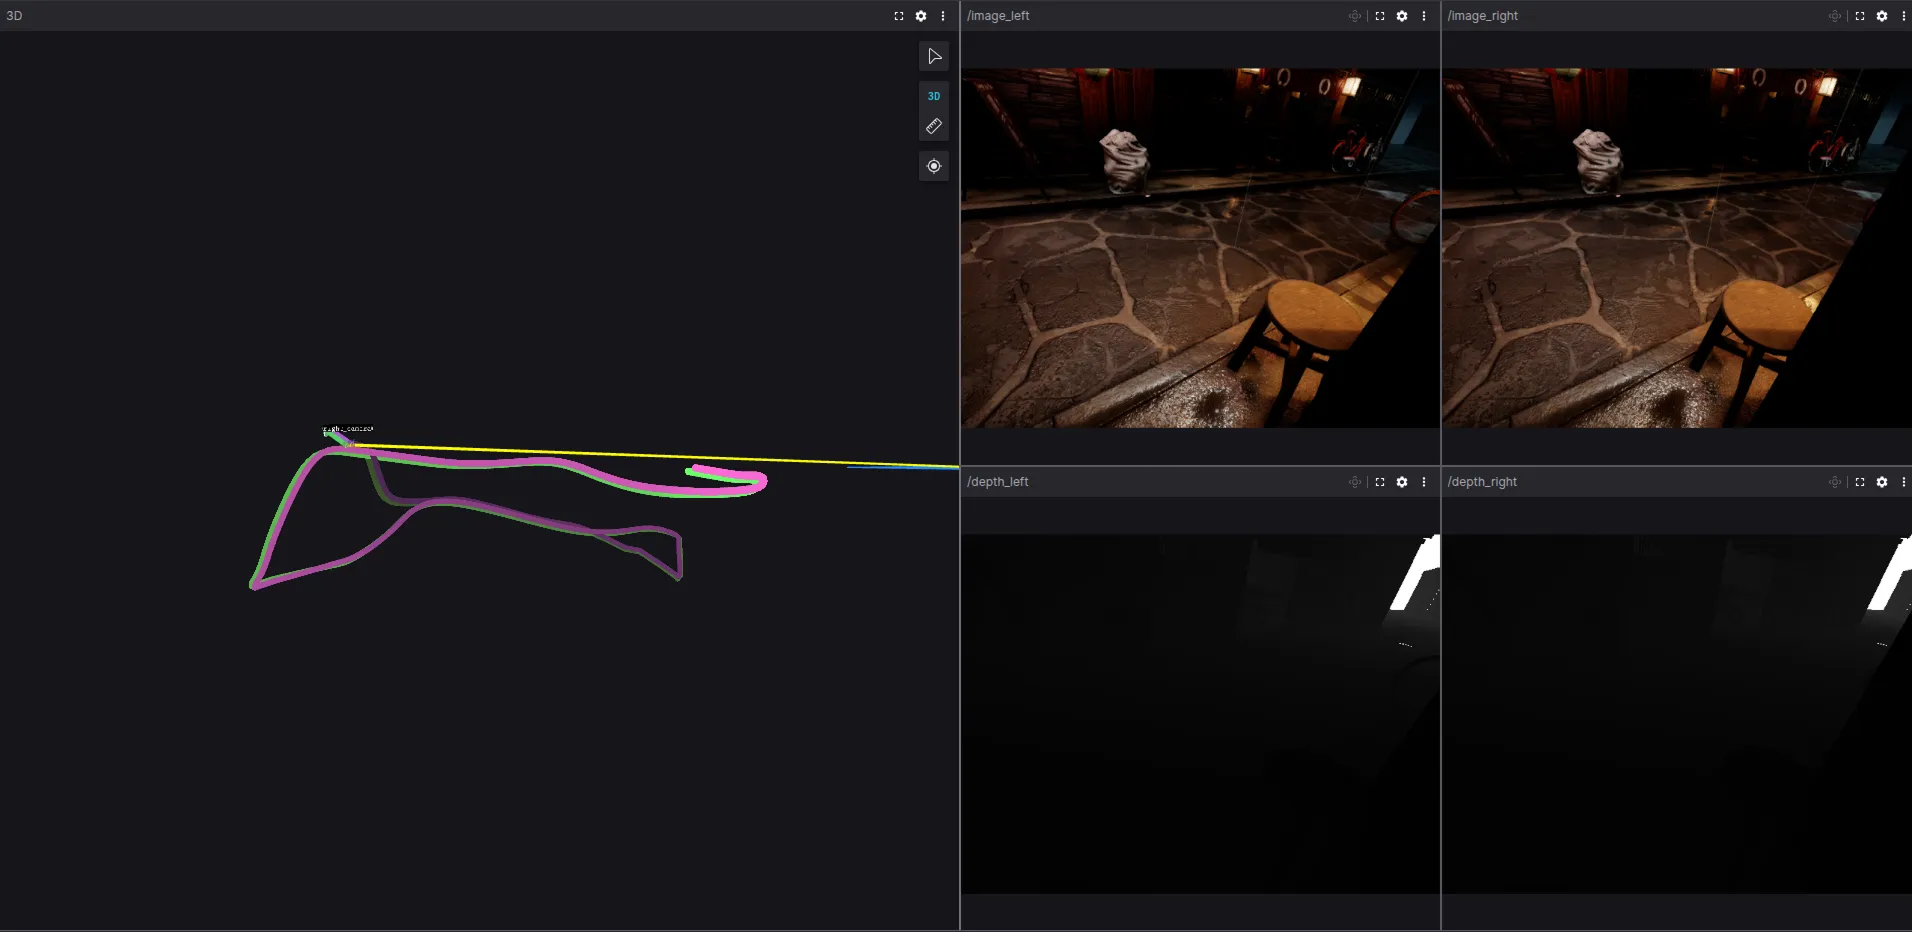
Use Foxglove with the following layout to visualize the mcap file.
Conclusion
Using the new Foxglove SDK increases the capabilities of recording robotic data, without the need for ROS 2. Furthermore, it is compatible with the three most used programming languages used in robotics: C++, Python and Rust.
Join our community and keep in touch to learn more about this new tool that will help you log better data from your robots, learning about their behavior both in real time and after.