Datasets are essential resources for robotics and physical AI development, serving critical roles in training, testing, and validating the algorithms that power perception, decision-making, and control systems. Yet despite their importance, the industry lacks a standardized message serialization format, resulting in a wide variety of dataset formats that hinder interoperability and slow development.
To address this challenge, MCAP provides a universal and efficient solution for storing and sharing multimodal data. Its standardized structure not only simplifies data organization and streamlines workflows but also ensures compatibility across tools. Furthermore, its seamless integration with Foxglove unlocks powerful visualization and analysis capabilities, helping teams better understand and work with their data.
In this post, we’ll show how to convert the Argoverse 2 (AV2) dataset to the MCAP format and visualize it using Foxglove.
Overview of the AV2 dataset.
To convert the AV2 dataset to MCAP we first have to understand the data it contains and the format it’s stored in. The dataset can be downloaded here and each log in it is structured as follows:
annotations.feather
city_SE3_egovehicle.feather
calibration
├── egovehicle_SE3_sensor.feather
└── intrinsics.feather
map
└── ...
sensors
├── cameras
│   ├── ring_front_center
│   │   ├── 315967376899927209.jpg
│   │   └── ...
│   └── ...
└── lidar
├── 315967376859506000.feather
└── ...
For this post we’ll focus on converting just the lidar data to MCAP. Each lidar scan is a .feather file, and each file is a table of x, y, z, and intensity values per point. It’s important to note that the points’ coordinates are given relative to the egovehicle, not the lidar.
For more information on the dataset check out the Argoverse 2 user guide, and if you want to see how to convert the entire dataset to MCAP, we’ve written a script for that which can be found here.
The conversion pipeline.
Picking the serialization format and schema.
MCAP is a generic container, meaning it supports a variety of serialization formats (Protobuf, ROS, JSON), and for each format Foxglove has defined a set of schemas for well-known kinds of messages. We’ll use Protobuf for this example, and since we’re working with lidar scans we’ll convert the data to PointCloud messages.
Converting the data to MCAP.
The first thing we’ll do is install the Foxglove SDK as well as pyarrow and pandas (which we need to read the .feather files).
pip install foxglove-sdk
pip install pyarrow
pip install pandas
and here are the the imports we’ll need:
import foxglove
import struct

from foxglove.schemas import (PackedElementField,
                              PackedElementFieldNumericType,
                              PointCloud, Pose, Vector3, Quaternion, Timestamp)
from glob import glob
from pandas import DataFrame
from pathlib import Path
from pyarrow import feather
next we’ll write the code for converting a lidar scan to a PointCloud message:
def convert_msg(data: DataFrame, timestamp_ns: int) -> PointCloud:
    sec  = timestamp_ns // int(1e9)
    nsec = timestamp_ns % int(1e9)

    rows = len(data)
    pt_stride = 12 # 3 FLOAT32 fields
    buffer = bytearray(rows * pt_stride)
    offset = 0
    for pt in data.loc[:].to_numpy():
        x, y, z, _, _, _ = pt
        struct.pack_into("<fff", buffer, offset, x, y, z)
        offset += pt_stride

    fields = [
        PackedElementField(name="x", offset=0, type=PackedElementFieldNumericType.Float32),
        PackedElementField(name="y", offset=4, type=PackedElementFieldNumericType.Float32),
        PackedElementField(name="z", offset=8, type=PackedElementFieldNumericType.Float32)
    ]

    return PointCloud(
                    timestamp    = Timestamp(sec=sec, nsec=nsec),
                    frame_id     = "base_link",
                    pose         = Pose(position=Vector3(), orientation=Quaternion()),
                    point_stride = pt_stride,
                    fields       = fields,
                    data         = bytes(buffer)
                )
and then the code for iterating over the lidar scans and writing the data to an MCAP file:
# replace with your path and log ID
DATASET_PATH = "/home/alp/data/datasets"
LOG_ID = "00a6ffc1-6ce9-3bc3-a060-6006e9893a1a"

with foxglove.open_mcap(f"{LOG_ID}-lidar.mcap"):
    # get a list of filenames sorted by timestamp
    fpaths = sorted(glob(f"{DATASET_PATH}/{LOG_ID}/sensors/lidar/*.feather"))
    for fpath in fpaths:
        with Path(fpath).open("rb") as fhandle:
            data = feather.read_feather(fhandle, memory_map=True)
            # extract the timestamp from the filename
            timestamp_ns = int(Path(fpath).stem.split(".")[0])

            foxglove.log(
                "/LIDAR_TOP", # choose a meaningful topic name
                convert_msg(data, timestamp_ns)
            )
Merging MCAP files.
We’ve just converted our lidar data to MCAP! At this point, we could write a script to convert the entire dataset to MCAP all at once, but the recommended approach is to process each type of data separately and merge the resulting files using the MCAP CLI, as this lets you debug your conversion code without needing to reprocess the entire dataset.
You can install the CLI either by downloading binaries for your platform from the latest Github release and marking the file executable:
chmod +x mcapor by using Homebrew on macOS or Linux
brew install mcapand then to merge the files run the following command:
mcap merge file1.mcap file2.mcap -o file3.mcapVisualizing the data.
Now that you’ve converted your dataset to MCAP, you can visualize it in Foxglove. In the Foxglove App click on the Open Local File and select the newly created file, then customize the layout as you wish.
[
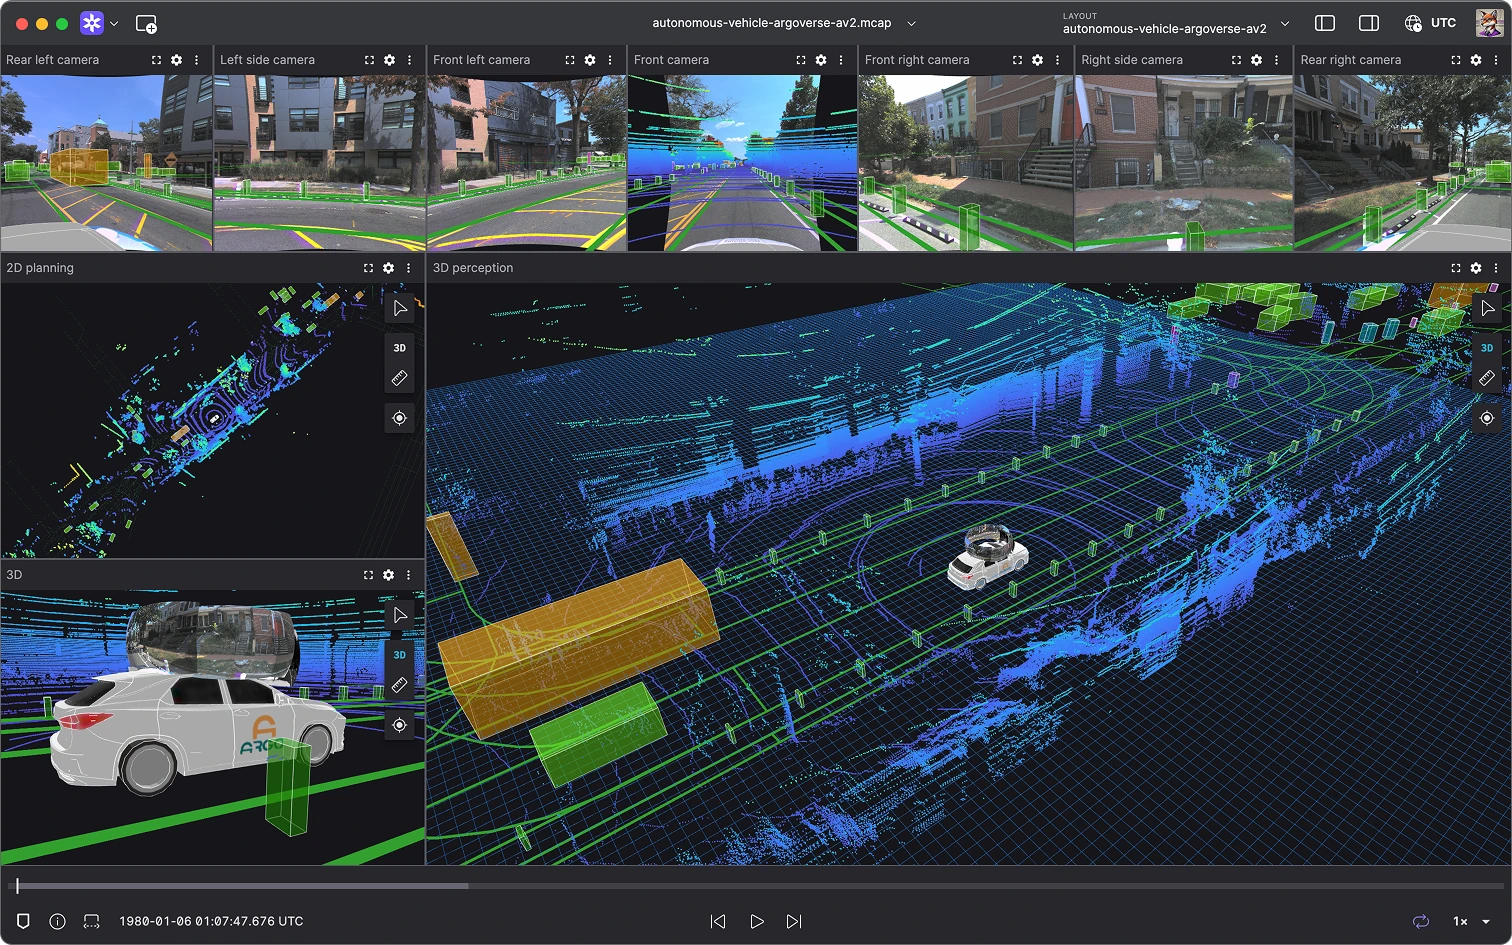
Argoverse 2 visualised using Foxglove.
Get started with Foxglove and MCAP today! If you have any questions or need support, join our community—we’d love to hear from you and help you succeed.