How to Visualize ROS Mesh Markers
Loading mesh resources inside Foxglove's 3D panel
Since v0.21, Foxglove has supported loading mesh resource markers in the 3D panel. This means that you can now visualize custom models in the context of your 3D scene, alongside the other players and perceived objects present in your robot’s world.
So how can you start loading 3D models into your scene?
Write a Python publisher
First, you’ll need to publish a marker topic, following the message definition outlined in ROS 1’s visualization_msgs/Marker or ROS 2’s visualization_msgs/msg/Marker. In both schemas, you’ll notice a mesh_resource field, where you can specify the file containing your 3D model. Foxglove currently supports reading an HTTP, HTTPS, or ROS package URL from this field to load glTF (.glb), COLLADA (.dae), and STL (.stl) files.
On a computer with a working ROS setup, create a Python file (e.g. mesh_marker.py) containing a simple publisher that outputs marker messages with a currently empty mesh_resource field:
#! /usr/bin/env python
import rospy
from visualization_msgs.msg import Marker
rospy.init_node('mesh_marker')
marker_pub = rospy.Publisher("/avocado", Marker, queue_size = 2)
marker = Marker()
marker.header.frame_id = "base_link"
marker.header.stamp = rospy.Time.now()
marker.ns = ""
# Shape (mesh resource type - 10)
marker.type = 10
marker.id = 0
marker.action = 0
# Note: Must set mesh_resource to a valid URL for a model to appear
marker.mesh_resource = ""
marker.mesh_use_embedded_materials = true
# Scale
marker.scale.x = 10.0
marker.scale.y = 10.0
marker.scale.z = 10.0
# Color
marker.color.r = 0.0
marker.color.g = 0.0
marker.color.b = 0.0
marker.color.a = 1.0
# Pose
marker.pose.position.x = 3
marker.pose.position.y = 0
marker.pose.position.z = 0
marker.pose.orientation.x = 0.0
marker.pose.orientation.y = 0.0
marker.pose.orientation.z = 0.0
marker.pose.orientation.w = 1.0
while not rospy.is_shutdown():
 marker_pub.publish(marker)
 rospy.rostime.wallsleep(1.0)
Now that we’ve written our publisher, let’s try loading a few different types of mesh resources in Foxglove’s 3D panel!
Load a glTF (.glb) file with an HTTPS URL
Let’s load a glTF file in our published marker’s mesh_resource field. In your mesh_marker.py file, replace the empty field value with the following URL:
marker.mesh_resource = "https://assets.foxglove.dev/website/blog/how-to-visualize-ros-mesh-markers/Avocado.glb"Run the following command in your terminal to start publishing marker messages on the /avocado topic:
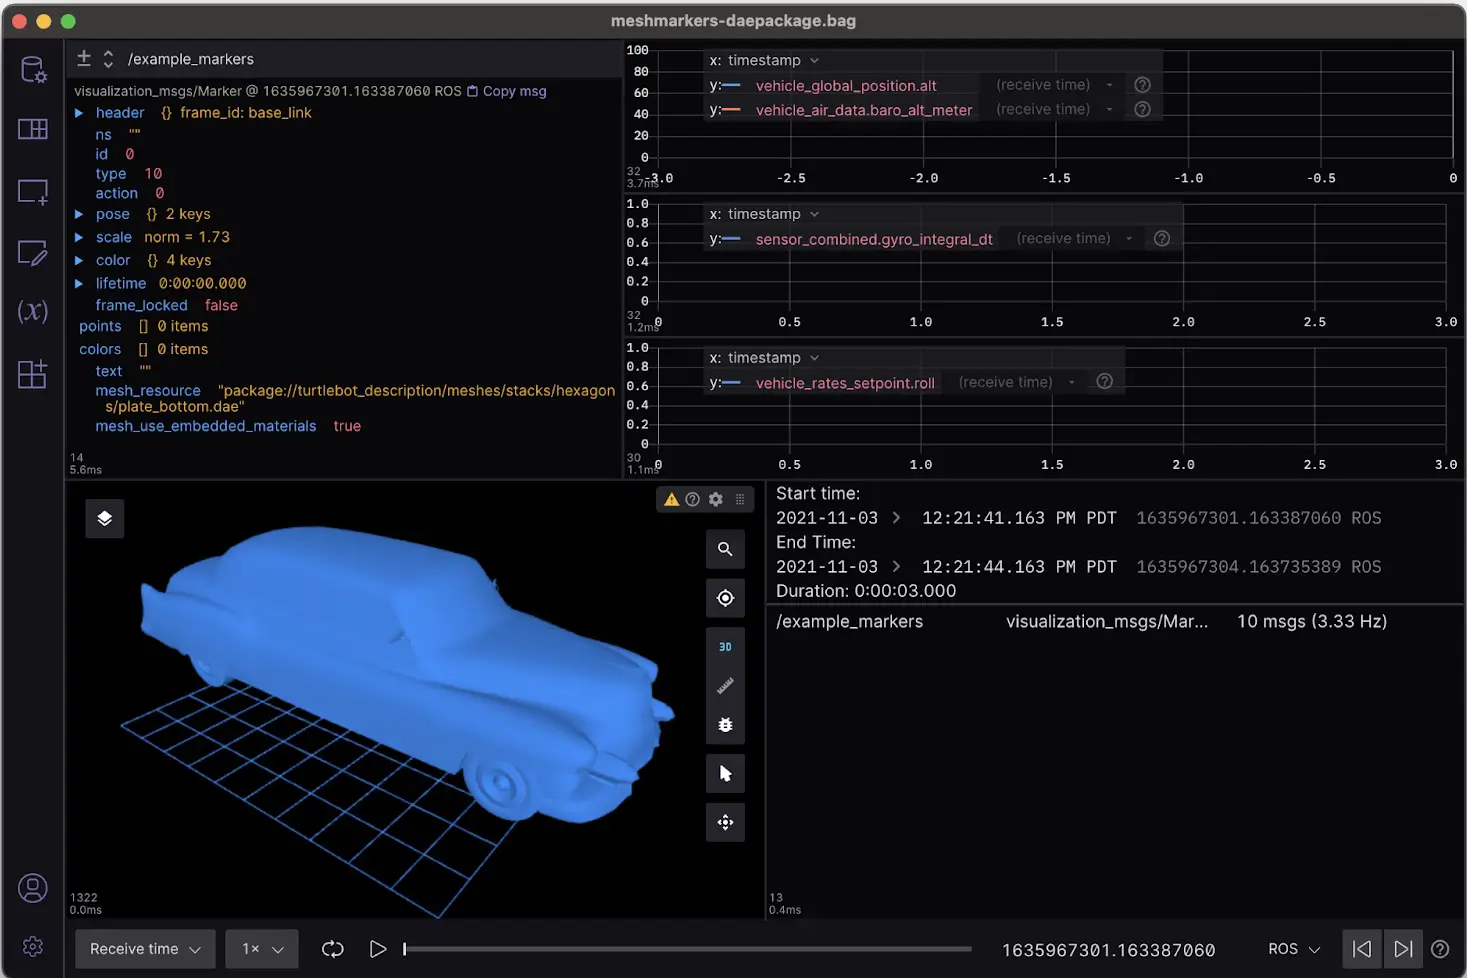
python3 mesh_marker.pyTo verify that your newly published messages include a link to the .glb file, inspect the /avocado topic in a Raw Messages panel in Foxglove. If everything is working as expected, you’ll see that the mesh_resource field points to an HTTPS URL for a glTF asset.
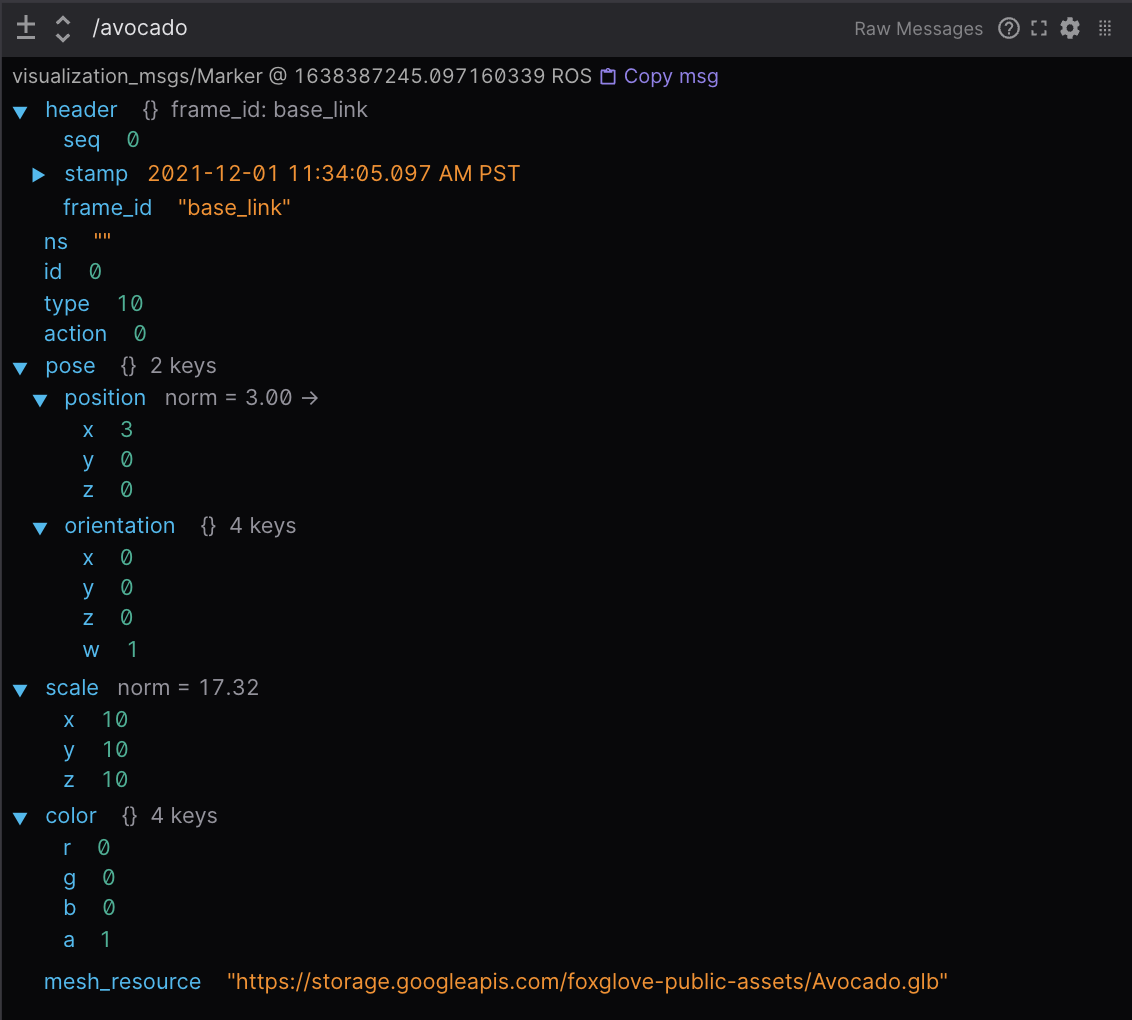
Next, add a 3D panel to your layout to see the mesh marker in 3D space. Open the topic picker to toggle on your mesh marker topic (/avocado). You’ll see a 3D avocado appear floating in the scene.

To see this working immediately, you can also drag and drop this meshmarkers.bag into Foxglove to see the same results.
Load a COLLADA (.dae) file with an HTTPS URL
Now, let’s try loading a different mesh resource. Replace the mesh_resource field value to point to an HTTPS URL for a COLLADA (.dae) asset:
marker.mesh_resource = "https://raw.githubusercontent.com/gundam-global-challenge/gundam_robot/master/gundam_rx78_description/meshes/rx78_object_005-lib.dae"In your 3D panel, you should now see a Gundam robot part where your avocado used to be:
Load an STL (.stl) file with a ROS package URL
Finally, let’s try a link to a file included in a ROS package.
First, install the turtlebot3_description ROS package on your machine. If you are using ROS Noetic, run the following command in your terminal:
$ sudo apt install ros-noetic-turtlebot3-descriptionSource your ROS setup file, then grab the correct package path:
$ source /opt/ros/noetic/setup.zsh
$ echo $ROS_PACKAGE_PATH
/opt/ros/noetic/share
Next, open the Preferences sidebar in Foxglove to set your ROS_PACKAGE_PATH environment variable to your package path (e.g. /opt/ros/noetic/share). This makes it so that all ROS package:// URLs referenced in the app will now use your ROS_PACKAGE_PATH to find the relevant package assets (e.g. /opt/ros/noetic/share/turtlebot3_description). Note that this will work only on the desktop app, as we are referencing files in our local file system.
Finally, replace the same line of code in your mesh_marker.py file with the following:
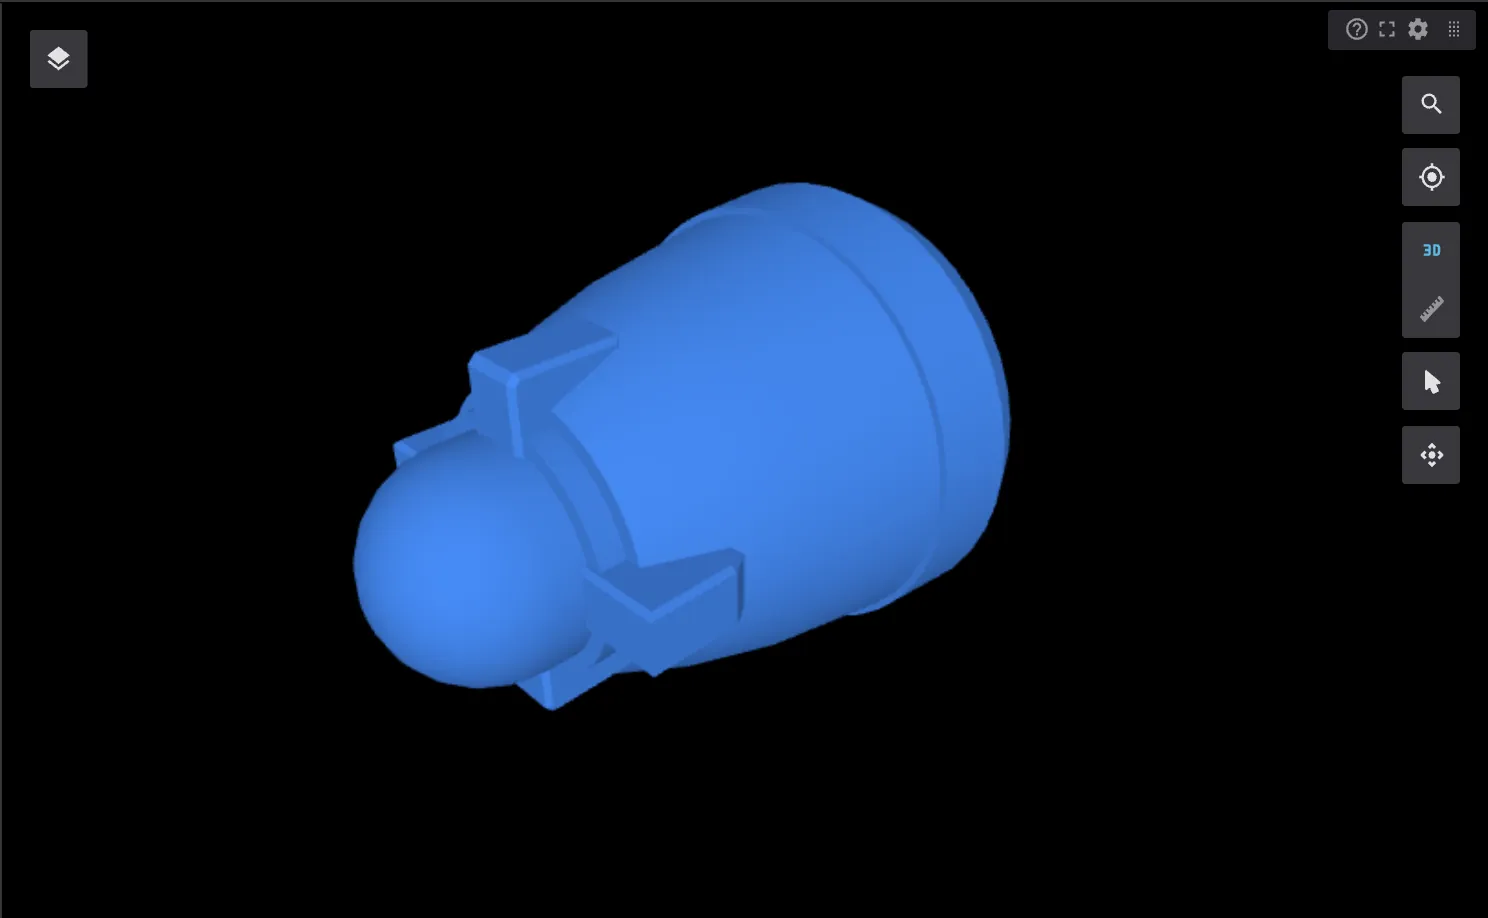
marker.mesh_resource = "package://turtlebot3_description/meshes/bases/burger_base.stl"If your ROS_PACKAGE_PATH was set to /opt/ros/noetic/share, the mesh_resource above will look in /opt/ros/noetic/share/turtlebot3_description/meshes/bases/burger_base.stl for the file in question.
The STL file in question contains the following model:
You should now see it displayed in your 3D panel.
Show us what you’ve got!
We hope this new feature helps you build ever-richer representations of the world your robots navigate, to better analyze their behavior and improve their performance. If you would like more file formats (beyond .glb, .dae, .stl) to be supported in the future, please let us know! You can message us directly in our Discord community.
This was a long-anticipated feature, so we’re excited to see what your Foxglove dashboards look like now! Share images of your models in our Discord community or on Twitter (don’t forget to tag us @foxglove). We’re so excited to see the workflows that this feature unlocks for your team.