Recording JSON Data to MCAP Files
Create an MCAP writer in Python to record robotics data


When we announced MCAP, a standardized container format for storing heterogeneous robotics data, we wanted to empower teams to spend less time building commodity tools and more time tackling their hardest robotics challenges. Not only does MCAP address the shortcomings of existing storage options, it also makes third-party tools (like Foxglove extremely easy to leverage, regardless of your data format.
To help you make the transition, we released an MCAP reader and writer with Python, C++, Go, TypeScript, and Swift support earlier this year. In this tutorial, we’ll cover how to write an MCAP writer in Python to record JSON data to an MCAP file. We’ll then load up our MCAP file in Foxglove to inspect the contents of our data.
Finding and decoding CSV data
For the purposes of this tutorial, let’s work with some publicly available robotics data. We’ll be using the “Sydney Urban Objects Dataset”, released by the Australian Centre for Field Robotics at the University of Sydney.
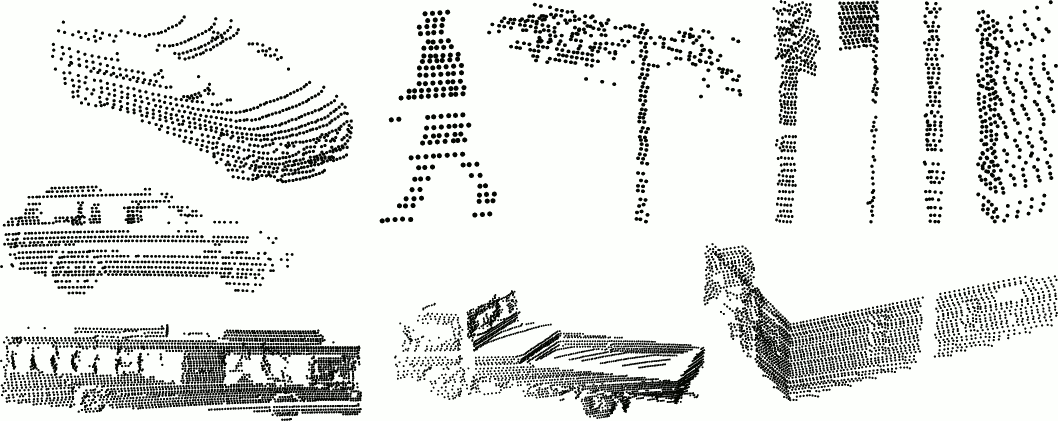
This CSV dataset contains a variety of common urban road objects scanned with a Velodyne HDL-64E LIDAR. The 600+ scans – from vehicles and pedestrians to signs and trees – were originally collected in order to test matching and classification algorithms.
Each scanned object contains the following fields:
t- Timestampintensity- Laser return intensityid- Laser IDx,y,z- 3D point coordinatesazimuth- Horizontal azimuth anglerange- Range of laser returnpid- Point ID of the original scan
Decoding this data is pretty simple, thanks to Python’s built-in csv and datetime libraries:
def point_reader(csv_path: typing.Union[str, Path]):
 with open(csv_path, "r") as f:
   for timestring, i, _, x, y, z, _, _, _ in csv.reader(f):
     timestamp = datetime.datetime.strptime(timestring, "%Y%m%dT%H%M%S.%f")
     yield (timestamp, float(i), float(x), float(y), float(z))
This prints out the timestamp, intensity, and coordinates for each point in the CSV file you choose to read in:
with open(PATH_TO_CSV_FILE) as f:
 for timestamp, i, x, y, z in point_reader(f):
   print(f"{timestamp}: {i}, {x}, {y}, {z}”)
Encoding the data into a foxglove.PointCloud
To later view a given CSV file’s point cloud in Foxglove , we must encode the point data in a way that Foxglove will understand. Fortunately, Foxglove provides a collection of message schemas that it knows how to display. For this tutorial, we’ll focus on building a JSON point cloud, using the foxglove.PointCloud schema. While JSON might not be the most efficient format for storing point cloud data, it’s easy to get started with! We will cover other serialization formats supported by MCAP (like Protobuf) in future tutorials.
field
type
description
timestamp
time
Timestamp of point cloud
frame_id
string
Frame of reference
pose
Pose
The origin of the point cloud relative to the frame of reference
point_stride
uint32
Number of bytes between points in the data
fields
PackedElementField[]
Fields in the data
data
bytes
Point data, interpreted using fields
Let’s start with encoding the point data. The foxglove.PointCloud schema expects a data field that contains a single base64-encoded buffer with all point data, as well as a fields field that contains metadata describing how to decode the data.
Since foxglove.PointCloud requires a single timestamp, let’s get it from the first point we see in our file. Then, we’ll pack each field as a four byte single-precision little-endian float.
Let’s start by describing the layout of our data in a foxglove.PointCloud message:
float32 = 7  # as defined in the schema
pointcloud = {
 "point_stride": (4 + 4 + 4 + 4),  # four bytes per float
 "fields": [
   {"name": "x", "offset": 0, "type": float32},
   {"name": "y", "offset": 4, "type": float32},
   {"name": "z", "offset": 8, "type": float32},
   {"name": "i", "offset": 12, "type": float32},
 ],
}
Next, let’s pack the points using Python’s built-in struct and base64 libraries.
points = bytearray()
base_timestamp = None
for point_timestamp, intensity, x, y, z in point_reader(args.csv):
 if base_timestamp is None:
   base_timestamp = point_timestamp
 points.extend(struct.pack("<ffff", x, y, z, intensity))
assert base_timestamp is not None, "found no points in input csv"
pointcloud["data"] = base64.b64encode(points).decode("utf-8")
In Foxglove, each 3D object exists in its own coordinate frame. A point cloud’s frame_id identifies the coordinate frame it belongs in, and its pose determines its relative position from that coordinate frame’s center.
Since we will only have one coordinate frame in our MCAP file, you can choose any arbitrary string as our frame_id, and use the identity pose to place our point cloud in its center.
pointcloud["pose"] = {
 "position": {"x": 0, "y": 0, "z": 0},
 "orientation": {"x": 0, "y": 0, "z": 0, "w": 1},
}
pointcloud["frame_id"] = "lidar"
We’ll leave the timestamp field for later, when we write the messages into the MCAP file.
Writing the MCAP file in Python
Now that the point cloud is built, we can write it into an MCAP file.
An MCAP file has messages, which are organized into channels, each of which adhere to a particular schema. A message’s channel informs the reader of the topic it was originally published on, while a channel’s schema describes how to interpret the message’s content.
Writing the header
We’ll start with some imports from the Python MCAP library:
from mcap.writer import Writer
from mcap.well_known import SchemaEncoding, MessageEncoding
Next, let’s open a file where we’ll output our MCAP data and write our header:
with open(args.output, "wb") as f:
 writer = Writer(f)
 writer.start("x-jsonschema", library="my-excellent-library") # can use any name, as we are not using an MCAP profile: https://www.google.com/url?q=https://github.com/foxglove/mcap/blob/main/docs/specification/appendix.md%23well-known-profiles&sa=D&source=docs&ust=1658261499762935&usg=AOvVaw2GgwRzJbSlqWOErSFru7L_
Creating a channel
Let’s create a channel of messages to contain our point cloud. The schema’s name and content tell Foxglove that it can parse and display this message as a point cloud.
with open(Path(__file__).parent / "PointCloud.json", "rb") as f:
 schema = f.read()
schema_id = writer.register_schema(
 name="foxglove.PointCloud",
 encoding=SchemaEncoding.JSONSchema,
 data=schema,
)
channel_id = writer.register_channel(
 topic="pointcloud",
 message_encoding=MessageEncoding.JSON,
 schema_id=schema_id,
)
Writing a message
Let’s write a single foxglove.PointCloud message on the channel we just created:
pointcloud["timestamp"] = {
   "sec": int(base_timestamp.timestamp()),
   "nsec": base_timestamp.microsecond * 1000,
}
writer.add_message(
   channel_id,
   log_time=int(base_timestamp.timestamp() * 1e9),
   data=json.dumps(pointcloud).encode("utf-8"),
   publish_time=int(base_timestamp.timestamp() * 1e9),
)
Close the MCAP writer to include the summary and footer in your output MCAP file:
writer.finish()That’s it! We now have a valid MCAP file with a single point cloud message.
Inspecting your MCAP file
To inspect your MCAP file, install the MCAP CLI tool:
$ brew install mcapRun the following commands to summarize your file’s contents and to verify that it has no issues:
$ mcap info output.mcap
 library: my-excellent-library
 profile: x-jsonschema
 messages: 1
 duration: 0s
 start: 2011-11-04T01:36:05.987339008+11:00 (1320330965.987339008)
 end: 2011-11-04T01:36:05.987339008+11:00 (1320330965.987339008)
 compression:
   zstd: [1/1 chunks] (48.09%)
 channels:
   (1) pointcloud  1 msgs (+Inf Hz)   : foxglove.PointCloud [jsonschema]
 attachments: 0
$ mcap doctor output.mcap
 Examining output.mcap
For a more visual representation of this data, let’s use Foxglove. Open either the desktop or web app, and add a Raw Messages and a 3D panel to your layout.
Then, simply drag and drop your output MCAP file into the app window to start playing the data. Make sure to enable the pointcloud topic in the 3D panel to display the point cloud in 3D space. You can also inspect the raw data for the pointcloud topic in your Raw Messages panel:
Stay tuned
This tutorial covered writing JSON data to an MCAP file using Python, but this is just the beginning. You can also read MCAP files, use other data formats (like ROS 1, ROS 2, and Protobuf), and write your reading / writing code in other languages (like C++). Our blog post Recording Robocar Data with MCAP, for example, covers how you can write Protobuf data using an MCAP C++ writer.
Check out the Python docs for more info on reading and writing MCAP files in Python, as well as the official MCAP website for a list of all the other languages we support. And as always, feel free to reach out to us in our Discord community to ask questions, give us feedback, and request a topic for the next tutorial!