Autonomous robot navigation and Nav2: The first steps.
Your first steps with Nav2.

Introduction
In our last post about robot navigation, we introduced the ROS2 navigation stack Nav2, the most widely used framework in ROS 2 for this purpose. In this tutorial, we’ll dive deeper into configuring and using Nav2. We’ll explore the basic configuration elements and how they connect to the concepts covered in the previous post.
Installing needed packages
We will be using the complete Nav2 stack along with the Turtlebot3 simulation packages. Please install the following packages:
sudo apt install ros-$ROS_DISTRO-navigation2 ros-$ROS_DISTRO-nav2-bringup ros-$ROS_DISTRO-turtlebot3-gazebo
Additionally, set the following environment variables in your terminal to configure the Turtlebot3 simulation. To make them persistent across terminal sessions, you can save them in your .bashrc.
export TURTLEBOT3_MODEL=burger
How to use
There will be many nodes, parameters, and processes running simultaneously, so it’s important to first understand the basics of what we’re working with.
Nodes
Nav2 nodes are launched from the launch file called navigation_launch.py, contained in the nav2_bringup package. This file launches nodes which load their configuration parameters from nav2_params.yaml. The nodes are of type LifecycleNodes and can be loaded into a composition or as individual nodes. A lifecycle manager node makes sure all nodes are brought up in the correct order, so that nodes that have dependency on others are activated once the prior node is correctly activated .For more information about lifecycle nodes, check out our tutorial here.
In the launch file, locate the lines that define and manage the lifecycle nodes. For now, we’ll focus on just a few of them.
lifecycle_nodes = ['controller_server',
		   'smoother_server',
		   'planner_server',
		   'behavior_server',
	   	   'bt_navigator',
		   'waypoint_follower',
		   'velocity_smoother']
The planner_server is responsible for calculating the plan. As mentioned in our previous post, the planner determines the route between two points within the drivable area. The controller_server controls the robot’s movement, ensuring it follows the previously calculated plan. Both servers use a costmap: the planner relies on the global_costmap, while the controller uses the local_costmap.
The behavior_server contains the available behaviors for the robot, typically small actions that help the robot recover from situations like getting stuck. Examples of these behaviors include spinning, waiting, and backing up. Each behavior is loaded as a plugin inside the server, which instantiates an action server that can be called when needed.
The bt_navigator is a navigator based on BehaviorTreeCpp, running a behavior tree that implements various general behaviors for the robot. It’s important to note that the behavior_server and the bt_navigator are different components, even though their names may seem similar.
As a general rule, the behavior_server contains action servers, which must be called by a client. Typically, the navigator contains the client that calls the action server. In this case, the bt_navigator implements a behavior tree in which each Action Node contains an action client.
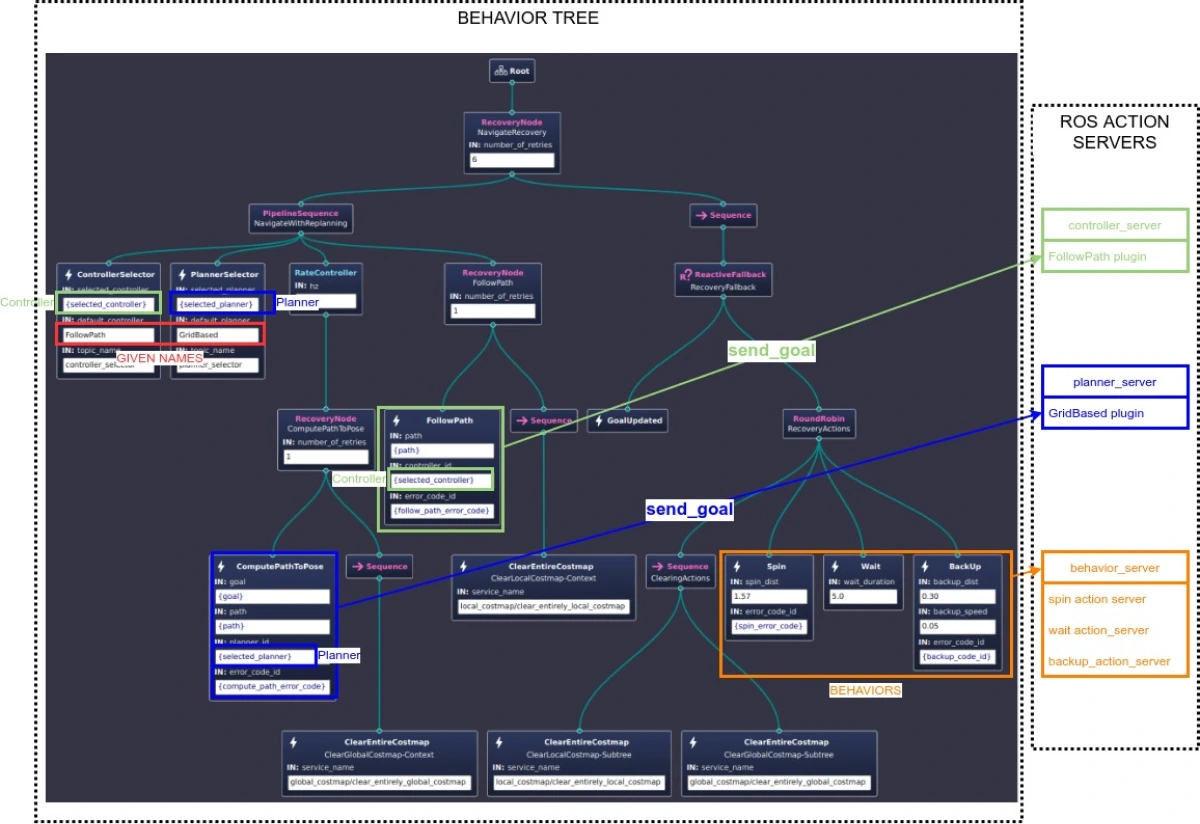
Nav2 behavior tree.
The behavior tree leaf nodes are simply one way to call the ROS action servers. However, you can also use other methods, such as the CLI or sending a goal through a PoseStamped topic, which activates the action server.
The remaining nodes are not essential but add additional functionality to the navigation stack. The smoother_server smooths the plan generated by the planner, helping to avoid sharp turns and irregular paths. The waypoint_follower enables multi-point navigation, allowing the robot to perform actions at each waypoint. Lastly, the velocity_smoother regulates the output commands to the robot, preventing sudden accelerations or braking.
Parameters
The default configuration file, nav2_params.yaml, includes some—but not all—of the parameters for the nodes launched in the navigation_launch.py file. We’ll focus on the parameters that configure the nodes we’ve discussed so far.
Let’s start with the planner and controller server plugins. These plugins define the algorithmic implementation of planning and controlling. For example, a basic planner is NavFn, which originates from ROS 1 but still works well in most cases. It’s important to distinguish between the name of the plugin and its implementation name in the parameters file. The plugin name is always the same and typically has two parts separated by :: (e.g., nav2_mppi_controller::MPPIController). The implementation name, however, can be customized (e.g., FollowPath) and must match the name of the action node in the behavior tree.
Additionally, the controller server has two other plugins: progress checkers and goal checkers. Each of these plugins has several parameters, and the best way to understand them is by reading the documentation and experimenting with different values in a simulation. For example, adjusting the xy_goal_tolerance parameter in the goal checker changes the distance at which the robot considers it has reached its goal.
controller_plugins: ["FollowPath"] # Given Implementation Name
...
FollowPath:
      plugin: "nav2_mppi_controller::MPPIController" # Plugin Name
We’ve discussed how both the planner and controller servers have their own costmaps, which share the same parameters but differ in their values. Let’s take a look at the global_costmap parameters. First, it includes a list of plugins used to build the map. In a typical global_costmap, you’ll find a static_layer, an obstacle_layer, and an inflation_layer.
- The
obstacle_layermust be configured to receive input from a sensor topic, such as LaserScan. - The
static_layeruses the/maptopic by default to retrieve the map. - The
inflation_layerinflates the obstacles to create a safety margin.
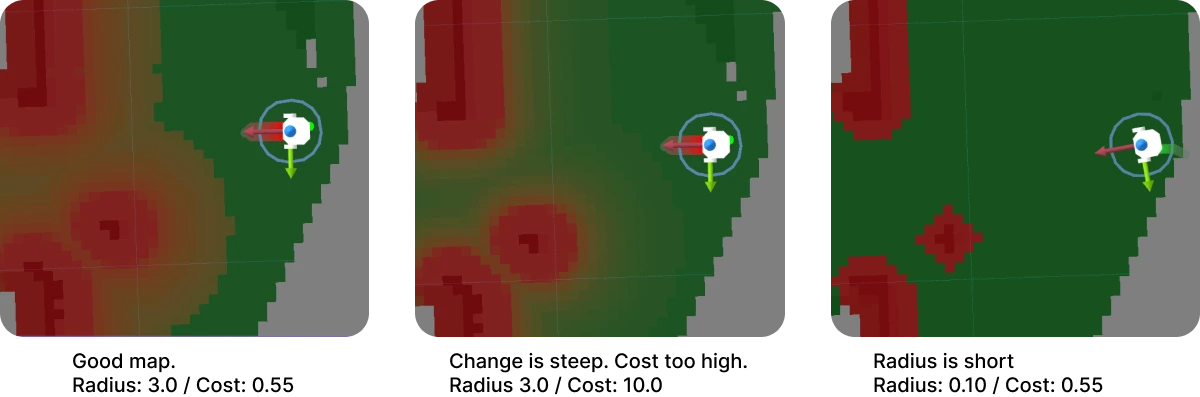
Some key parameters include the robot_footprint, cost_scaling_factor, and inflation_radius. You can find more detailed information on how these parameters relate to each other in the costmap_2d wiki. As a general rule:
- Set the
robot_footprintto match the real dimensions of your robot as closely as possible. - The
inflation_radiusdetermines how far the robot stays from obstacles. - The
cost_scaling_factordefines how the robot behaves near obstacles—whether it avoids entering the radius entirely or simply navigates more slowly.
It is recommended to create gradual costmaps rather than having high cost frontiers for smoother and more effective navigation. If the costmap is defined with high cost frontiers, the robot will easily get stuck as the costmap will tell the cost is too high near the obstacles. However, having a gradual costmap allows for the robot to move slowly near the obstacles and will perform in a much smoother and continuous manner.
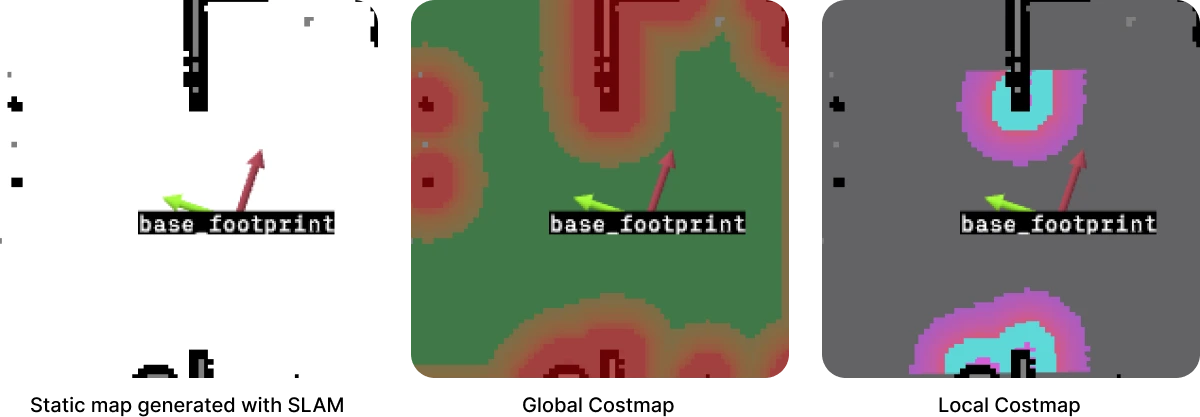
The two key differences between the local and global costmaps are their size and movement. The global costmap is much larger (around ~100m) and dynamic, changing with the map, while the local costmap is smaller (around ~5m) but refreshes more quickly. The global costmap is static, whereas the local costmap is a rolling window that moves with the robot.
The behavior_server parameters define which costmaps and footprints to use, along with the list of plugins, with each plugin implementing a specific behavior.
Lastly, the most important parameters for the bt_navigator are the navigators used (which are also plugins) and the behavior trees associated with each navigator. The default parameter names are default_nav_through_poses_bt_xml and default_nav_to_pose_bt_xml for the default navigators. By selecting different behavior trees—encoded in XML files—you can modify the robot’s behavior. To edit and visualize behavior trees, use the tool Groot2.
Simulation
Simulation is essential in robotics. It enables easy, cost-effective, and repeatable testing, reduces the reliance on expensive hardware, and allows teams to collaborate on the same platform, even when working remotely.
For this tutorial, we’ll use the Turtlebot3 simulation, as it’s well-known and highly reliable. Note that it may take a few minutes to load the first time.
Running everything
Start a new simulation if one is not currently running with the following command, which will load the Gazebo simulator.
ros2 launch turtlebot3_gazebo turtlebot3_house.launch.py
To enable a static map, we’ll use slam_toolbox, which will perform SLAM using the Turtlebot3’s LaserScan data.
ros2 launch slam_toolbox online_async_launch.py use_sim_time:=true
Run the navigation_launch.py file to launch all the navigation nodes.
ros2 launch nav2_bringup navigation_launch.py params_file:=/path/to/your/params/file/nav2_params.yaml use_sim_time:=true
Start foxglove_bridge and open a new instance of Foxglove in the browser.
ros2 launch foxglove_bridge foxglove_bridge_launch.xml use_sim_time:=true
Visualizing and commanding with Foxglove
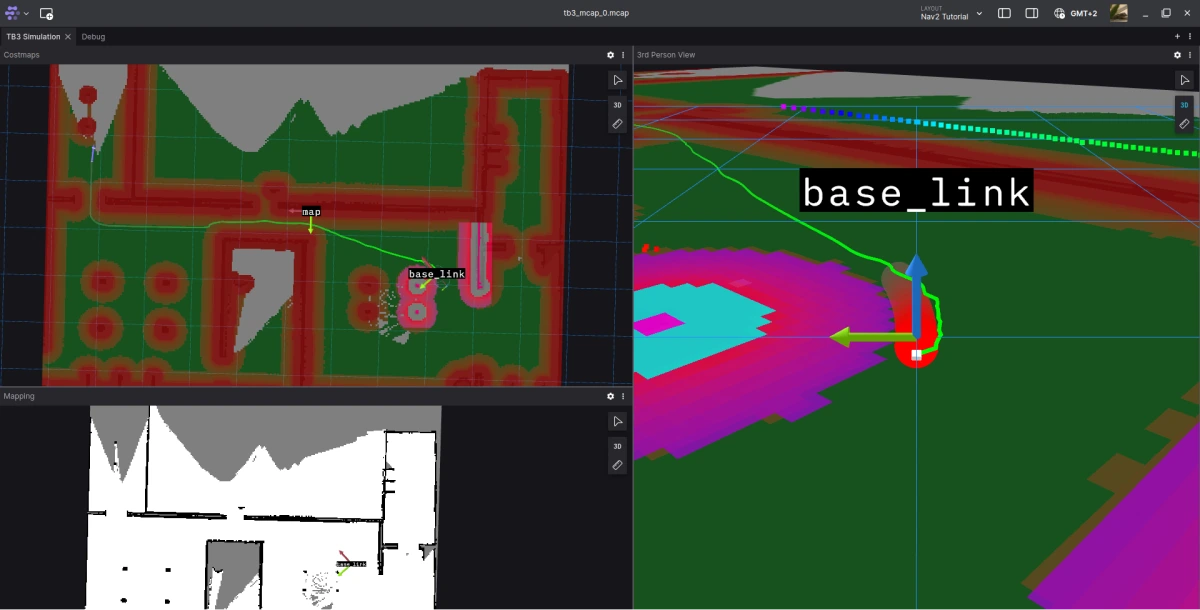
The following layout is designed to best showcase the different concepts we’ve covered in this post: Nav2_Tutorial.json
Starting with maps, we can see three different ones. The first map was created using SLAM with slam_toolbox. The second is the global costmap, configured in Foxglove to show “free” areas in green and occupied areas in red, making it easier to understand where the planner can trace routes. Lastly, the third map displays the local costmap, using a colormap commonly used in robotics.
Send a new pose using the Publish feature called goal_pose.

At this point, the action servers begin to work. The planner creates a plan, which the controller receives, and then starts commanding the robot to move.
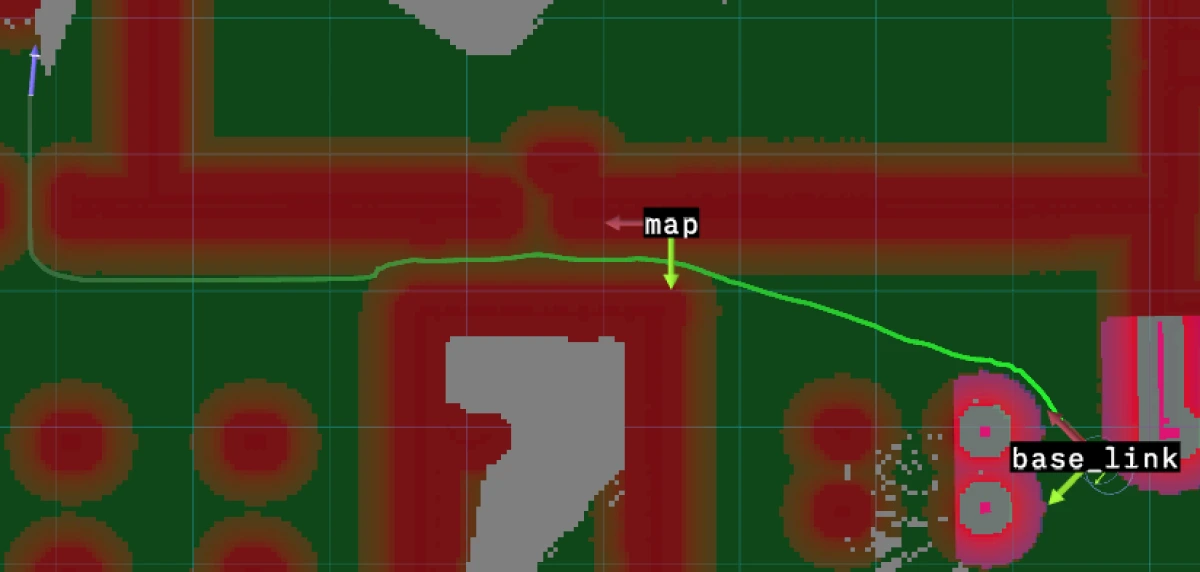
GREEN PATH: Plan created by the planner
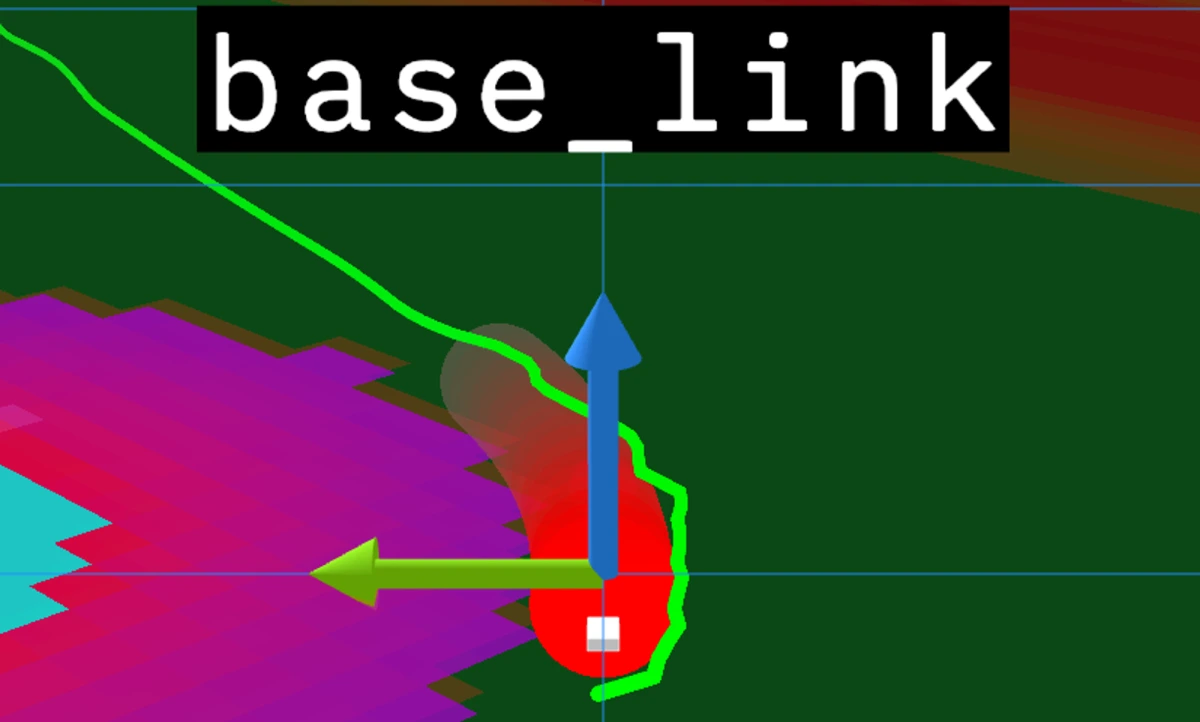
RED LINE: Controller command on the robot
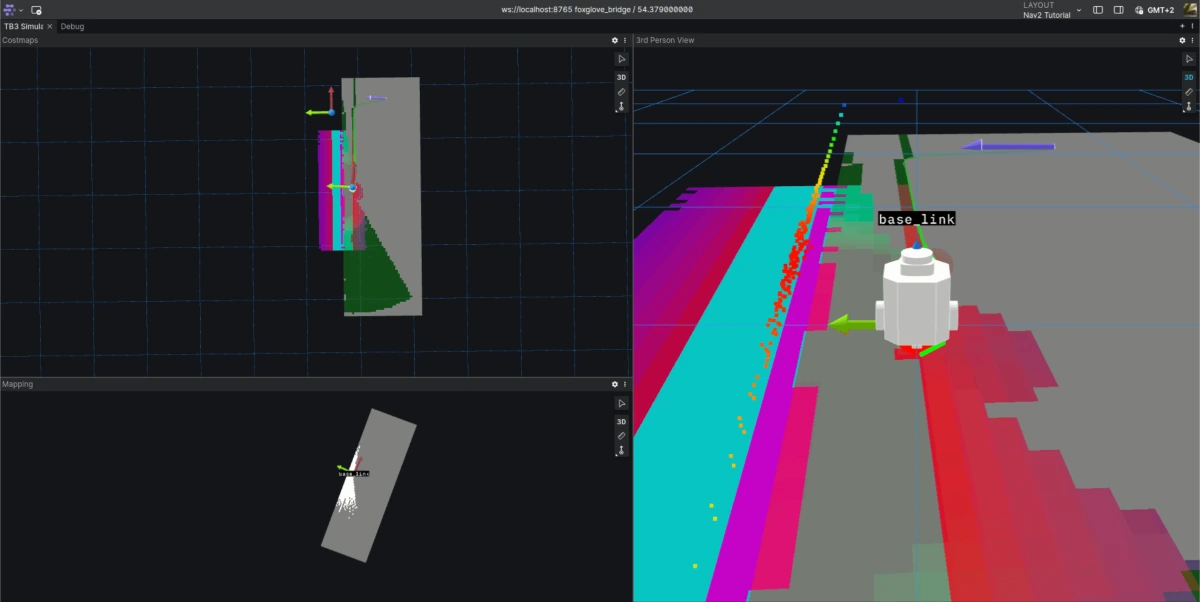
The Foxglove UI with 3D and image panels.
Congratulations! You now know how to command a robot to move using Nav2. The next steps involve diving deeper into the configuration parameters and exploring the various available plugins. You can apply the steps you’ve learned today to adjust parameters, experiment with different plugins, and test everything in simulation.
Additional tidbits
To get a deeper look at all the parameters for each node, you can dump their configuration into a file. For example, you can do this for the controller_server node.
ros2 param dump /controller_server controller_server_params.yaml
Conclusion
Navigation2 is a powerful and comprehensive framework that enables ground robots to navigate their environment. It’s constantly evolving thanks to the efforts of Open Navigation and numerous open-source contributors.
Keep learning ROS with our tutorials, and stay tuned for future posts on topics like node composition, SLAM, and more! As always, feel free to reach out to us on our Discord channel.