
In previous posts, we’ve seen how ROS 2 nodes communicate using topics, services and actions. We’ve also talked about how we can configure nodes using parameters. In these tutorials, we have been running nodes one by one.
Rather than launching one node at a time, we can leverage launch files to execute and configure multiple nodes with a single command. You can even pull in nodes from other packages to run different processes.
In this tutorial, we will cover how to use a launch file to run multiple nodes, configure them, and group them into meaningful namespaces.
Why ROS 2 launch files?
Running many ROS 2 nodes takes a lot of time and many terminal windows. Even small projects or robots can have many nodes running simultaneously.
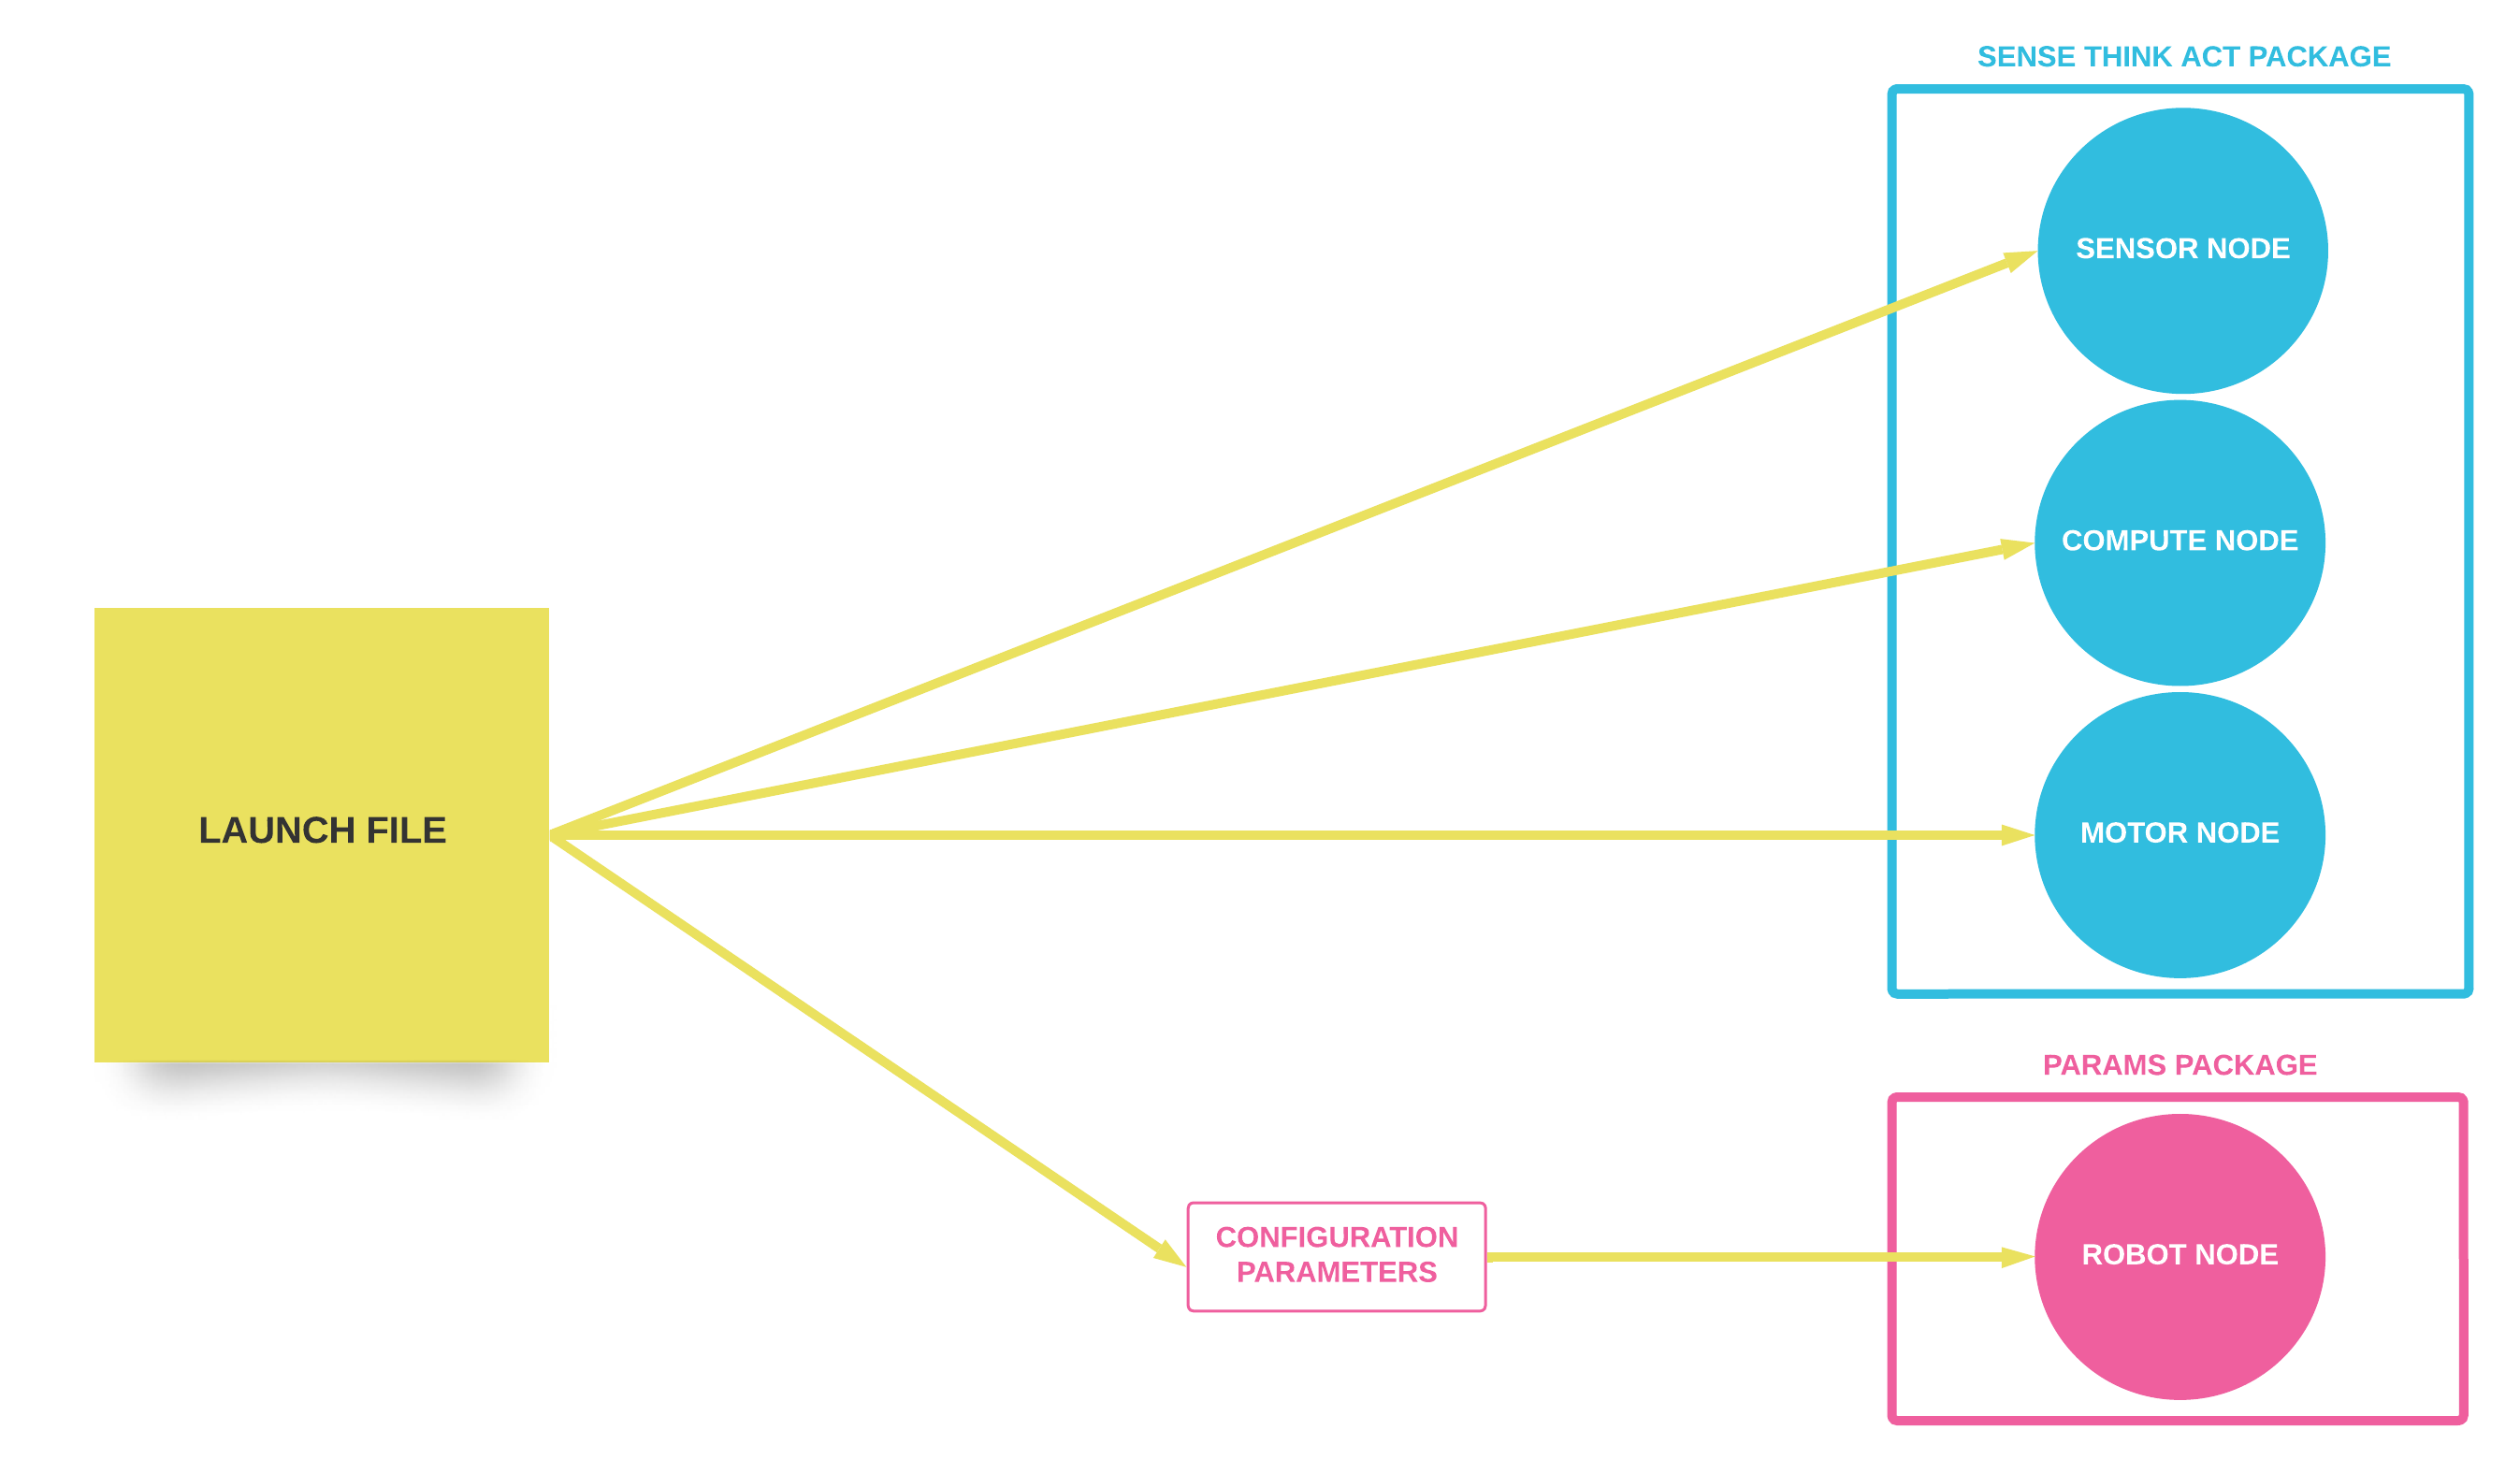
Imagine a robot following the “sense-think-act” model that runs one node for each step. A sensor_node is in charge of reading distance data from a sensor, a compute_node receives this data and sends a command to the wheels, and finally a motor_node receives the command and outputs the needed voltage to the motors.
Instead of running each of these nodes in a separate terminal window each time we startup the robot, we can use a launch file to execute them all at once – with a single command, in a single terminal window.
Creating a launch file
Start by creating a new package named launch_pkg in your ROS 2 workspace. In the src folder, create the following files for each of your nodes:
In the root directory of your package, create a launch folder with a launch_example.launch.py file – start by importing the LaunchDescription and Node classes:
# launch module includes elements to launch all types of processes and actions
from launch import LaunchDescription
# launch_ros module includes elements to launch ROS 2 processes and actions
from launch_ros.actions import Node
Every launch file requires a generate_launch_description function – use it to declare a Node object for each of your nodes:
# This function is always needed
def generate_launch_description():
 # Declare a variable Node for each node
 compute_node = Node(
   package="launch_pkg",
   executable="compute_node"
 )
 sensor_node = Node(
   package="launch_pkg",
   executable="sensor_node"
 )
 motor_node = Node(
   package="launch_pkg",
   executable="motor_node"
 )
Finally, create a list of all the processes we want to execute - this list will be used to generate the returned LaunchDescription object:
python # Add the nodes and the process to the LaunchDescription list ld = [compute_node, sensor_node, motor_node] return LaunchDescription(ld)
Executing the launch file will call our defined function and use the returned LaunchDescription to run the list of processes. Everything else happens behind the curtains of ROS 2.
Before launching our file, let’s compile the executables and add the launch folder to your CMakeLists.txt:
# find dependencies
find_package(ament_cmake REQUIRED)
find_package(rclcpp REQUIRED)
find_package(std_msgs REQUIRED)
find_package(geometry_msgs REQUIRED)
set(dependencies
 rclcpp
 std_msgs
 geometry_msgs
)
add_executable(compute_node src/compute.cpp)
ament_target_dependencies(compute_node ${dependencies})
add_executable(sensor_node src/sensor.cpp)
ament_target_dependencies(sensor_node ${dependencies})
add_executable(motor_node src/motor.cpp)
ament_target_dependencies(motor_node ${dependencies})
install(TARGETS
 compute_node
 sensor_node
 motor_node
DESTINATION lib/${PROJECT_NAME})
install(DIRECTORY launch
DESTINATION share/${PROJECT_NAME})
Compile your workspace with colcon build -symlink-install (the symlink-install option allows you to make modifications to your Python scripts without recompiling).
Finally, remember to source your workspace before you run your launch file:
$ ros2 launch launch_pkg launch_example.launch.py
[INFO] [launch]: All log files can be found below /home/jose/.ros/log/2022-10-15-21-14-11-449940-jose-hp-133584
[INFO] [launch]: Default logging verbosity is set to INFO
[INFO] [compute_node-1]: process started with pid [133586]
[INFO] [sensor_node-2]: process started with pid [133588]
[INFO] [motor_node-3]: process started with pid [133590]
[sensor_node-2] [INFO] [1665861252.516992544] [sensor_node]: Read value 17767
[compute_node-1] [INFO] [1665861252.517637417] [compute_node]: Received value 17767, sending 1.00
[motor_node-3] [INFO] [1665861252.518161503] [motor_node]: Received value 1.00
[motor_node-3] [INFO] [1665861252.518330855] [motor_node]: Moving motors forward
[sensor_node-2] [INFO] [1665861253.516959490] [sensor_node]: Read value 9158
[compute_node-1] [INFO] [1665861253.517407357] [compute_node]: Received value 9158, sending 1.00
[motor_node-3] [INFO] [1665861253.517805704] [motor_node]: Received value 1.00
[motor_node-3] [INFO] [1665861253.517878172] [motor_node]: Moving motors forward
[sensor_node-2] [INFO] [1665861254.516885083] [sensor_node]: Read value -26519
[compute_node-1] [INFO] [1665861254.517315070] [compute_node]: Received value -26519, sending -1.00
[motor_node-3] [INFO] [1665861254.517702343] [motor_node]: Received value -1.00
[motor_node-3] [INFO] [1665861254.517776227] [motor_node]: Moving motors backwards
[sensor_node-2] [INFO] [1665861255.516885039] [sensor_node]: Read value 18547
[compute_node-1] [INFO] [1665861255.517282411] [compute_node]: Received value 18547, sending 1.00
[motor_node-3] [INFO] [1665861255.517668351] [motor_node]: Received value 1.00
[motor_node-3] [INFO] [1665861255.517731057] [motor_node]: Moving motors forward
[sensor_node-2] [INFO] [1665861256.516948004] [sensor_node]: Read value -9135
[compute_node-1] [INFO] [1665861256.517377886] [compute_node]: Received value -9135, sending -1.00
[motor_node-3] [INFO] [1665861256.517770547] [motor_node]: Received value -1.00
[motor_node-3] [INFO] [1665861256.517844024] [motor_node]: Moving motors backwards
[sensor_node-2] [INFO] [1665861257.516883031] [sensor_node]: Read value 23807
[compute_node-1] [INFO] [1665861257.517304842] [compute_node]: Received value 23807, sending 1.00
[motor_node-3] [INFO] [1665861257.517698544] [motor_node]: Received value 1.00
[motor_node-3] [INFO] [1665861257.517771511] [motor_node]: Moving motors forward
[sensor_node-2] [INFO] [1665861258.516889986] [sensor_node]: Read value -27574
[compute_node-1] [INFO] [1665861258.517309097] [compute_node]: Received value -27574, sending -1.00
[motor_node-3] [INFO] [1665861258.517721883] [motor_node]: Received value -1.00
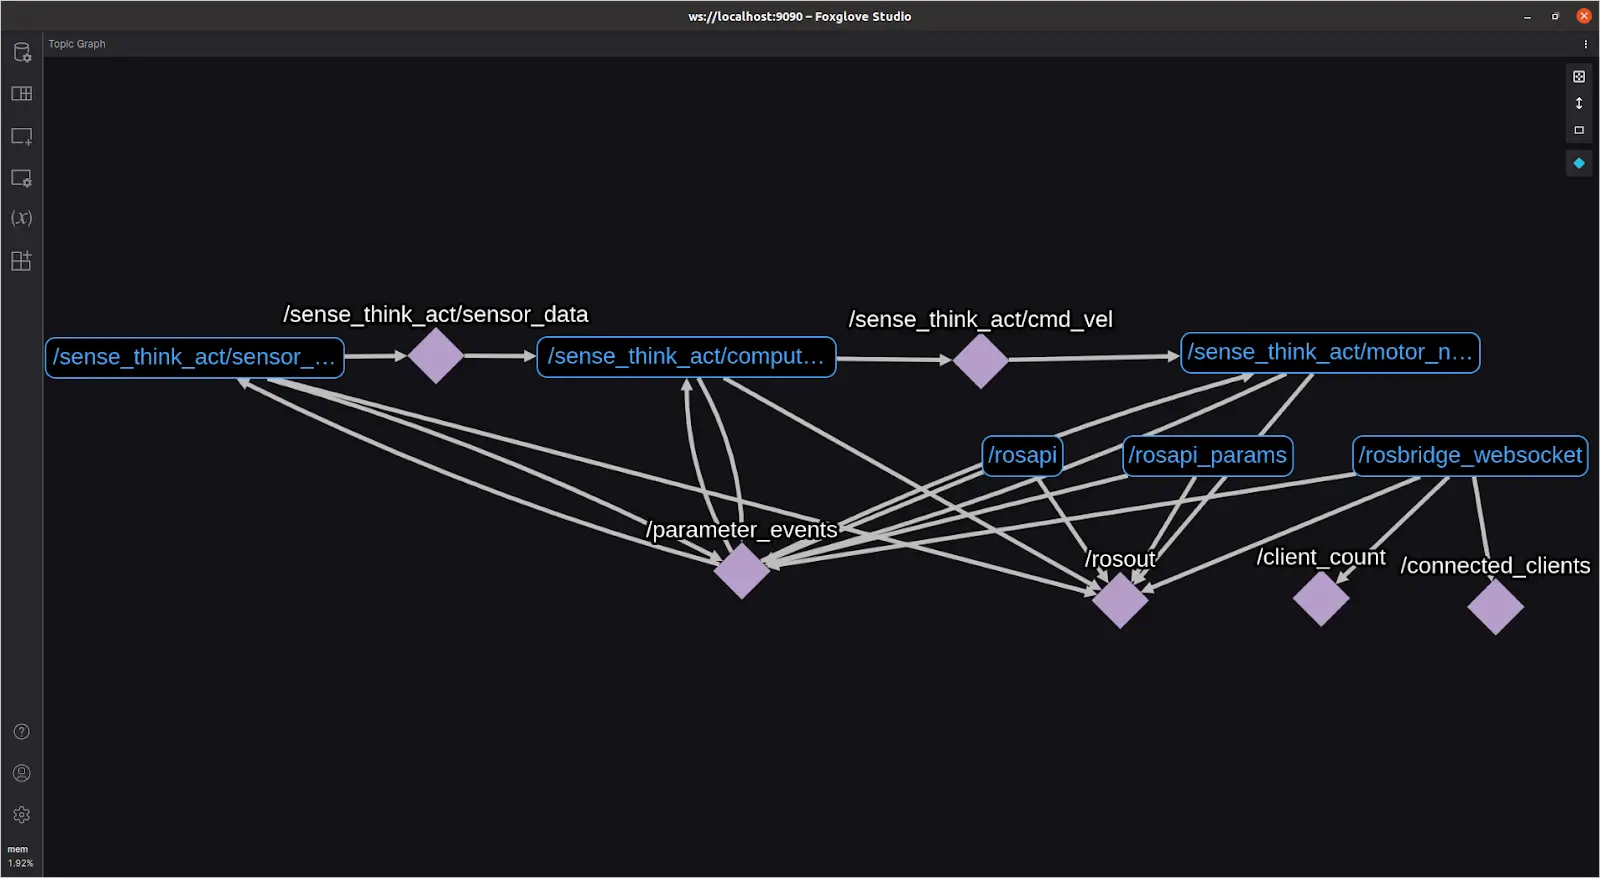
[motor_node-3] [INFO] [1665861258.517791007] [motor_node]: Moving motors backwardsCheck that your nodes are running by opening a new terminal window with ROS 2 sourced and adding Foxglove’s Topic Graph panel to your layout:
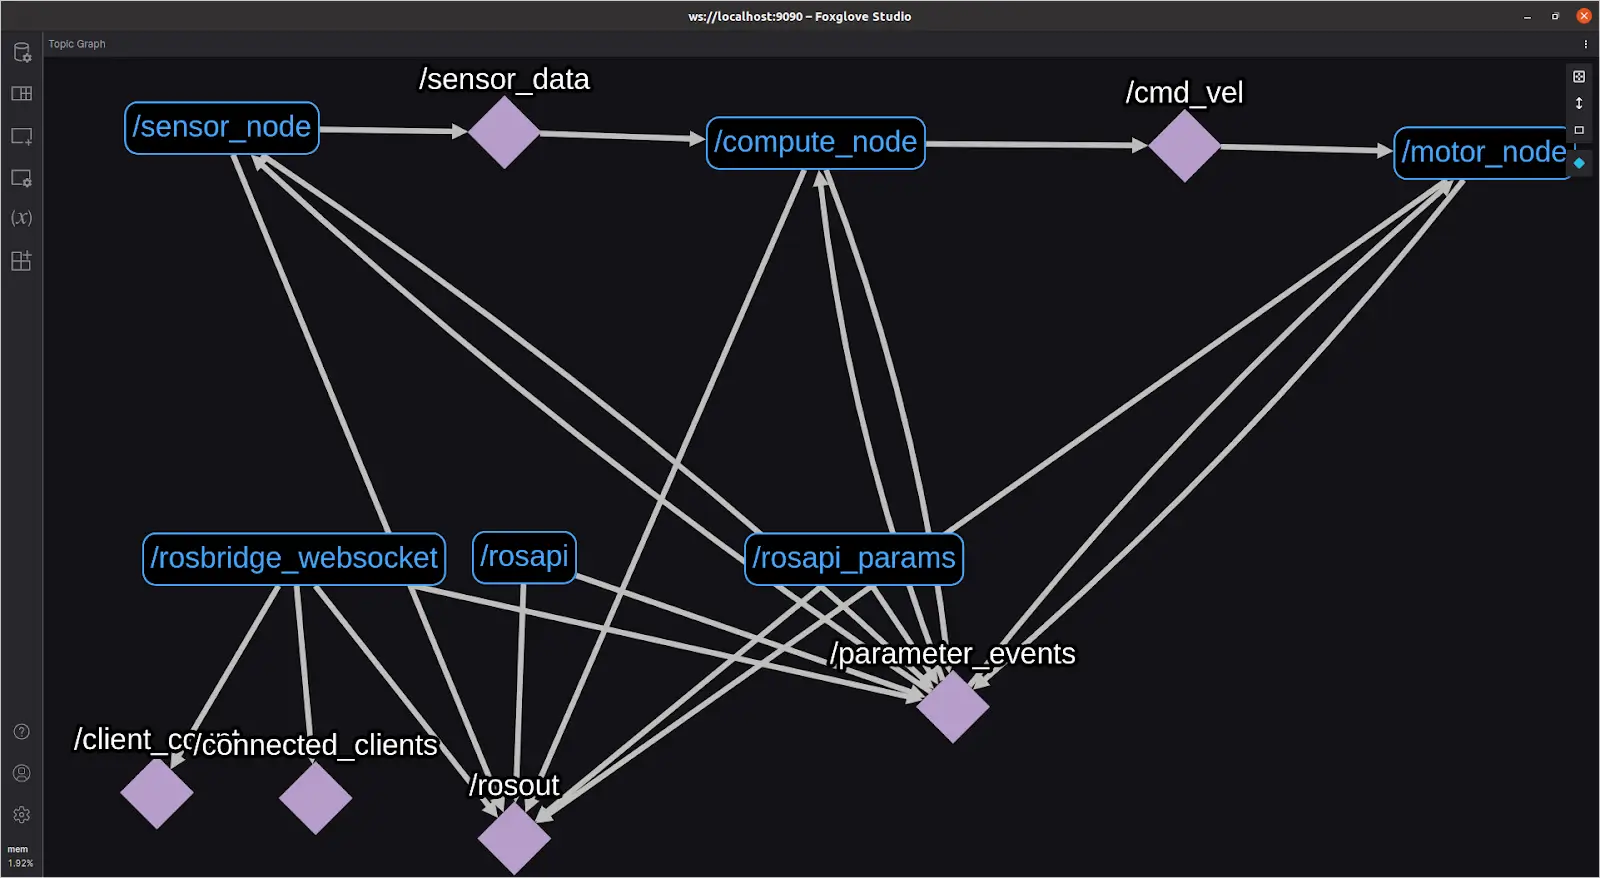
We got three nodes running with a single line!
Adding namespaces
Launch files can also group your nodes into families, or namespaces. This makes it easier for you to keep track of and monitor your nodes’ behavior.
A node has only one name, but can belong to multiple levels of namespaces. These namespaces can be joined with a forward slash (/) – all nodes without a namespace will always have a single / before their names (e.g. /sensor_node). All topics without a namespace specified during declaration will inherit the node’s namespace, as seen in the previous image.
Let’s add our three nodes to a “sense_think_act” namespace in our launch file:
sensor_node = Node(
namespace="sense_think_act",
package="launch_pkg",
executable="sensor_node"
)
compute_node = Node(
namespace="sense_think_act",
package="launch_pkg",
executable="compute_node"
)
motor_node = Node(
namespace="sense_think_act",
package="launch_pkg",
executable="motor_node"
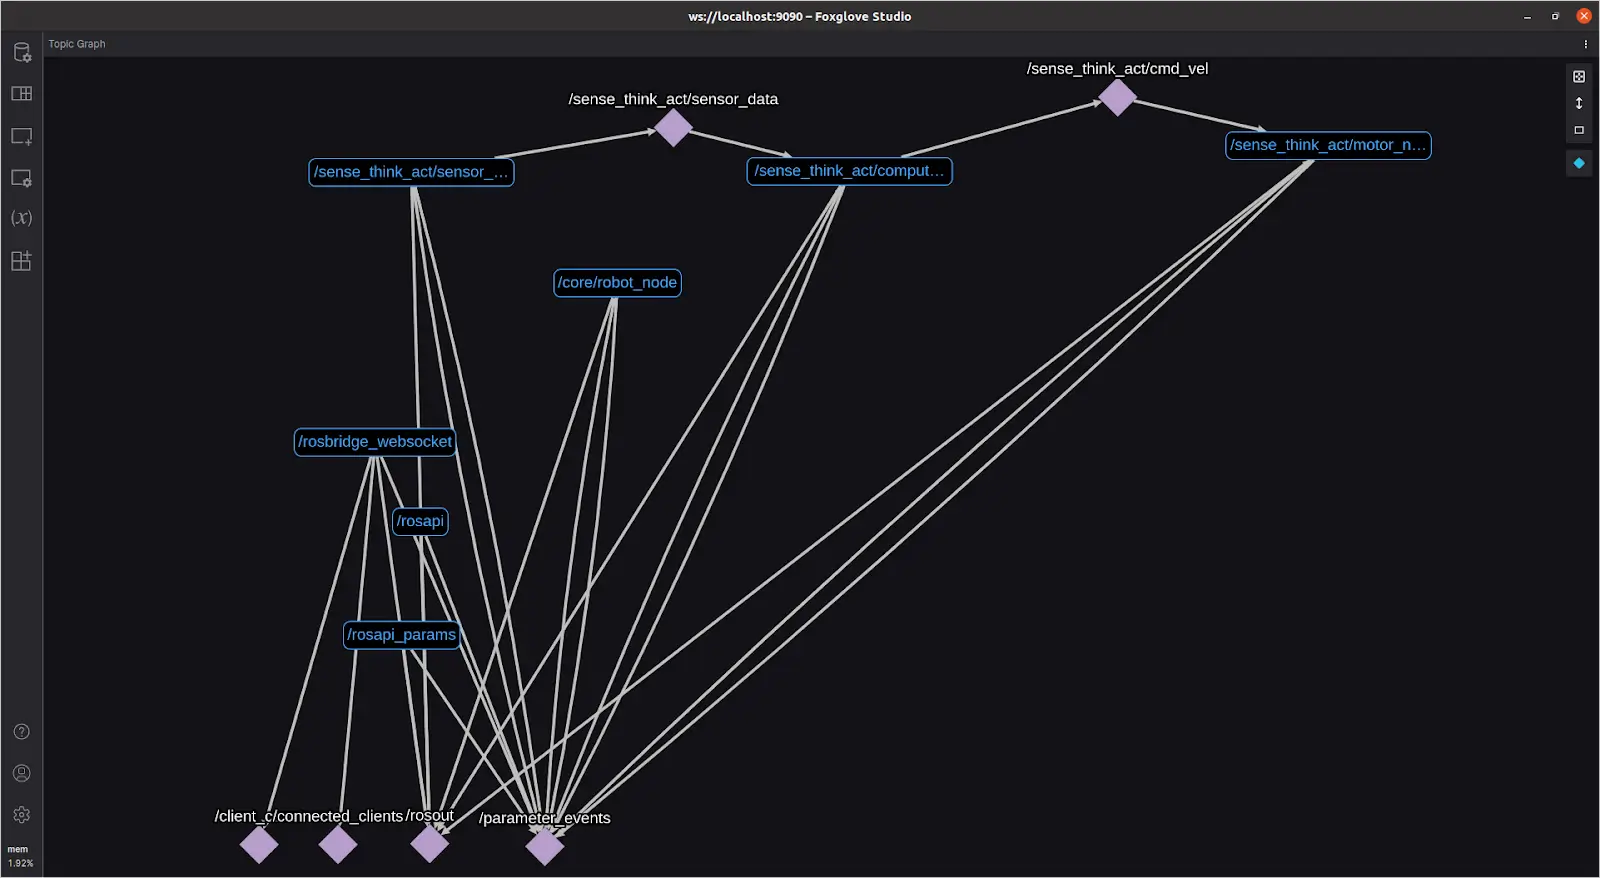
)Run the launch file again, and check the new results with the Topic Graph panel – you’ll see that the nodes and the topics have the namespace specified in the launch file:
Including nodes from other packages
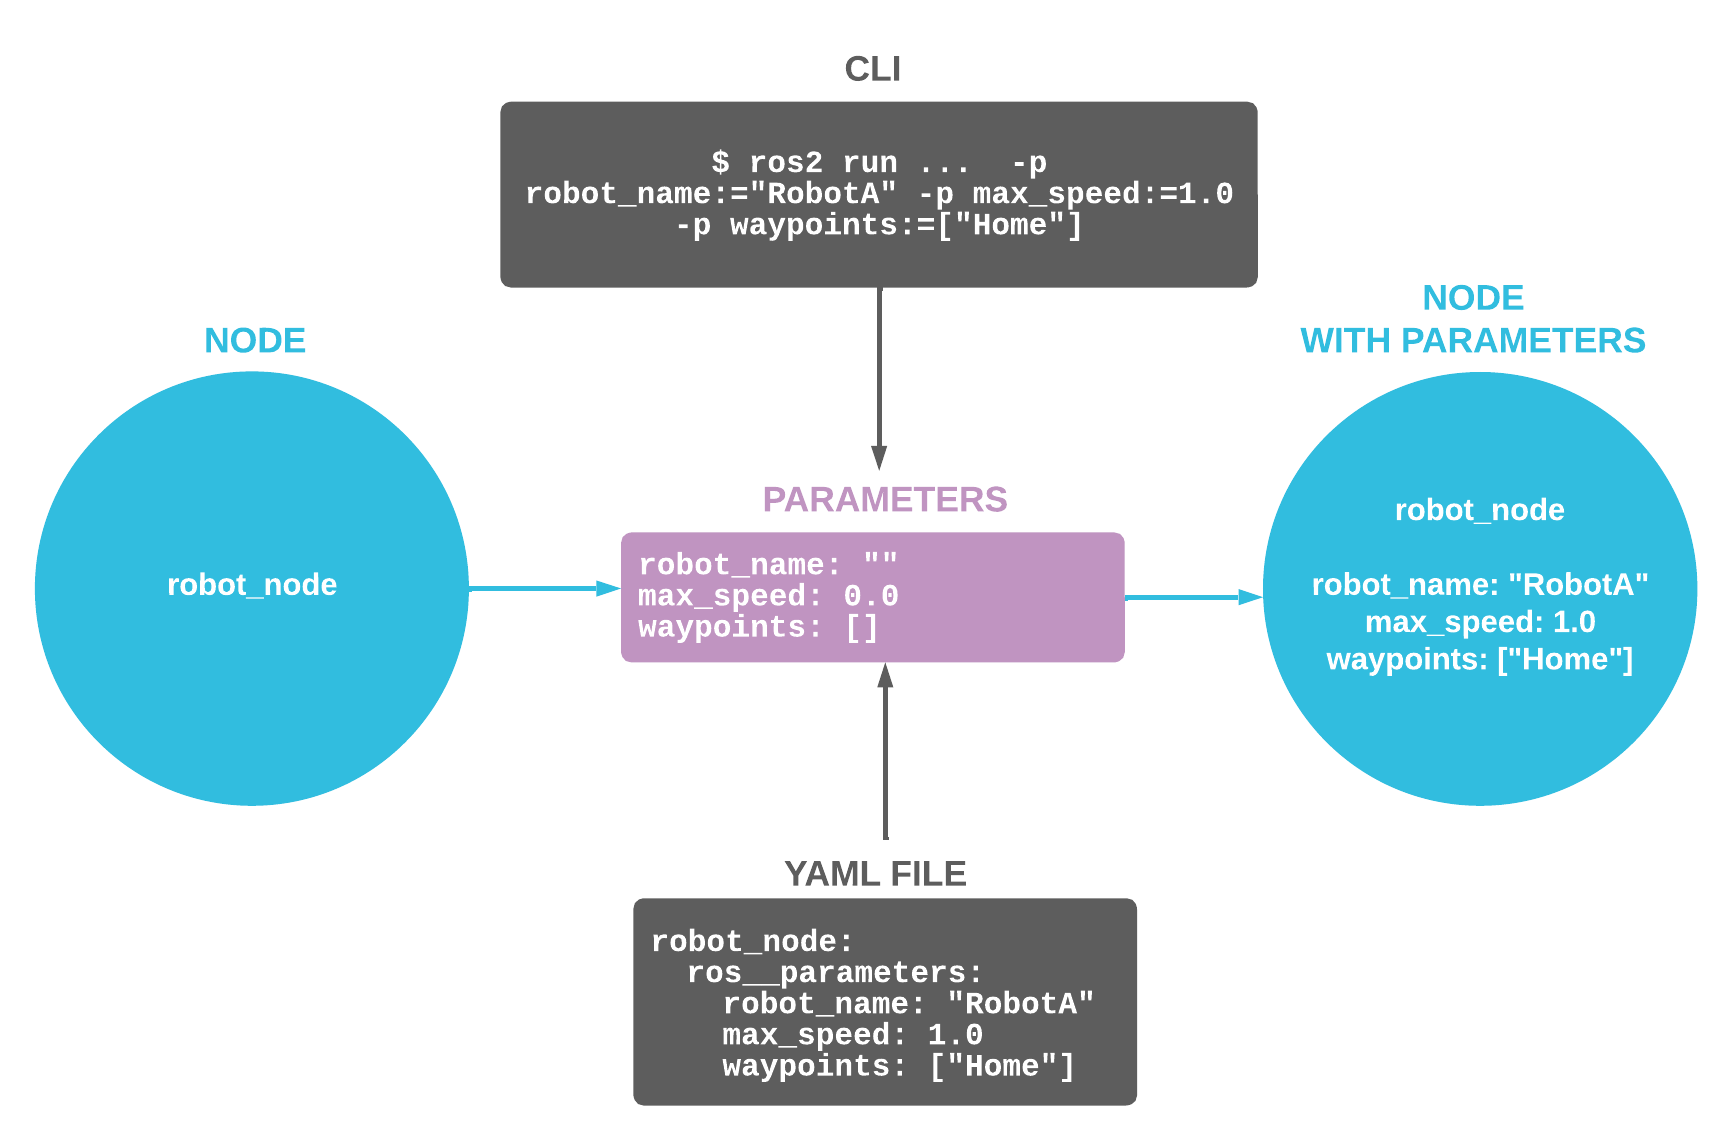
Another great feature of launch files is the possibility to include nodes from another package. Let’s pull the robot_node node created in our ROS 2 parameters tutorial into our launch file and configure it with some parameters:
robot_node = Node(
 namespace="core",
 package="params_pkg",
 executable="robot_node",
 parameters=[{
   "robot_name":"RobotA",
   "max_speed":4.2,
   "waypoints":["Home", "Room 1", "Corridor", "Home"]
 }]
)
ld = [compute_node,
 sensor_node,
 motor_node,
 robot_node]
If you have a different workspace, you have to source as well. Remember that you can source as many workspaces as you want. Run your launch file again:
$ ros2 launch launch_pkg launch_example.launch.py
 [INFO] [launch]: All log files can be found below /home/jose/.ros/log/2022-10-15-21-50-34-047404-jose-hp-135988
 [INFO] [launch]: Default logging verbosity is set to INFO
 [INFO] [compute_node-1]: process started with pid [135990]
 [INFO] [sensor_node-2]: process started with pid [135992]
 [INFO] [motor_node-3]: process started with pid [135994]
 [INFO] [robot_node-4]: process started with pid [135996]
 [robot_node-4] [INFO] [1665863434.111560533] [core.robot_node]: Hi! I'm 'RobotA'
 [robot_node-4] [INFO] [1665863434.111637979] [core.robot_node]: My max speed is 4.2
 [robot_node-4] [INFO] [1665863434.111651425] [core.robot_node]: I will follow the waypoints:
 [robot_node-4] [INFO] [1665863434.111657065] [core.robot_node]: 1) Home
 [robot_node-4] [INFO] [1665863434.111662868] [core.robot_node]: 2) Room 1
 [robot_node-4] [INFO] [1665863434.111667807] [core.robot_node]: 3) Corridor
 [robot_node-4] [INFO] [1665863434.111672832] [core.robot_node]: 4) Home
 [sensor_node-2] [INFO] [1665863435.111555320] [sense_think_act.sensor_node]: Read value 17767
 [compute_node-1] [INFO] [1665863435.112220363] [sense_think_act.compute_node]: Received value 17767, sending 1.00
 [motor_node-3] [INFO] [1665863435.112682820] [sense_think_act.motor_node]: Received value 1.00
 [motor_node-3] [INFO] [1665863435.112874617] [sense_think_act.motor_node]: Moving motors forward
 [sensor_node-2] [INFO] [1665863436.111443899] [sense_think_act.sensor_node]: Read value 9158
 [compute_node-1] [INFO] [1665863436.111717836] [sense_think_act.compute_node]: Received value 9158, sending 1.00
 [motor_node-3] [INFO] [1665863436.111856863] [sense_think_act.motor_node]: Received value 1.00
 [motor_node-3] [INFO] [1665863436.111893916] [sense_think_act.motor_node]: Moving motors forward
And check your nodes again with the Topic Graph panel:
Starting Foxglove
Now that we’ve created launch files that execute multiple nodes, let’s include Foxglove in the launch process.
First of all, make sure you have the latest version of foxglove-bridge installed with sudo apt install ros-$ROS_DISTRO-foxglove-bridge
Then, add following lines to your launch file:
from launch.actions import ExecuteProcess
...
# Launch Foxglove to monitor data
foxglove_studio = ExecuteProcess(cmd=["foxglove-studio"])
foxglove_bridge = ExecuteProcess(cmd=["ros2", "launch", "foxglove_bridge", "foxglove_bridge_launch.xml"])
# Add the nodes and the process to the LaunchDescription list
ld = [compute_node,
 ...,
 foxglove_studio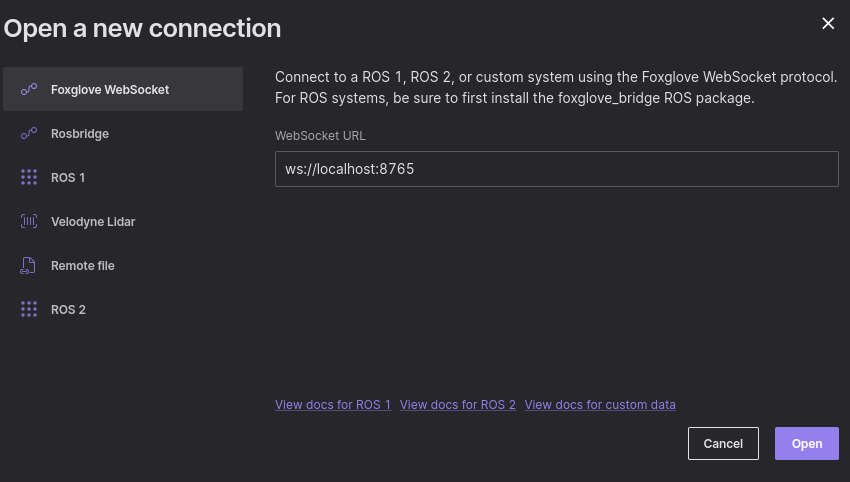
foxglove_bridge]language-pythonOpen a live connection using Foxglove WebSocket.
Use Foxglove to monitor the sensor and command values:
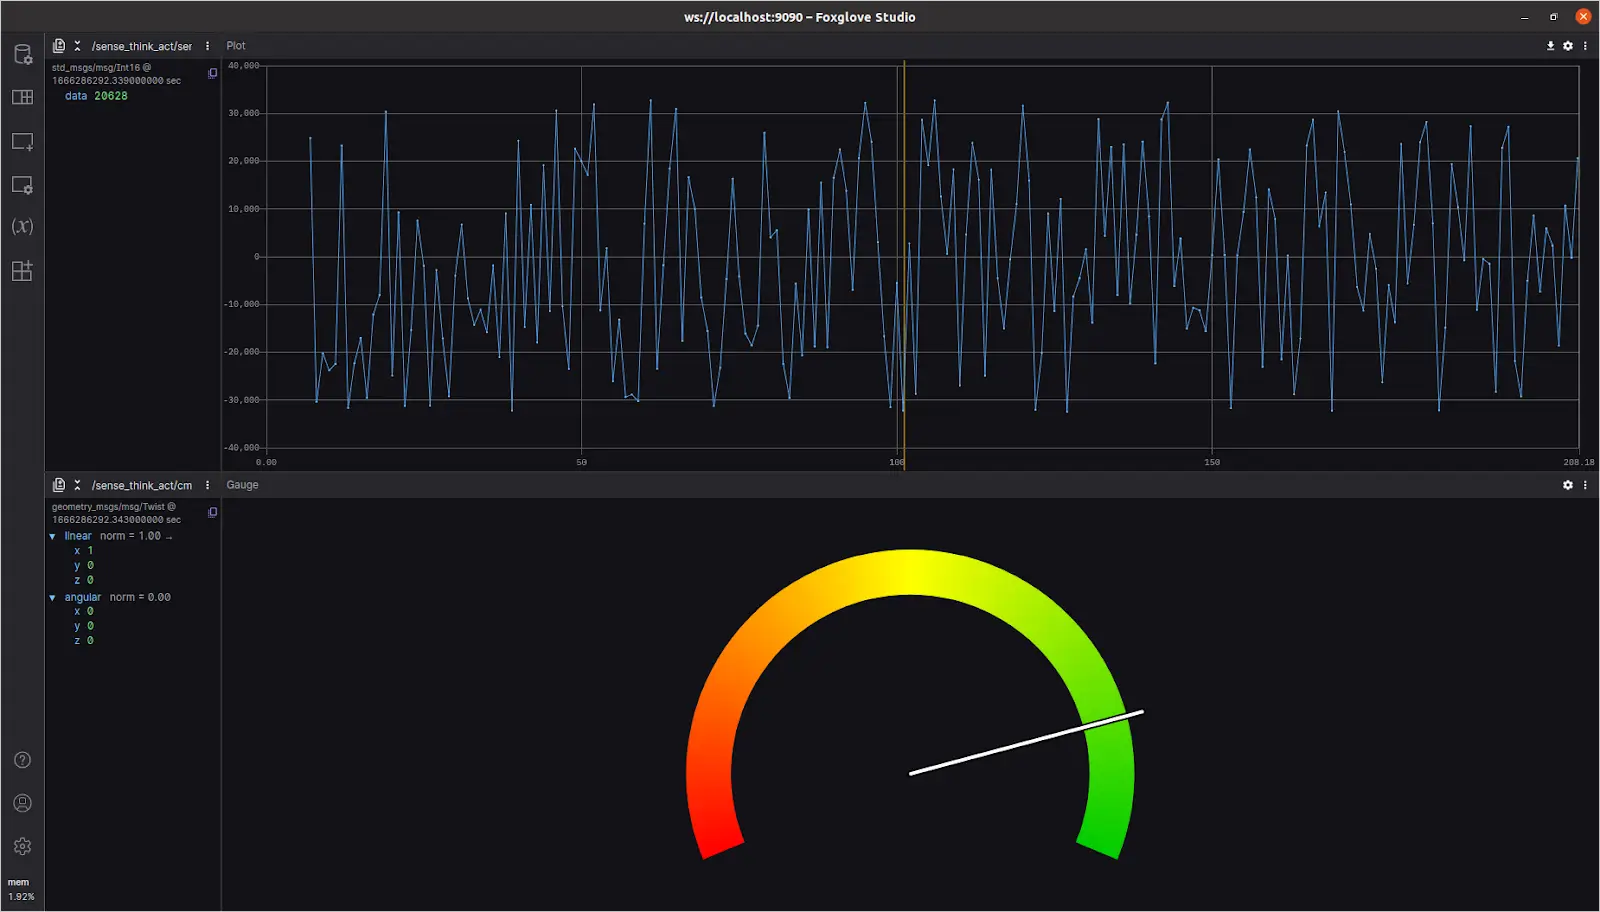
L to R, top to bottom: Raw sensor data in a Raw Messages panel, sensor data plotted with a Plot panel, cmd_vel value in a Raw Messages panel, cmd_vel.linear.x monitored with a Gauge panel
While executing your nodes, you can see how the command values change depending on the incoming sensor data.
Summary
ROS 2 launch files can dramatically streamline your robotics development, by making it possible to execute multiple nodes and processes with a single command. We hope you found this tutorial useful, and learned how to streamline your workflows in the future!
For a reference to all the code covered in this post, check out our foxglove/tutorials GitHub repo.
As always, feel free to reach out to the Foxglove team in our Discord community to ask questions, give us feedback, and request a topic for the next tutorial!