Using Protobuf Data with the Foxglove WebSocket Connection
Write a simple WebSocket server that loads Protobuf data into Foxglove

⚠️ Important Notice: The foxglove-websocket package is entering maintenance mode. We recommend migrating to the Foxglove SDK for future development.
We recently announced the Foxglove WebSocket protocol, which enables Foxglove to ingest and visualize robotics data in custom formats, not just ROS data from live robots or .bag files. Now even more teams can use Foxglove to enhance their robotics development workflows.
Currently, Foxglove supports messages encoded as JSON and Protobuf. In this tutorial, we’ll see how to integrate Protobuf data into Foxglove by writing a simple Foxglove WebSocket server with Python.
What is Protobuf?
Protocol buffers (Protobuf) are a way to serialize data into a common format that can be interpreted by any program, regardless of language or platform.
Protobuf defines a syntax for human-readable .proto files, which describe the structure and format of the custom data in the form of messages. It also defines a wire format, which specifies exactly how a Protobuf message should be serialized to and deserialized from a compact binary representation. The Protobuf compiler (protoc) can read .proto files and generate code to convert to and from the wire format in many different languages.
Writing a simple .proto message
The rest of this tutorial will demonstrate how Protobuf can be used with the Foxglove WebSocket connection to load custom data into Foxglove.
Before continuing, make sure you’ve installed protoc on your computer — either from GitHub or via a package manager (e.g. brew install protobuf).
To get started, let’s create a file called ExampleMsg.proto and define a simple message that contains a string and a number:
syntax = "proto3";
message ExampleMsg {
 string msg = 1;
 int32 count = 2;
}
Next, run the following command to generate a Python module for working with ExampleMsg objects in a file called ExampleMsg_pb2.py:
$ protoc --python_out=. ExampleMsg.protoThis module can be used to serialize an ExampleMsg object into a byte string in the Protobuf wire format. Our WebSocket server will eventually send this raw data to Foxglove.
$ python3
>>> from ExampleMsg_pb2 import ExampleMsg
>>> ExampleMsg(msg="Hello!", count=42).SerializeToString()
b'\n\x06Hello!\x10*'
Since Foxglove is available as a pre-built web app and desktop app, it doesn’t have any inherent knowledge of your custom schemas — so in order to decode the Protobuf data, Foxglove needs some information about the original .proto files. Luckily, Protobuf is distributed with a self-describing descriptor.proto which defines FileDescriptorSet, a Protobuf message type that can represent parsed .proto files.
Run the following command to compile ExampleMsg.proto into a binary FileDescriptorSet. This will produce a file called ExampleMsg.bin.
$ protoc --include_imports --descriptor_set_out=ExampleMsg.bin ExampleMsg.protoThis file is not meant to be human-readable, but by inspecting it with hexdump, we can see that it contains the “ExampleMsg” message name, as well as the “msg” and “count” field names.
$ hexdump -C ExampleMsg.bin
00000000  0a 50 0a 10 45 78 61 6d  70 6c 65 4d 73 67 2e 70  |.P..ExampleMsg.p|
00000010  72 6f 74 6f 22 34 0a 0a  45 78 61 6d 70 6c 65 4d  |roto"4..ExampleM|
00000020  73 67 12 10 0a 03 6d 73  67 18 01 20 01 28 09 52  |sg....msg.. .(.R|
00000030  03 6d 73 67 12 14 0a 05  63 6f 75 6e 74 18 02 20  |.msg....count.. |
00000040  01 28 05 52 05 63 6f 75  6e 74 62 06 70 72 6f 74  |.(.R.countb.prot|
00000050  6f 33                                             |o3|
00000052
Foxglove will use this information to decode incoming data from the Protobuf wire format.
Now we have everything we need to put together a simple WebSocket server!
Serving messages with a Foxglove WebSocket server
To build a server that can communicate with Foxglove, we need to install the foxglove-websocket and protobuf Python packages:
$ pip install foxglove-websocket protobufLet’s create a file called my_server.py. In it, we’ll import the Python module and schema data we generated with protoc. The schema needs to be base64-encoded so it can be sent on the WebSocket as a string. We’ll do this once at the beginning of the program.
import os
import ExampleMsg_pb2
from base64 import standard_b64encode

with open(
   os.path.join(os.path.dirname(ExampleMsg_pb2.__file__), "ExampleMsg.bin"), "rb"
) as schema_bin:
   schema_base64 = standard_b64encode(schema_bin.read()).decode("ascii")
Below that, we’ll create a main() function that will start up a FoxgloveServer, which hosts a WebSocket server that Foxglove can connect to.
If you’re not familiar with the async and await syntax used in this tutorial, visit the asyncio documentation for an introduction.
import asyncio
import time
from foxglove_websocket import run_cancellable
from foxglove_websocket.server import FoxgloveServer

async def main():
   # Specify the server's host, port, and a human-readable name
   async with FoxgloveServer("0.0.0.0", 8765, "example server") as server:
Now that the server is set up, we’ll add a channel to inform Foxglove about our stream of ExampleMsg data. To indicate that this channel’s messages are encoded with Protobuf, we provide the following fields:
       chan_id = await server.add_channel(
           {
               "topic": "example_msg",
               "encoding": "protobuf",
               "schemaName": "ExampleMsg",
               "schema": schema_base64,
           }
       )
The schemaName must be set to “ExampleMsg” — if the FileDescriptorSet contained multiple message definitions, this would tell Foxglove which one to use.
Let’s start publishing messages on the channel so we can view them in Foxglove. We’ll make a loop that publishes a message every 0.2 seconds:
       i = 0
       while True:
           i += 1
           await asyncio.sleep(0.2)
           await server.send_message(
               chan_id,
               time.time_ns(),
               ExampleMsg_pb2.ExampleMsg(msg="Hello!", count=i).SerializeToString(),
           )
As the last step, we need to invoke the main() function when the program is run. Because we’d like our server to exit gracefully when control+C is pressed, we’ll use the run_cancellable helper from the foxglove_websocket package.
if __name__ == "__main__":
   run_cancellable(main())
Now our server is ready to publish messages to clients!
Viewing message data inside Foxglove
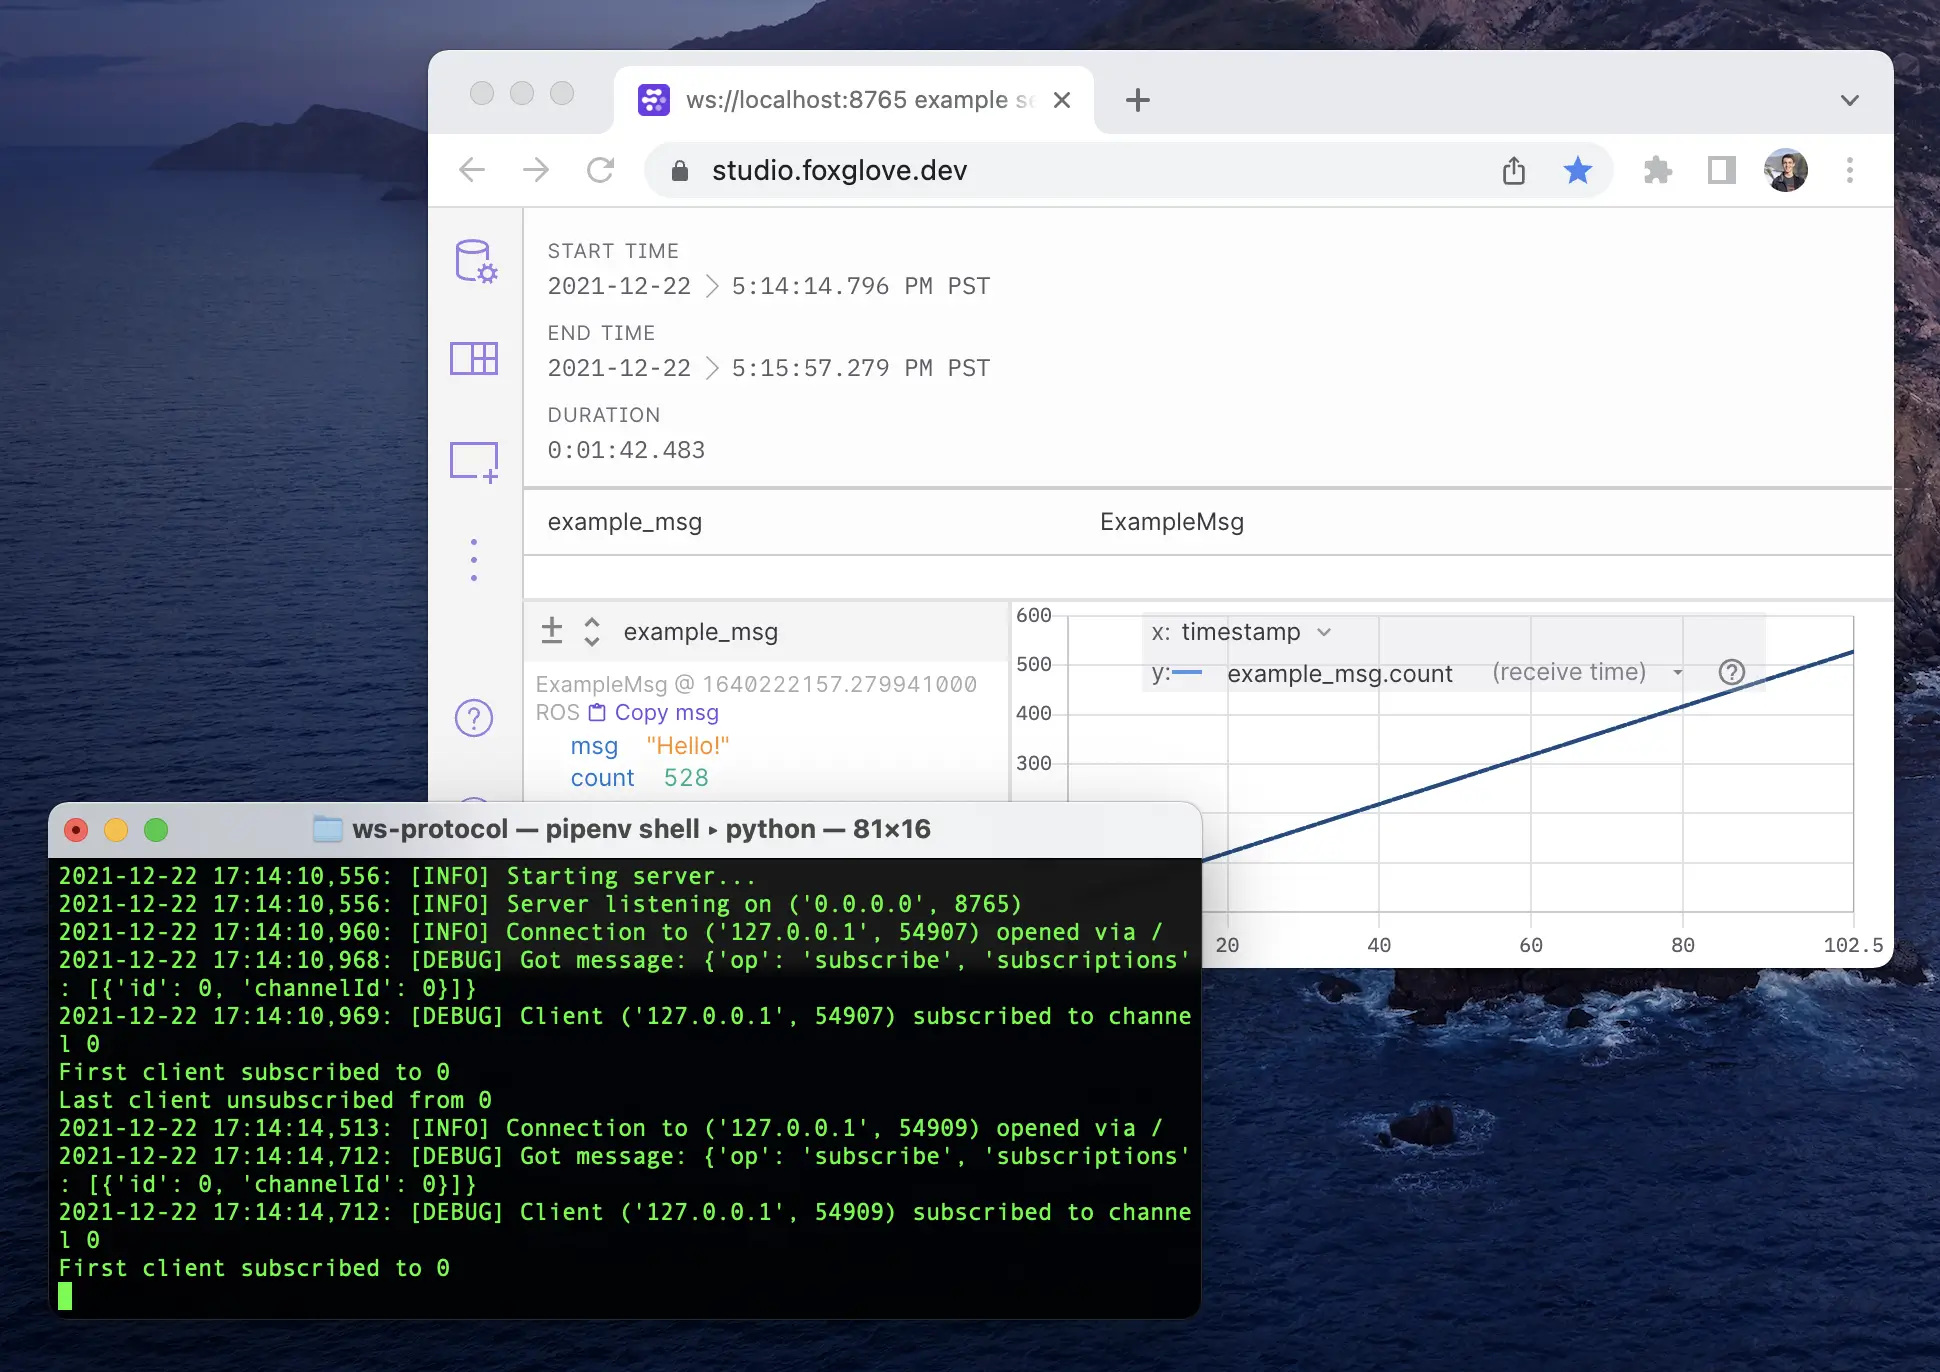
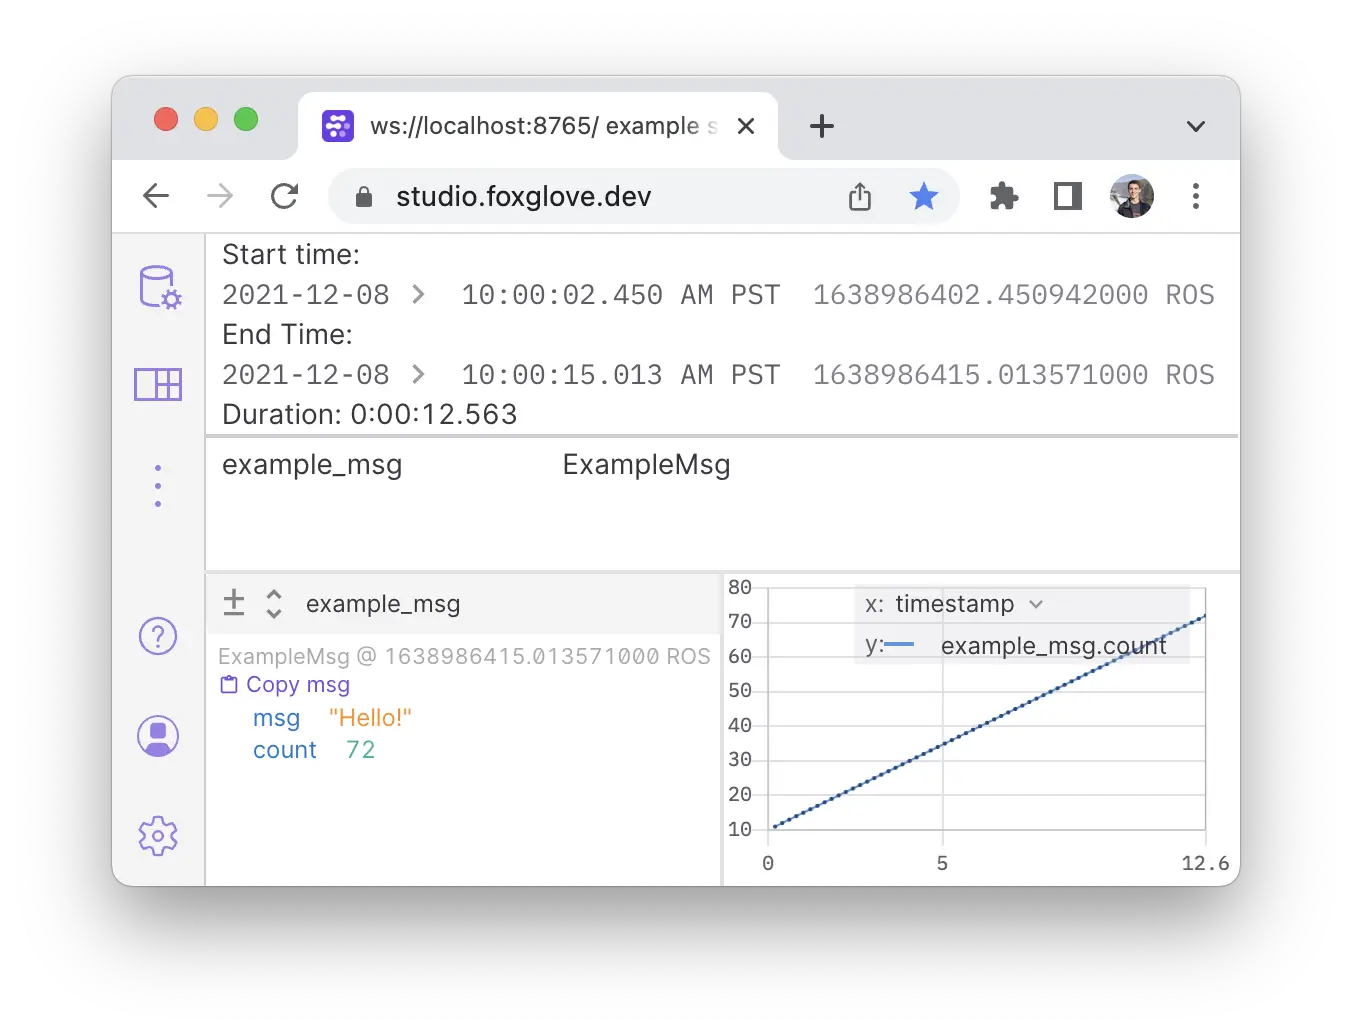
Let’s test that Foxglove can connect to our server and receive messages.
First, run the server:
$ python3 my_server.py
2021-12-21 15:27:56,509: [INFO] Starting server...
2021-12-21 15:27:56,509: [INFO] Server listening on ('0.0.0.0', 8765)
Then, open Foxglove and initiate a Foxglove WebSocket connection to ws://localhost:8765. The data published by the server should now be visible under the example_msg topic! You can visualize the data using a Raw Messages or Plot panel. The Data Source Info panel shows metadata about the data source, including the example_msg topic with ExampleMsg data.
Hopefully this tutorial has given you a helpful starting point for bringing in your own Protobuf data to Foxglove. The full example code for this tutorial is available in the foxglove/ws-protocol repo, and you can also run the complete Protobuf example server directly from the installed package, using python -m foxglove_websocket.examples.protobuf_server.
You’ll need to make changes to adapt the ideas presented in this tutorial to your own particular development workflow, but feel free to get in touch with us via Discord if you have any questions.
Using schemas with built-in Foxglove visualization support
Certain Foxglove panels expect specific message schemas in order to work properly. For instance, while the Raw Messages and Plot panels are very flexible and work with many kinds of data, the Image panel expects image messages to contain format and data fields. Likewise, the 3D panel only knows how to render meshes, point clouds, and other specific types.
To help you take full advantage of Foxglove’s features, we’ve published a set of schemas, including .proto files, that are supported by Foxglove’s panels. We’ve also listed the message types supported by each panel in our panel documentation.
We can’t wait to see how you’ll use the Foxglove WebSocket protocol with your custom data! Join our community to ask any questions or show off what you’ve built.