Using ROS 2 Transforms to Calculate Object Positions
Utilize the ROS 2 tf2 library to compute the relative positions of detected objects.

In previous posts, we’ve covered how visualizing ROS 2 transforms in Foxglove can help us describe the relative positions of a robot’s components.
In this tutorial, we’ll learn how ROS 2 transforms can help us calculate the position of an object not explicitly linked to a robot – in relation to both the sensor that detected it and the actuator that will interact with it.
Calculating positions in different frames
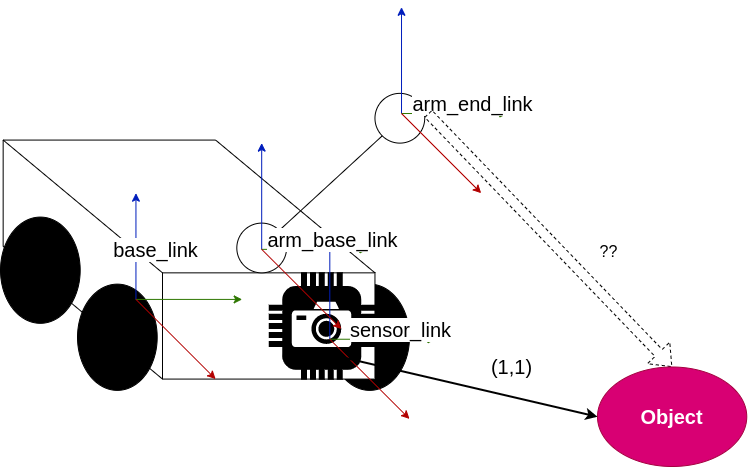
Let’s consider the robot model from our previous ROS transforms tutorials:
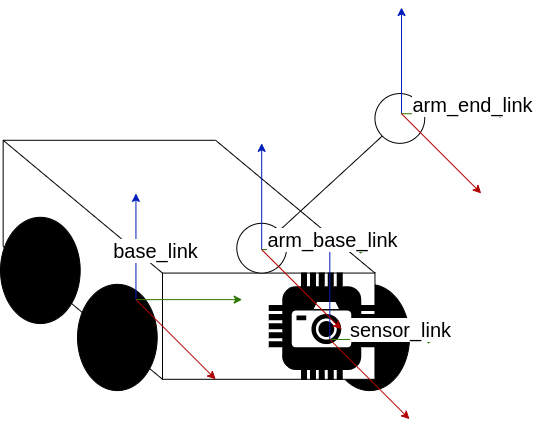
If our robot’s sensor were to detect an object, we’d have that object’s position in the sensor_link frame. To use our robot’s arm to grab it, however, we’d then need to calculate the object’s position in the arm_end_link frame.
With the ROS 2 tf2 library, we can easily transform our object’s position across frames – all without worrying about any of the complicated mathematical operations happening under the hood – and deduce how our arm needs to move to complete this task.
Create a sensor node to simulate object detection
First, let’s create a node that simulates our robot’s sensor.
In a sensor.cpp file, include the following libraries:
#include <rclcpp/rclcpp.hpp>
#include "geometry_msgs/msg/pose_stamped.hpp"
Define a Sensor class with the following private variables:
class Sensor: public rclcpp::Node{
private:
    // Timer for the simulated detected object
    rclcpp::TimerBase::SharedPtr object_timer_;
    // Publisher for the simulated detected object
    rclcpp::Publisher<geometry_msgs::msg::PoseStamped>::SharedPtr pose_pub_;
    // Pose to publish
    geometry_msgs::msg::PoseStamped pose_;
    // Aux variable that determines the detected object’s position
    int count_ = 0;
It should also include a timer callback, to periodically publish the detected object’s position:
void objectCallback(){
    // All transforms must be correctly timestamped
    pose_.header.stamp = this->get_clock()->now();
    pose_.header.frame_id = "sensor_link";

    if (count_ % 2) {
        pose_.pose.position.x = 1.0;
        pose_.pose.position.y = 1.0;
    } else {
        pose_.pose.position.x = 2.0;
        pose_.pose.position.y = 3.0;
    }

    // Change the detected object’s position, depending on whether count_ is even or odd
    count_++;
    pose_pub_->publish(pose_);
}
Next, write a class constructor that publishes the detected object’s pose on a timer (every second). Since poses are not transform messages, they will be published on a /detected_object topic (instead of /tf or /tf_static):
public:
    Sensor(const std::string & name):Node(name){
        // Initialize timer for object detection
        object_timer_ = create_wall_timer(std::chrono::seconds(1),
            std::bind(&Sensor::objectCallback, this));

        // Initialize publisher for object detection
        pose_pub_ = create_publisher<geometry_msgs::msg::PoseStamped>(
            "/detected_object", 10);
    }

    ~Sensor(){}
};
Finally, add the main function that declares and spins the node:
int main(int argc, char const *argv[]){
    rclcpp::init(argc, argv);
    auto node = std::make_shared>Sensor<("sensor");
    rclcpp::spin(node);
    return 0;
}
Create a listener node to calculate the object’s position
Next, let’s create a listener node to transform the object’s position from the sensor_link frame to the arm_end_link frame.
In a tf_listener.cpp file, include the following libraries:
#include <rclcpp/rclcpp.hpp>
#include "geometry_msgs/msg/pose_stamped.hpp"
#include "tf2_geometry_msgs/tf2_geometry_msgs.h"
#include "tf2/exceptions.h"
#include "tf2_ros/transform_listener.h"
#include "tf2_ros/buffer.h"
It should also include a poseCallback function, which looks up the transform between the source and target frames every time the sensor sends a new pose:
void poseCallback(const geometry_msgs::msg::PoseStamped::SharedPtr msg){
    try {
        pose_in_ = *msg;
        // Transforms the pose between the source frame and target frame
        tf_buffer_->transform<geometry_msgs::msg::PoseStamped>(pose_in_, pose_out_, "arm_end_link",
            tf2::Duration(std::chrono::seconds(1)));
        // Log coordinates of pose in target frame
        RCLCPP_INFO(get_logger(),"Object pose in 'arm_end_link' is:\n x,y,z = %.1f,%.1f,%.1f",
            pose_out_.pose.position.x,
            pose_out_.pose.position.y,
            pose_out_.pose.position.z);
    } catch (const tf2::TransformException & ex){
        RCLCPP_WARN(get_logger(),"Could not find object position in 'arm_end_link' frame.");
        return;
    }
}
Next, write a class constructor that loads and listens to your buffer of transforms, and then subscribe’s to the sensor’s /detected_object pose topic:
public:
    TfListener(const std::string & name):
    Node(name){
        // Load a buffer of transforms
        tf_buffer_ = std::make_unique<tf2_ros::Buffer>(this->get_clock());
        // Listen to the buffer of transforms
        tf_listener_ = std::make_unique>tf2_ros::TransformListener<(*tf_buffer_);
        // Subscribe to pose published by sensor node (check every second)
        pose_sub_ = create_subscription>geometry_msgs::msg::PoseStamped<
            ("/detected_object", 10,
            std::bind(&TfListener::poseCallback, this, std::placeholders::_1));
    }
    ~TfListener(){}
};
Lastly, write a main function that declares and spins the node:
int main(int argc, char const *argv[]){
   rclcpp::init(argc, argv);
   auto node = std::make_shared<TfListener>("tf_listener");
   rclcpp::spin(node);
   return 0;
}
Add the following lines to your CMakeLists.txt to add the executables to the compilation list:
add_executable(tf_listener src/tf_listener.cpp)
ament_target_dependencies(tf_listener ${dependencies})
add_executable(sensor_node src/sensor.cpp)
ament_target_dependencies(sensor_node ${dependencies})

install(TARGETS
 tf_broadcaster
 # NEW LINES
 tf_listener
 sensor_node
DESTINATION lib/${PROJECT_NAME})
Compile your package with $ colcon build --symlink-install.
Launch nodes and visualize transforms
Let’s first publish the transforms between our base_link and both arm_base_link and sensor_link. Use the static_transform_publisher we’ve learned in the previous post:
$ ros2 run tf2_ros static_transform_publisher 1 1 0 0 0 0 base_link arm_base_link
$ ros2 run tf2_ros static_transform_publisher 1 -1 0 0 0 0 base_link sensor_link
You will also need the tf_broadcaster that publishes the arm_end_link frame:
$ ros2 run transforms tf_broadcasterFinally, run your new nodes:
$ ros2 run transforms sensor_node
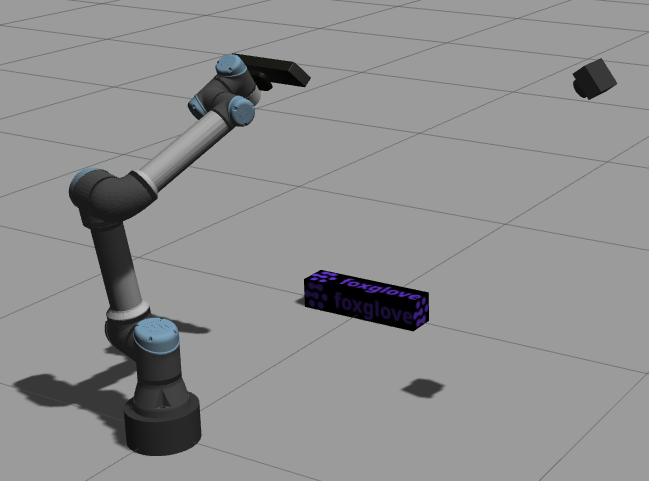
$ ros2 run transforms tf_listenerOpen a connection to your data in Foxglove using the Foxglove bridge. Open a 3D panel to visualize the frames and detected object positions, and a Log panel to see the printout of our object’s position.
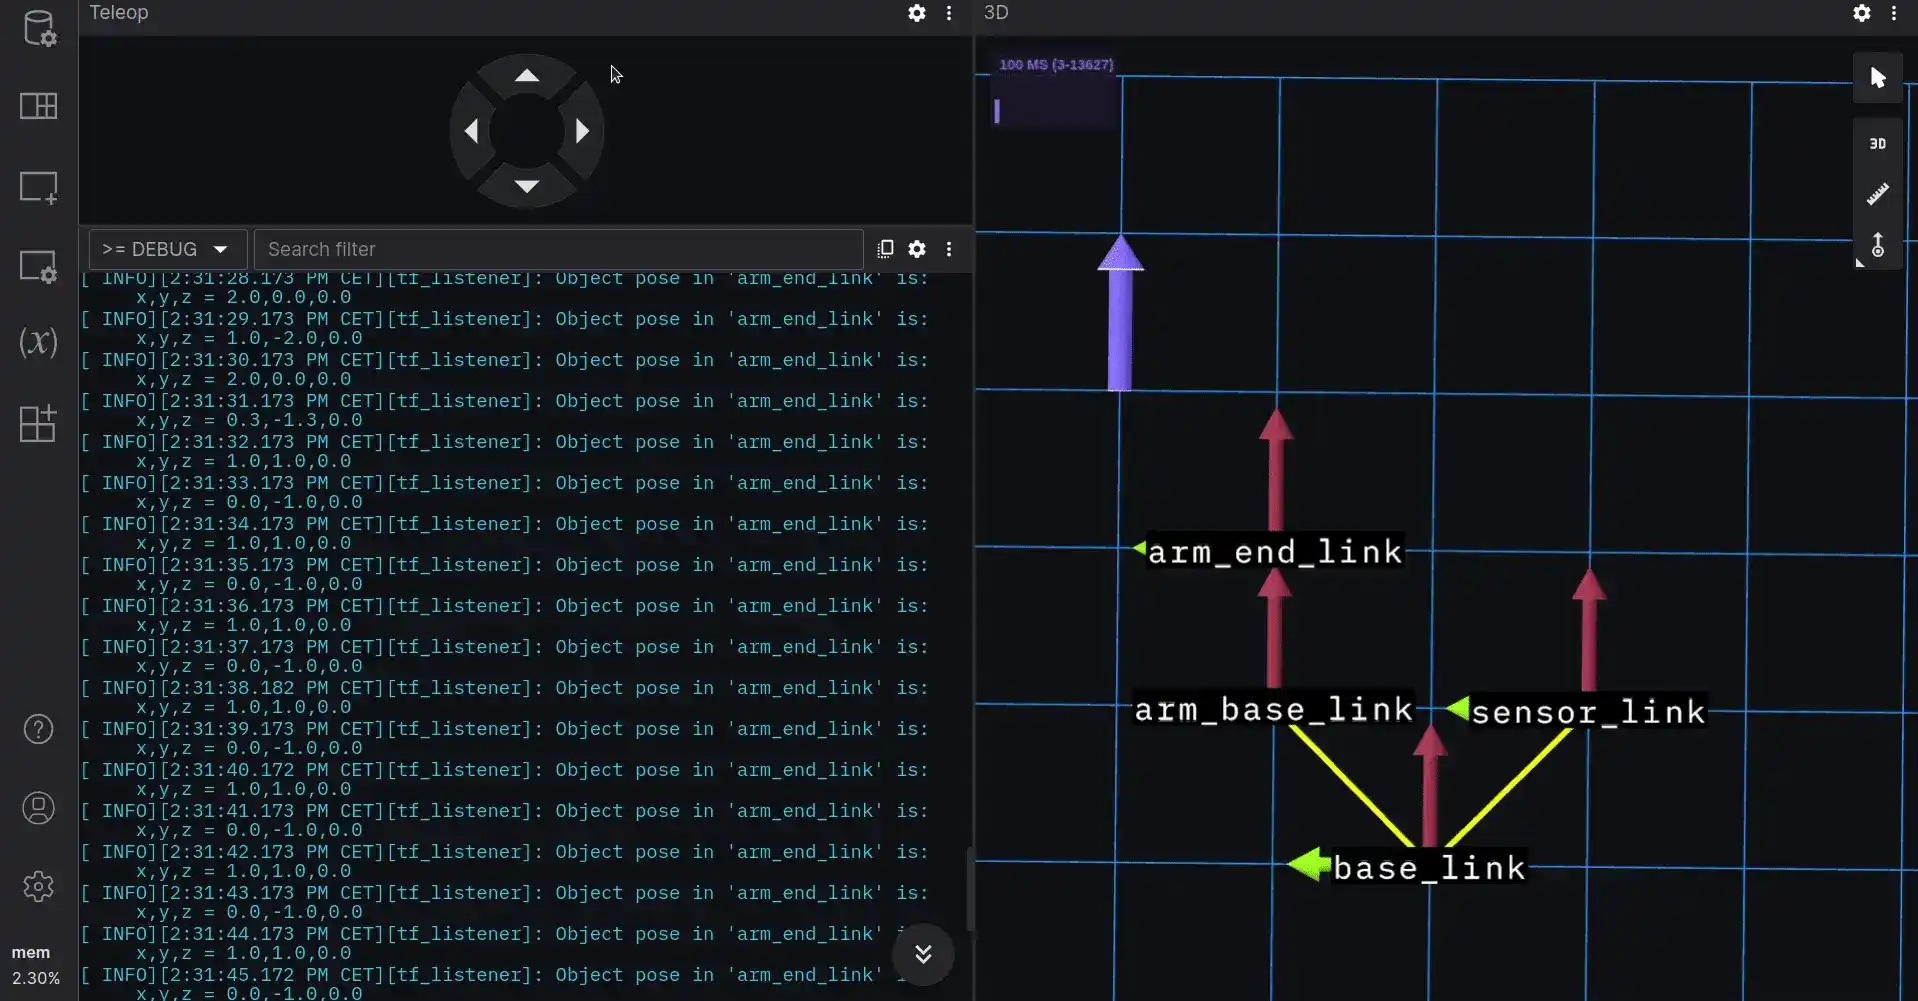
The object is represented by a purple arrow in the 3D panel. Its position in the arm_end_link frame is printed by the tf_listener node in the Log panel.
Notice that the object arrow is different from the axes arrows that represent each frame. This is because the object is not a transform, but a Pose. If you use the Teleop panel to move the arm_end_link frame around, you can see firsthand how the position of your detected object changes.
Create a launch file
In a launch folder, let’s create a tf_launch.launch.py file to launch all nodes together:
from launch import LaunchDescription
from launch.actions import ExecuteProcess
from launch_ros.actions import Node

def generate_launch_description():

  arm_frame_publisher = Node(
    package="tf2_ros",
    executable="static_transform_publisher",
    arguments=["1", "1", "0", "0", "0", "0", "base_link", "arm_base_link"]
  )
  sensor_frame_publisher = Node(
    package="tf2_ros",
    executable="static_transform_publisher",
    arguments=["1", "-1", "0", "0", "0", "0", "base_link", "sensor_link"]
  )
  tf_broadcaster = Node(
    package="tf_pkg",
    executable="tf_broadcaster"
  )
  tf_listener = Node(
    package="tf_pkg",
    executable="tf_listener"
  )
  sensor_node = Node(
    package="tf_pkg",
    executable="sensor_node"
  )

  # Node for Foxglove bridge connection
  foxglove_bridge_node = Node(
    package="foxglove_bridge",
    executable="foxglove_bridge"
  )

  # Launch Foxglove to monitor data
  foxglove_studio = ExecuteProcess(cmd=["foxglove-studio"])

  # Add nodes and process to the LaunchDescription list
  ld = [arm_frame_publisher,
        sensor_frame_publisher,
        tf_broadcaster,
        tf_listener,
        sensor_node,
        foxglove_studio,
        foxglove_bridge_node]

  return LaunchDescription(ld)
Add the following lines in the CMakeLists.txt:
install(DIRECTORY launch
DESTINATION share/${PROJECT_NAME})
Compile your package with $ colcon build --symlink-install.
Now you can start all nodes, the Foxglove bridge connection, and Foxglove with a single command.
Stay in touch
By leveraging ROS 2 transforms and the tf2 library, you can easily integrate your robots’ sensors and actuators to work better together.
For a reference to all the code covered in this post, check out our foxglove/tutorials GitHub repo. And as always, feel free to reach out to us directly in our Discord community to request a topic for the next tutorial!