Downloading Debian packages to set up ROS on your Linux machine


This tutorial will focus on installing Noetic Ninjemys, the latest LTS release for ROS 1, on Ubuntu Focal.
Though it’s possible to install ROS 1 from source, the easiest way to get ROS running on your Ubuntu machine is to install its corresponding Debian packages using apt, a command line utility for installing and managing packages on Linux distributions.
In this tutorial, we’ll walk you through installing the Debian packages for ROS 1 Noetic Ninjemys on Ubuntu Focal (20.04.4 LTS). If you are on Ubuntu Jammy (22.04 LTS), the latest LTS release, you can opt for a ROS 2 installation instead – both Rolling Ridley and Humble Hawksbill can run on Ubuntu Jammy.
Before installing anything, you’ll need to make sure your system locale supports UTF-8. Locale issues can cause unexpected problems further down the line, when using various ROS tools and libraries.
Run $ locale in a terminal window to view your currently installed locale – if UTF-8 appears in the listed output, you’re all set!
Otherwise, you'll need to set up your locale in one of two ways – choose a locale on your system or generate a new one.
$ locale -a # on system with UTF-8 locales
  C
  C.UTF-8
  de_AT.utf8
  de_BE.utf8
  de_CH.utf8
  en_US.utf8
  ...
  POSIX
language-bash
If your system doesn’t have any UTF-8 locales set up already, generate the desired locale yourself:
$ locale -a # on system without UTF-8 locales
  C
  POSIX

$ sudo apt update && sudo apt install locales
$ sudo locale-gen en_US.UTF-8

$ locale -a
  C
  en_US.UTF-8 # newly generated locale
  POSIX
language-bash
Finally, update your system with your desired option (e.g. en_US.UTF-8):
$ sudo update-locale LC_ALL=en_US.UTF-8 LANG=en_US.UTF-8
$ export LANG=en_US.UTF-8
language-bash
Open a new terminal window, and run $ locale again to verify that your system has been successfully updated.
Ubuntu programs are stored in repositories that make installing new software easy and secure. Ubuntu’s four main repositories are as follows:
For the purposes of installing ROS, we need to enable the Ubuntu Universe, Restricted, and Multiverse repositories:
$ sudo apt install software-properties-common
$ sudo add-apt-repository universe
$ sudo add-apt-repository restricted
$ sudo add-apt-repository multiverse
language-bash
Now you can set up your sources to accept software from packages.ros.org and add the PGP key provided by ROS:
$ sudo sh -c 'echo "deb http://packages.ros.org/ros/ubuntu $(lsb_release -sc) main" > /etc/apt/sources.list.d/ros-latest.list'
$ curl -s https://raw.githubusercontent.com/ros/rosdistro/master/ros.asc | sudo apt-key add -
language-bash
Install your ROS 1 Noetic desktop setup with the following commands:
$ sudo apt update # update your apt repo caches
$ sudo apt install ros-noetic-desktop-full
language-bash
This will install a few different components like the core ROS libraries, developer tools like RViz, and a variety of 2D/3D simulators and perception packages.
To install an additional ROS package separately, you can follow the pattern of $ sudo apt install ros-noetic-PACKAGE:
$ apt search ros-noetic # see available packages
$ sudo apt install ros-noetic-slam-gmapping
language-bash
Check out the official REP for a full breakdown of the ROS 1 packages that are included in each distribution (i.e. core, base, desktop, desktop-full).
To create and manage your own ROS workspaces, you'll need to install a few extra dependencies:
rosdep – Installs system dependencies for source you want to compile and runs some core ROS componentsrosinstall – Downloads source trees for ROS packagesrosinstall-generator – Generates rosinstall files with information about repositories containing ROS packageswstool – Maintains a workspace of projects from multiple version control systemsbuild-essential – Links to packages crucial to compiling software$ sudo apt install python3-rosdep python3-rosinstall python3-rosinstall-generator python3-wstool build-essential
$ sudo rosdep init # initializes rosdep
$ rosdep update
language-bash
Typically, you would need to source your setup file every time you open a terminal to use ROS:
$ source /opt/ros/noetic/setup.bash
language-bash
To save yourself the time, you can automatically trigger this step every time you launch a new shell. Run the following commands if you’re using a bash shell:
echo "source /opt/ros/noetic/setup.bash" >> ~/.bashrc
source ~/.bashrc
language-bash
Run the following commands if you’re using a zsh shell:
echo "source /opt/ros/noetic/setup.zsh" >> ~/.zshrc
source ~/.zshrc
language-bash
Continue with the official ROS 1 tutorials.
To uninstall ROS 1, remove the repository from your system completely:
$ sudo apt-get remove ros-noetic
language-bash
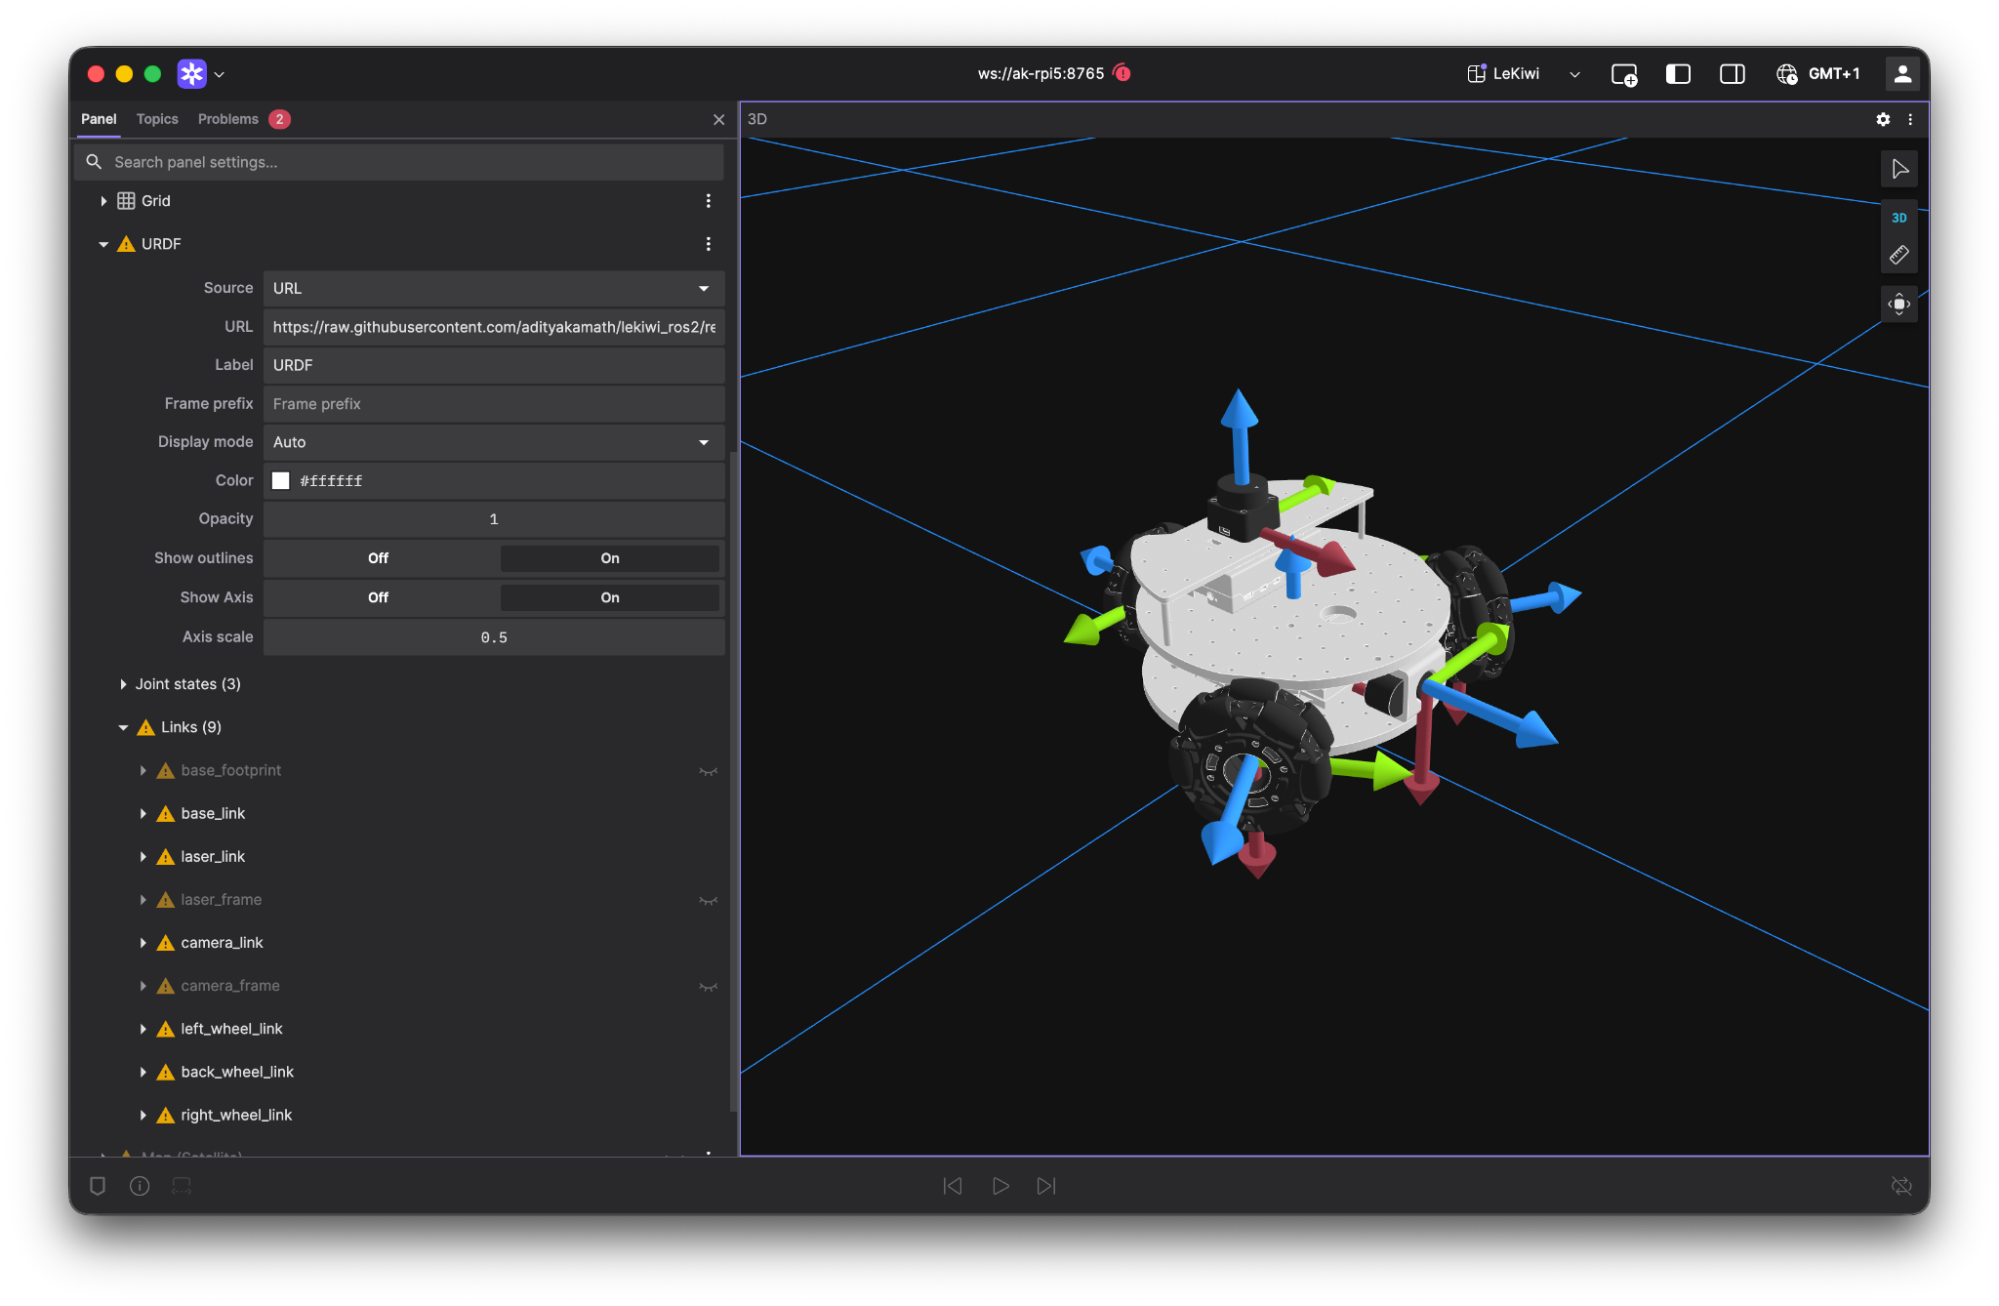
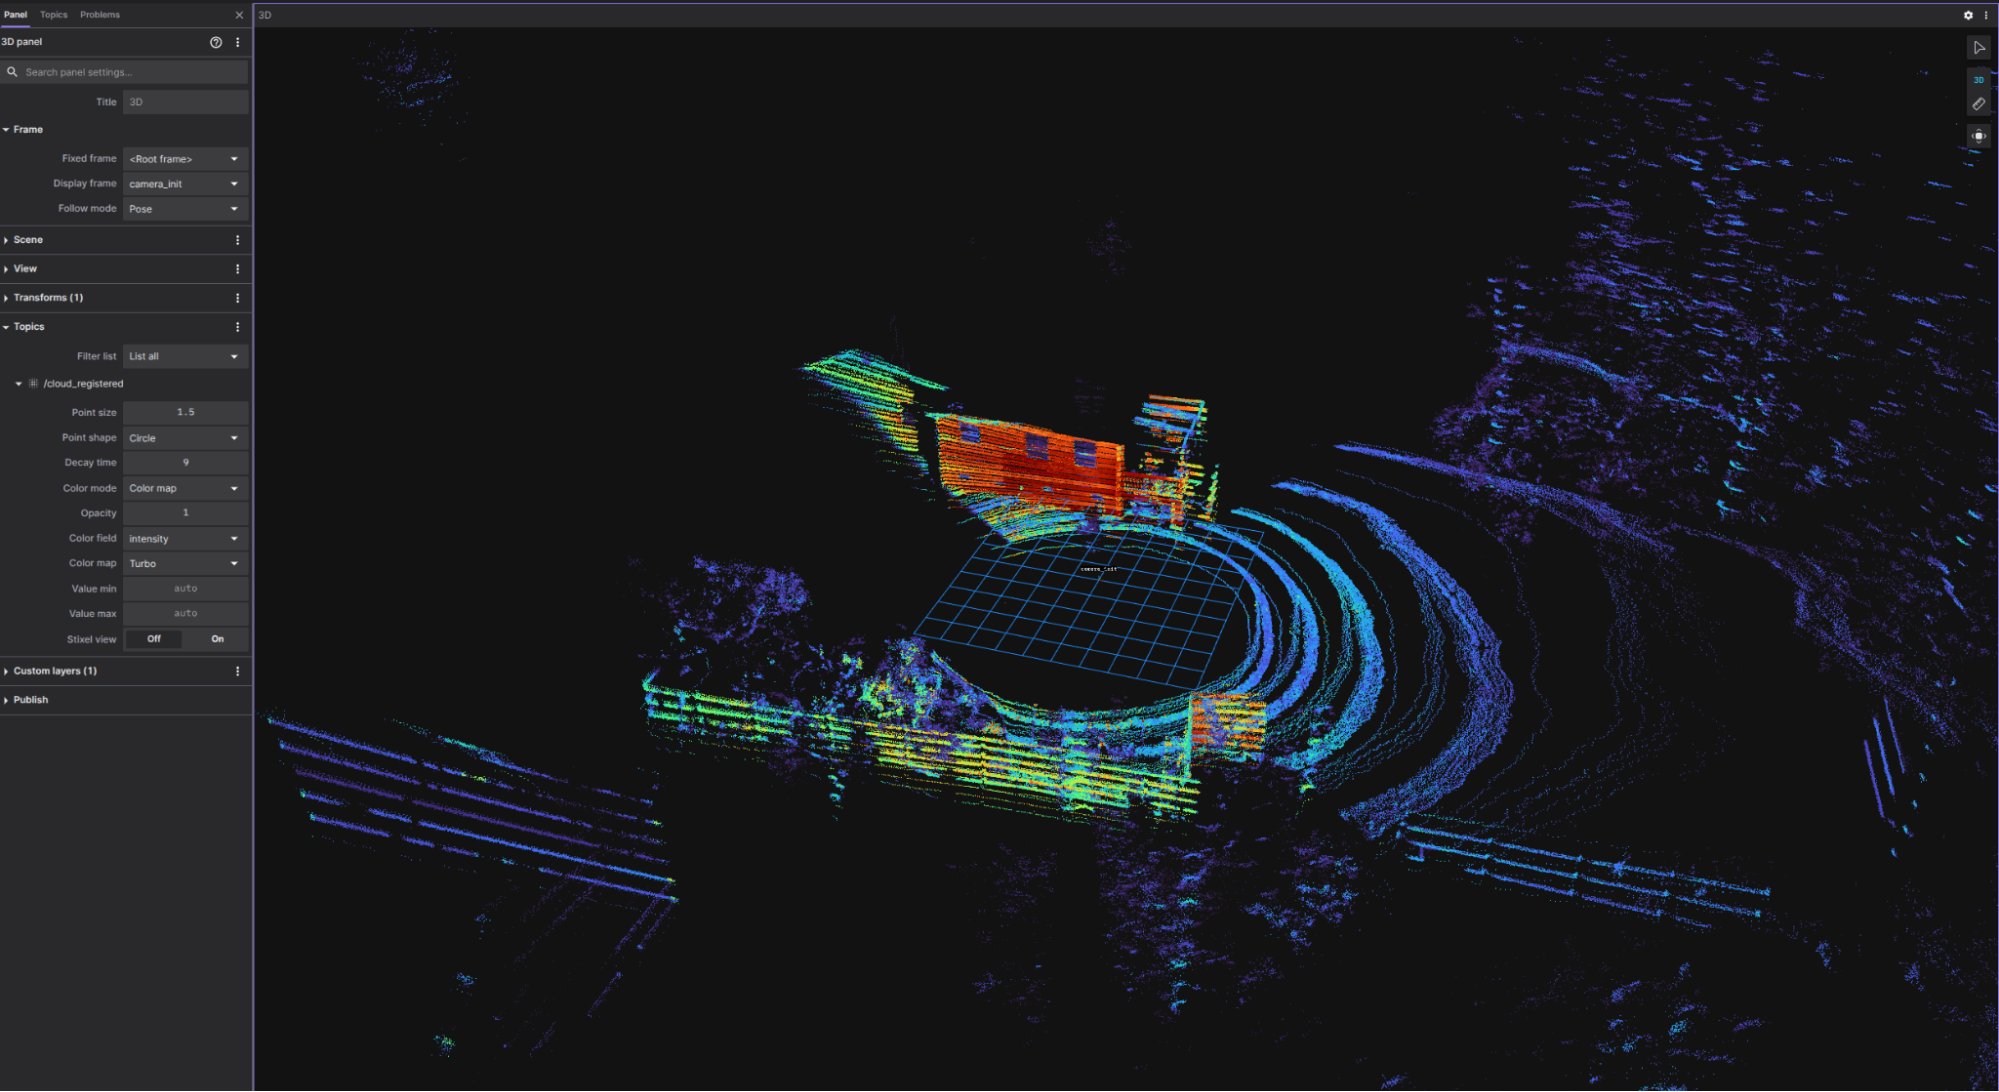
Once you’ve gotten the lay of the land and started recording your robots’ data, you’ll need to start visualizing your data to understand what’s going on under the hood of your robots.
Your ROS .bag files can be imported directly into Foxglove, so your whole team can collaborate on organizing and tagging your data:

They can also be dragged-and-dropped into Foxglove for instant rich visualizations. Load up your data to view camera images, display 3D markers, review log messages, and more:

Join our Discord community to ask questions and learn more.
.svg)