
In our previous posts, we’ve talked about how ROS 1 nodes can leverage different ways of communicating with each other. They can use topics to publish continuous communication streams, or use services and actions to make individual requests.
ROS 1 parameters are slightly different from these concepts – rather than being a way for nodes to communicate, they are a way to configure your nodes so that they can have slightly different behaviors when they launch in different contexts.
In this tutorial, we will cover when and why you would use ROS 1 parameters – as well as how you can read and set parameter values using both YAML configuration files and CLI commands.
How ROS 1 parameters work
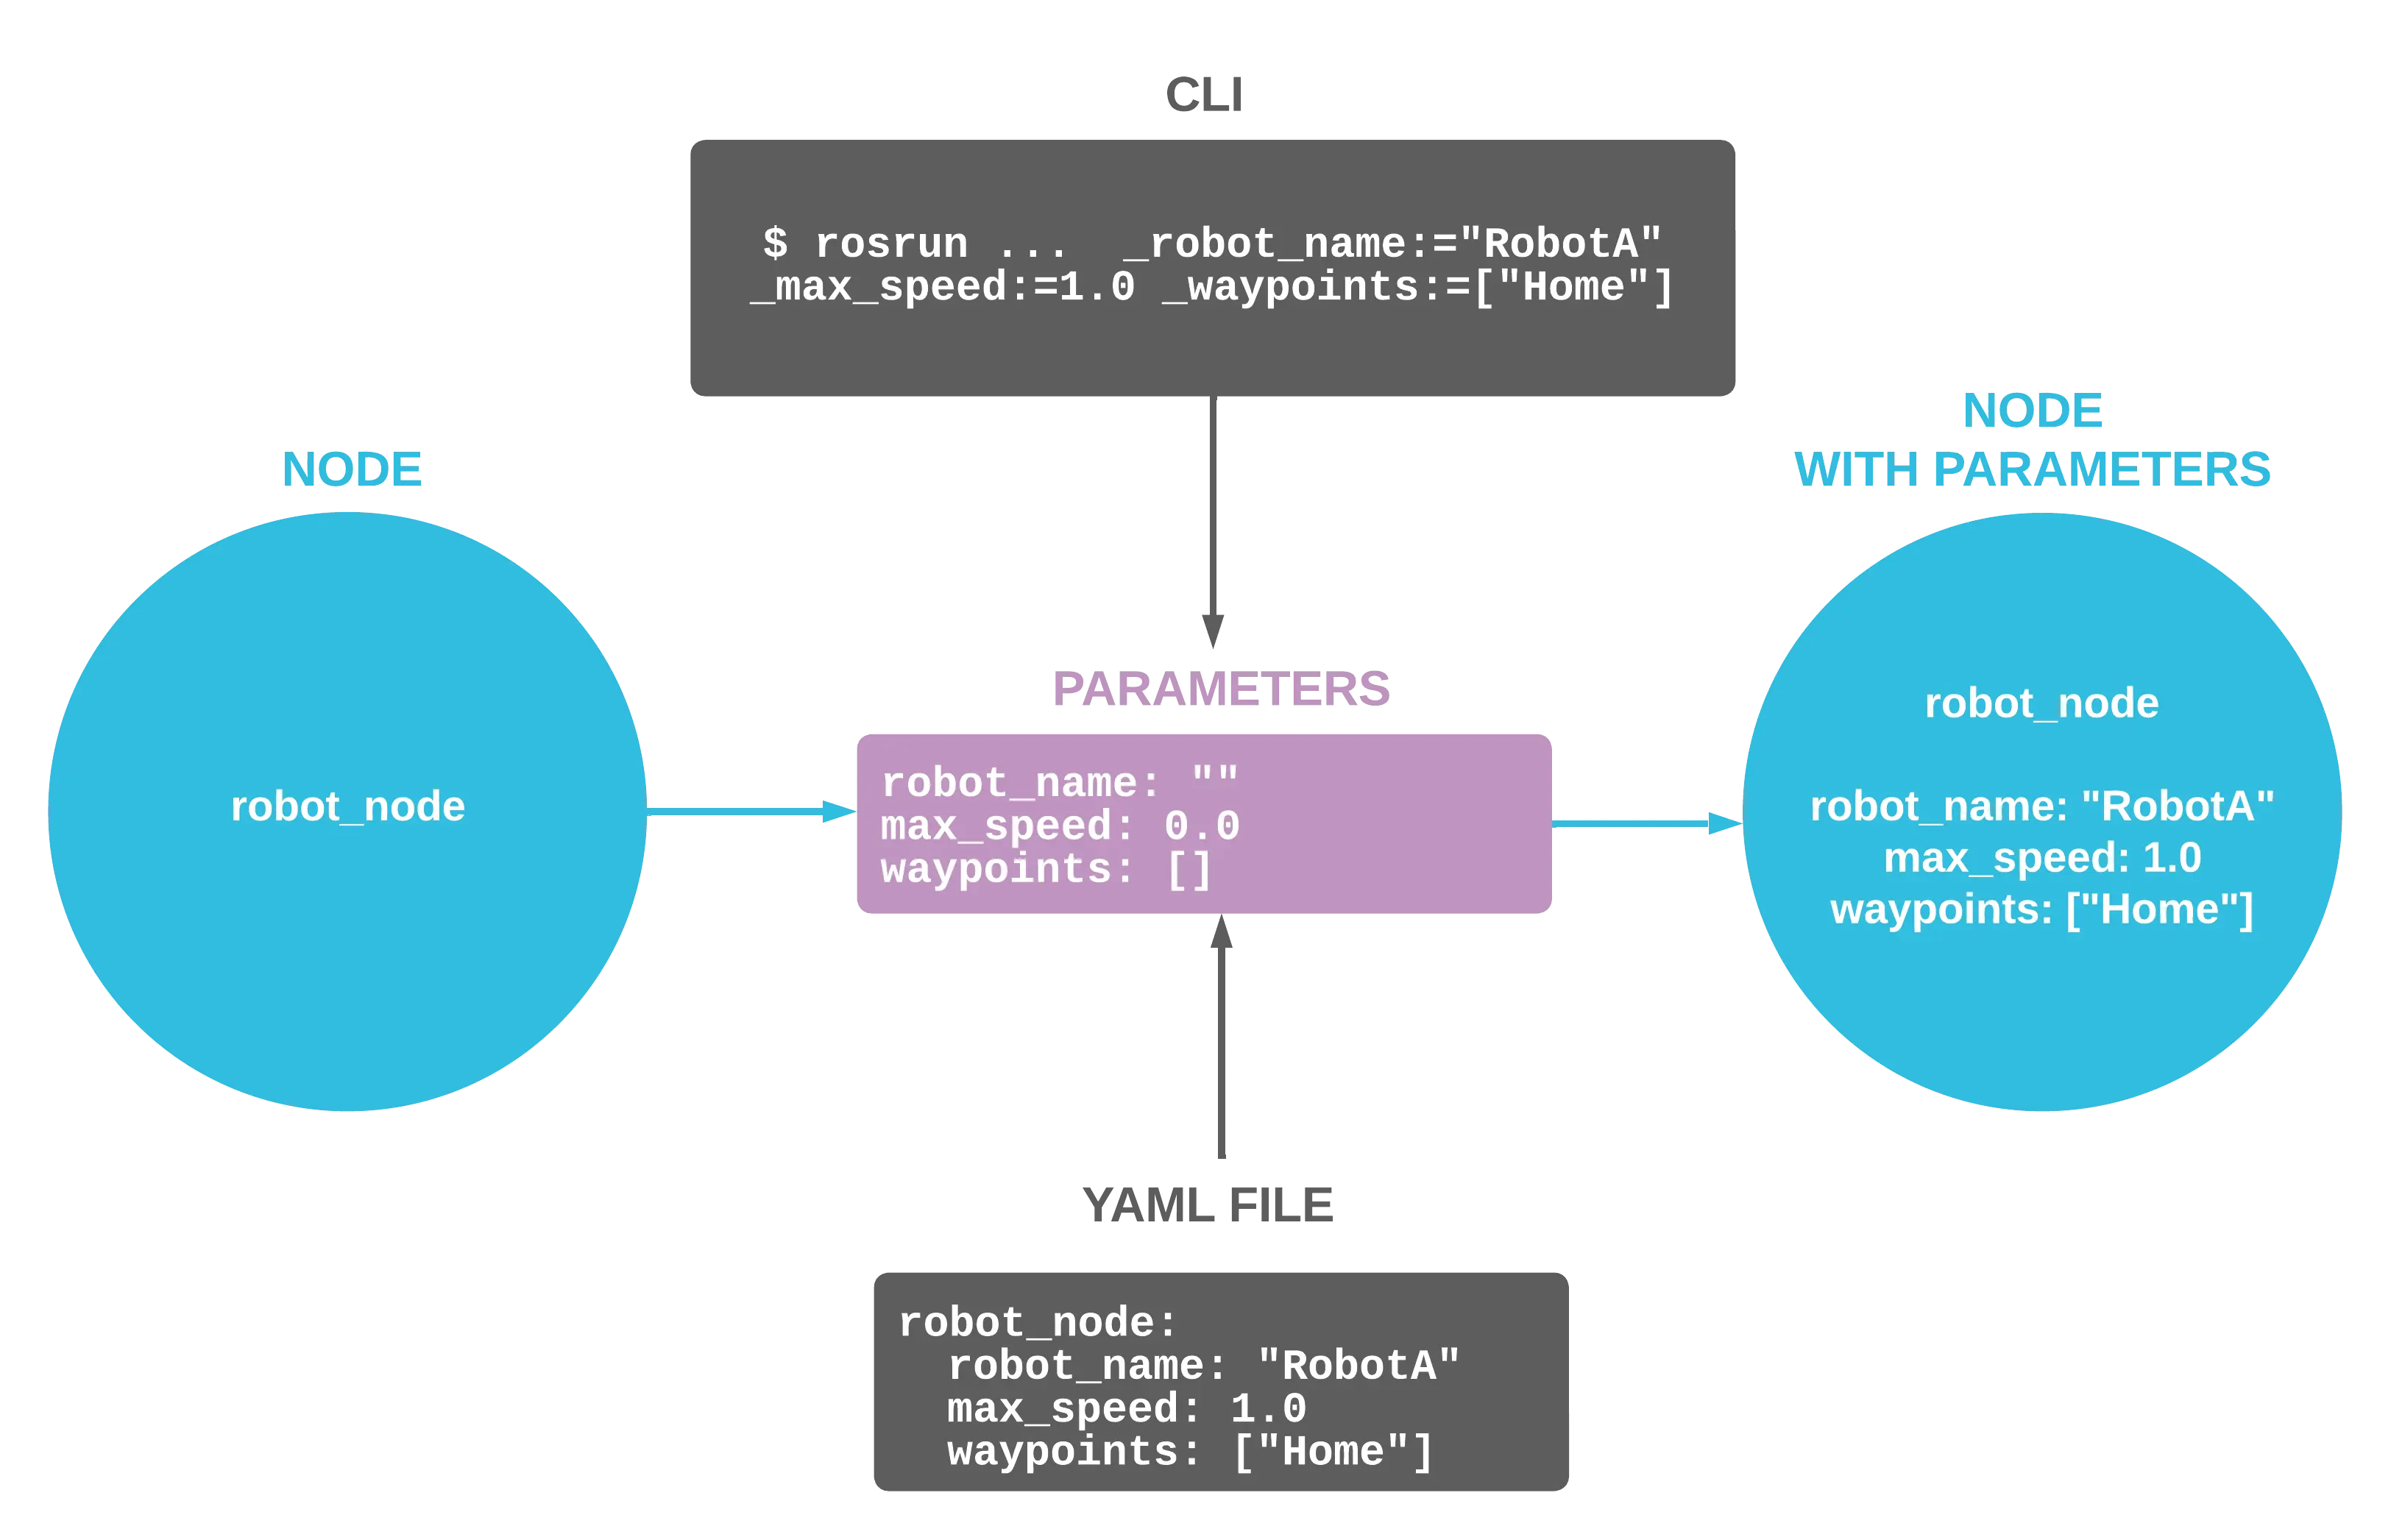
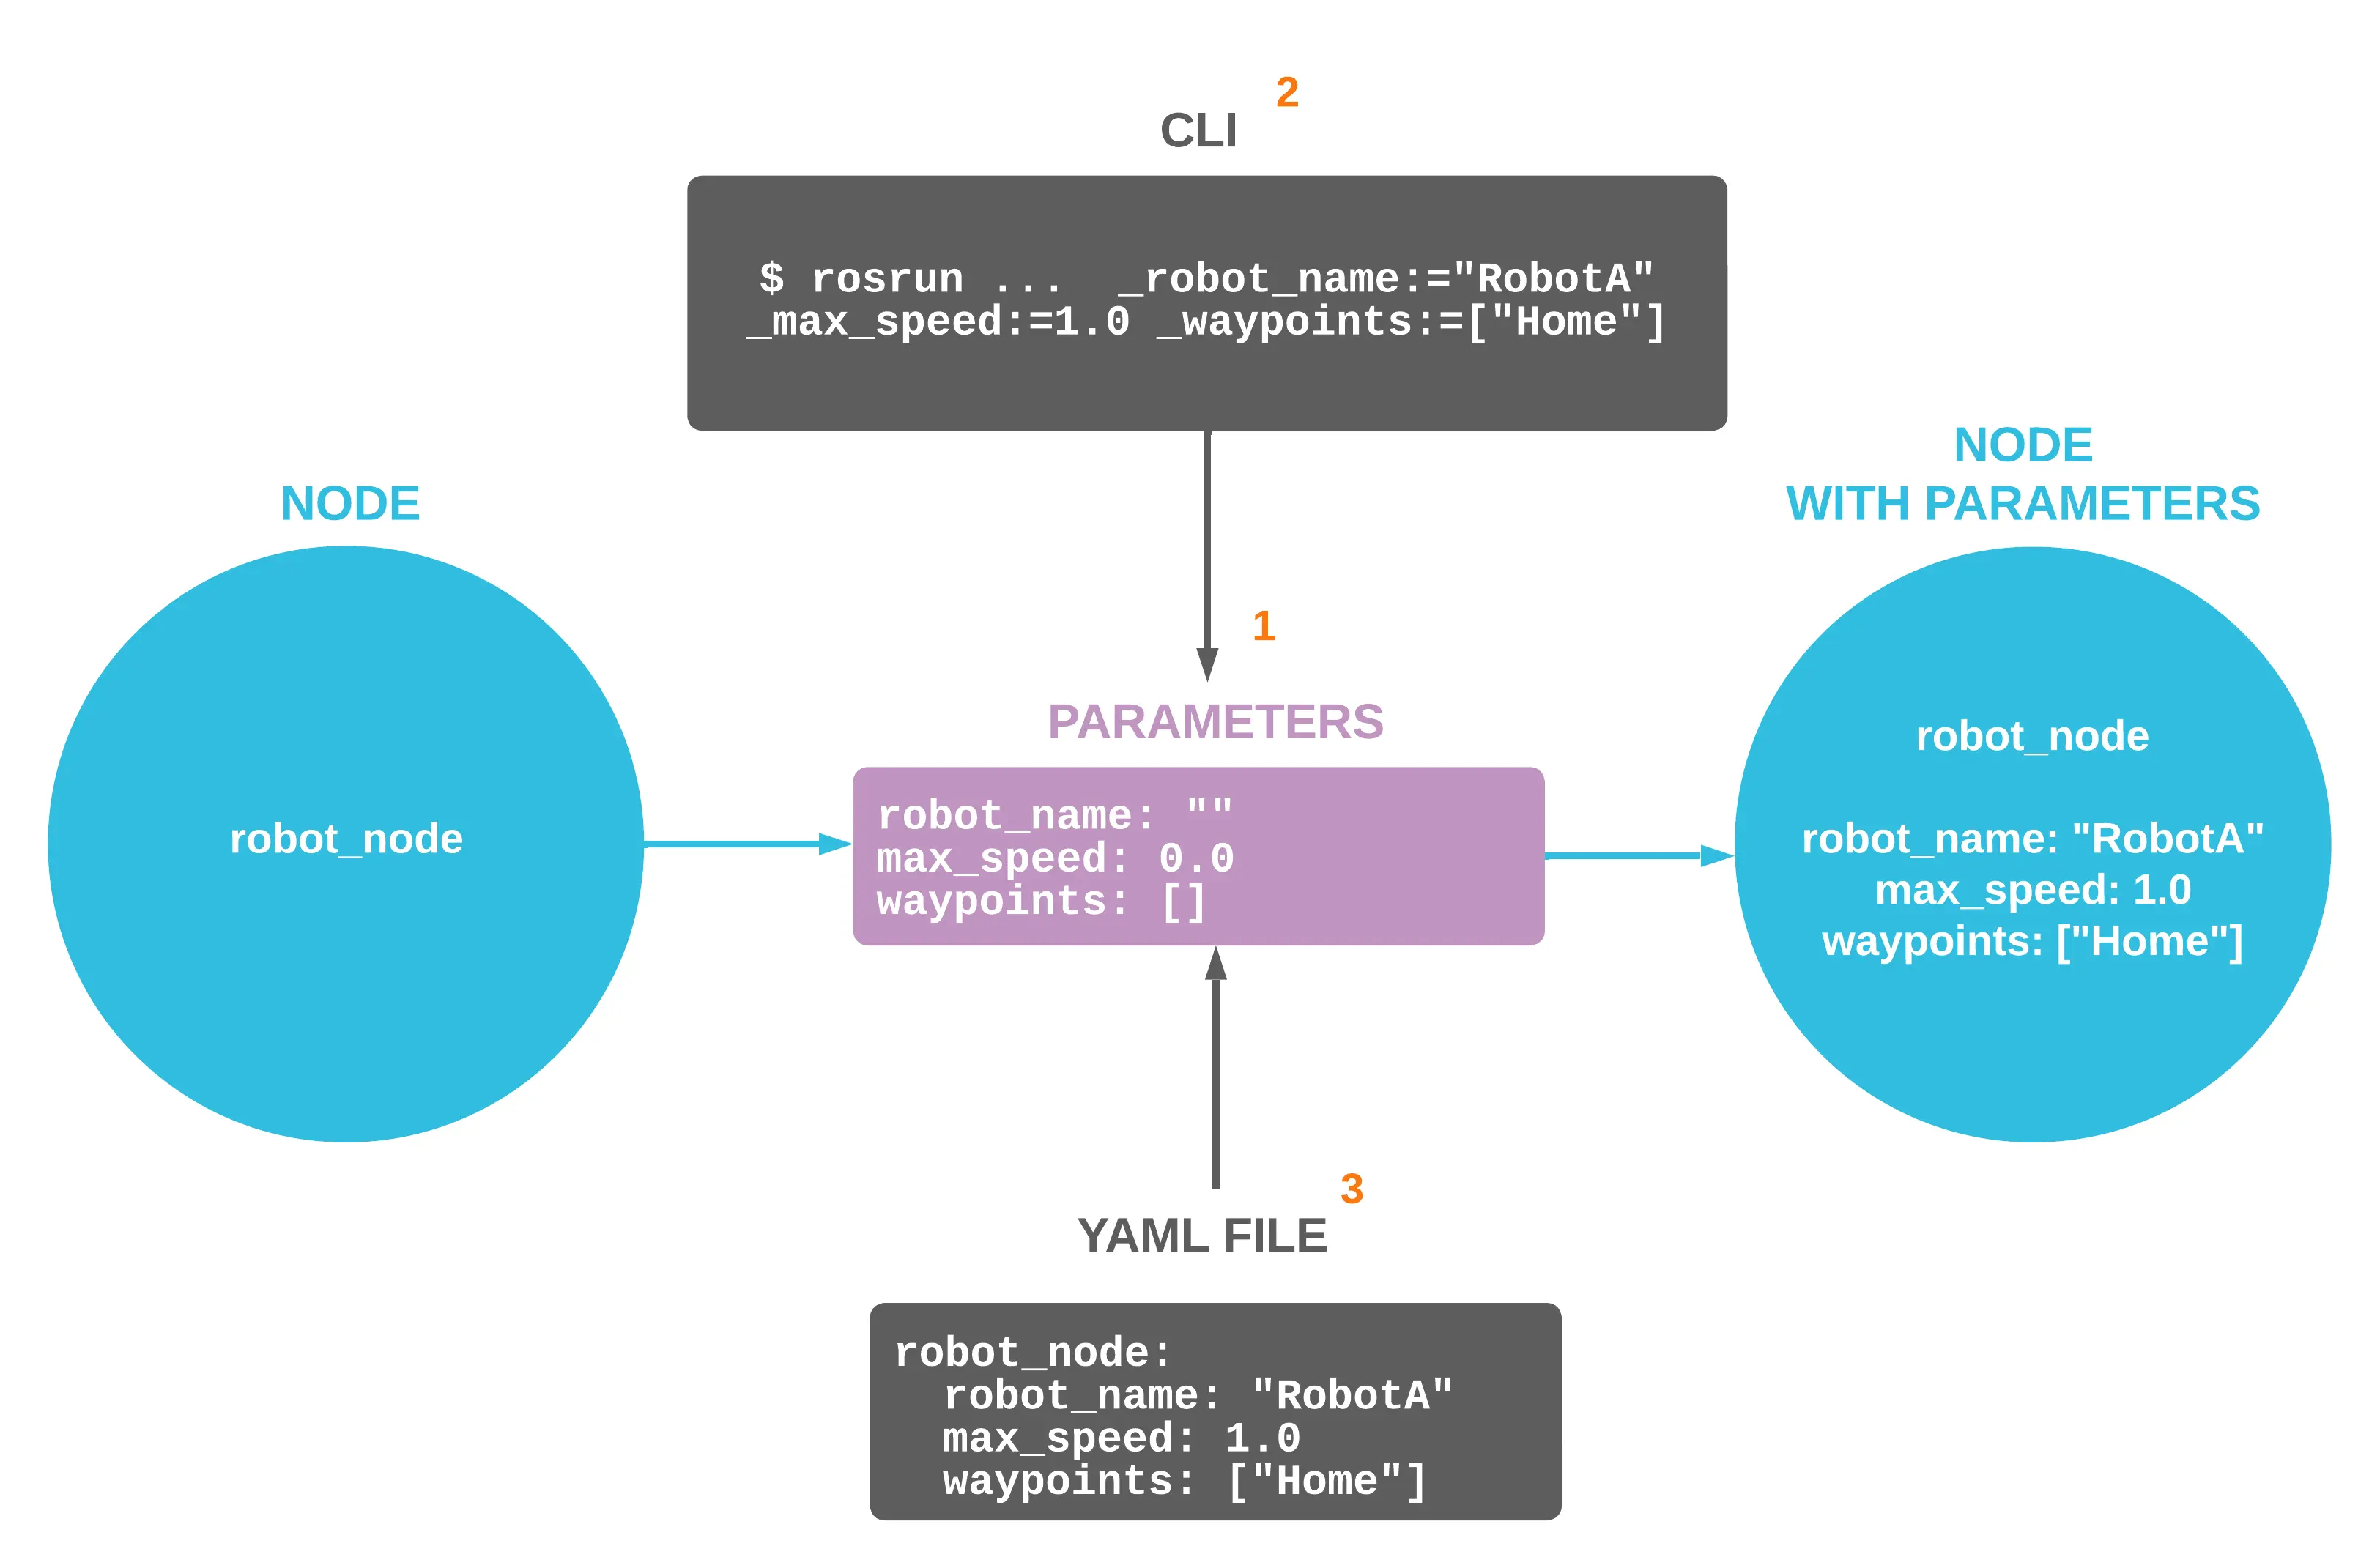
ROS 1 nodes first declare the parameters they can accept (1), then read the parameter values passed to them during startup – via the command line interface (2) or a YAML configuration file (3) – to determine their behavior. Parameters can be integers, floating point numbers, booleans, string, or arrays of the previous types.
By setting different parameter values in different contexts, a node can modify its behavior to work in various scenarios. For example, a node that controls a robot’s speed can be configured with different speed limits, depending on whether the robot will be deployed.
When to use ROS 1 parameters
Let’s suppose you have two identical robots in two different warehouses. While their general responsibilities are the same – i.e. locating, loading, and moving inventory – these robots will have different names, move at different speeds, and navigate through different sets of waypoints. By using ROS 1 parameters, you can modify each robot’s internal variables to differentiate their behavior based on their home warehouse.
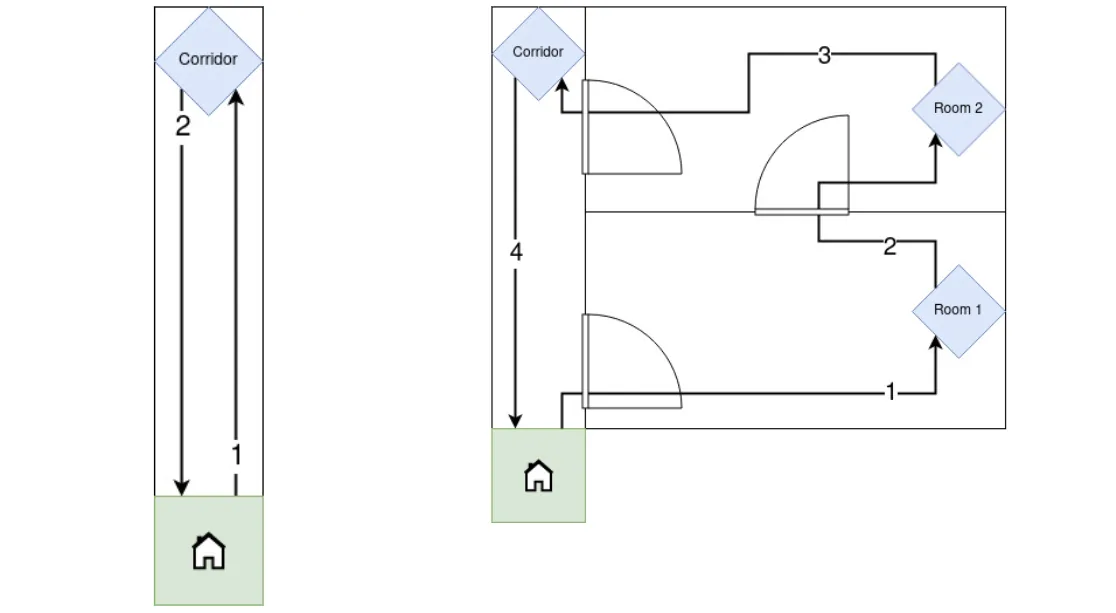
For this tutorial, let’s assume “RobotA” will be in Warehouse A and go back and forth in a corridor at a max speed of 1.4 m/s. “RobotB” will be in Warehouse B and navigate a more complicated set of waypoints at a max speed of 5.6 m/s.
To differentiate how our robots behave, we will define three parameters for them to read at startup – robot_name, max_speed and waypoints.
Creating a node with ROS 1 parameters
Let’s create our node, define its parameters, and read the parameters’ values from the command line interface.
Start by creating a new package in your ROS 1 workspace:
$ cd ros1_ws/src
$ catkin_create_pkg params_pkg roscpp
In the src/ folder of your package, create a new robot_node.cpp file with the following dependencies:
// Standard C++ API for interacting with ROS 1
#include <ros/ros.h>
// Useful namespace for duration
using namespace std::chrono_literals;
Declare a new RobotNode class that inherits from Node and contains our parameter values as its private attributes:
class RobotNode : ros::NodeHandle{
private:
 // Declare the node’s private attributes
 std::string robot_name_;
 float max_speed_, last_max_speed_;
 std::vector<std::string> waypoints_;
Next, add a constructor that searches and reads your robot_name, max_speed and waypoints parameters:
public:
 // Initialize class
 RobotNode()
 :NodeHandle("~") {
   // Auxiliary variable
   std::string param_name;
   // Search and get the parameters
   if (searchParam("robot_name", param_name)) {
     getParam(param_name, robot_name_);
   } else {
     ROS_WARN("Parameter 'robot_name' not defined");
   }
   if (searchParam("max_speed", param_name)) {
     getParam(param_name, max_speed_);
   } else {
     ROS_WARN("Parameter 'max_speed' not defined");
   }
   if (searchParam("waypoints", param_name)) {
     getParam(param_name, waypoints_);
   } else {
     ROS_WARN("Parameter 'waypoints' not defined");
   }
Now that we’ve gotten the parameters and stored them in the class attributes, we can now check the values passed:
cpp // Show the robot's attributes loaded with parameters ROS_INFO("Hi! I'm '%s'", robot_name_.c_str()); ROS_INFO("My max speed is %.1f", max_speed_); ROS_INFO("I will follow the waypoints:”); for (unsigned int i = 0; i < waypoints_.size(); i++) { ROS_INFO("%d) %s", i+1, waypoints_[i].c_str()); } }
Add a class destructor to avoid compilation problems:
cpp // Destructor of the node ~RobotNode() { ROS_INFO( "'%s' says bye!", robot_name_.c_str()); } };
Finally, create the main function to execute your node.
int main(int argc, char **argv){
 ros::init(argc, argv, "robot_node");
 auto robot_node = RobotNode();
 ros::spin();
 return 0;
}
Modify your CMakeLists.txt file to include your executable and install it in the project’s lib folder:
add_executable(robot_node src/robot_node.cpp)
target_link_libraries(robot_node
 ${catkin_LIBRARIES})
Compile the package with $ catkin_make and source your workspace.
Running your executable should give you the following output:
$ rosrun params_pkg robot_node
[WARN] [1662740359.575159103]: Parameter 'robot_name' not defined
[WARN] [1662740359.575834336]: Parameter 'max_speed' not defined
[WARN] [1662740359.576002548]: Parameter 'waypoints' not defined
[INFO] [1662740359.576012299]: Hi! I'm ''
[INFO] [1662740359.576020493]: My max speed is 0.0
[INFO] [1662740359.576025211]: I will follow the waypoints:
The parameter values are not yet defined. To pass the parameters to the node during startup, we have to add them with the argument _<param>:=<value>. You can pass as many parameters as you like:
$ rosrun params_pkg robot_node _robot_name:="RobotA" _max_speed:=1.0 _waypoints:=[“A","B"]
[INFO] [1662740547.308242716]: Hi! I'm 'RobotA'
[INFO] [1662740547.308740433]: My max speed is 1.0
[INFO] [1662740547.308750846]: I will follow the waypoints:
We have successfully configured our node with the first two parameters, but we see that the node has trouble correctly reading the third one’s array value.
Setting multiple parameter values with a YAML file
Now let’s imagine that we want to pass many more parameters to our node. It may get tiresome passing these values one by one via the CLI. To streamline this process, we can leverage YAML configuration files and launch files.
A YAML configuration file contains the parameters and their values in an easy-to-read and -write format. A single YAML file can be used to configure multiple nodes, each with their parameters. It can also help the node correctly read its parameters’ array values.
Let’s create a warehouseA.yaml file for our first robot:
/robot_node:
robot_name: 'RobotA'
max_speed: 1.4
waypoints: ['Home', 'Corridor', 'Home']
And a warehouseB.yaml file for our second robot:
/robot_node:
robot_name: 'RobotB'
max_speed: 5.6
waypoints: ['Home', 'Room 1', 'Room 2', 'Corridor', 'Home']
Store these YAML files in a newly created params/ folder in your package.
Let’s try running our node with our new warehouseA.yaml file. To do this, we need to write a launch file.
Create a new folder named launch/ in your package, and create a new warehouseA.launch file:
<?xml version="1.0"?>
<launch>
<rosparam command="load" file="$(find params_pkg)/params/warehouseA.yaml" />
<node pkg="params_pkg" type="robot_node" name="robot_node" output="screen"/>
</launch>
And a similar warehouseB.launch file:
<?xml version="1.0"?>
<launch>
<rosparam command="load" file="$(find params_pkg)/params/warehouseB.yaml" />
<node pkg="params_pkg" type="robot_node" name="robot_node" output="screen"/>
</launch>
We can now execute the first warehouseA.launch file with the following command:
$ roslaunch params_pkg warehouseA.launch
[INFO] [1662740884.098872668]: Hi! I'm 'RobotA'
[INFO] [1662740884.099268849]: My max speed is 1.4
[INFO] [1662740884.099278250]: I will follow the waypoints:
[INFO] [1662740884.099287895]: 1) Home
[INFO] [1662740884.099296864]: 2) Corridor
[INFO] [1662740884.099313796]: 3) Home
Running warehouseB.launch should give you a slightly different output:
$ roslaunch params_pkg warehouseB.launch
[INFO] [1664384182.368908478]: Hi! I'm 'RobotB'
[INFO] [1664384182.369613493]: My max speed is 5.6
[INFO] [1664384182.369627503]: I will follow the waypoints:
[INFO] [1664384182.369640798]: 1) Home
[INFO] [1664384182.369648028]: 2) Room 1
[INFO] [1664384182.369659449]: 3) Room 2
[INFO] [1664384182.369665759]: 4) Corridor
[INFO] [1664384182.369673717]: 5) Home
We have successfully passed different parameters to the same node using YAML files! These configuration files make parameters much easier to modify and read.
Using CLI commands and Foxglove to update and monitor parameters
A great way to monitor your parameters is to use Foxglove’s Parameters panel. Download the desktop app at foxglove.dev/download, and open a new ROS 1 connection:
Add a Parameters panel to your current layout, and then launch the warehouseA.launch file.
You should now see your parameters’ values being displayed in the panel. This is a great way to check your parameters without having to manually print them to stdout in your Terminal window.
We can also add add a timer to your node that checks periodically for a new max_speed parameter value. First, declare the timer as a private attribute:
private:
// ...

// Define a timer for periodic check
ros::Timer timer_;
Next, create the timer in your node’s constructor:
// Create a periodic timer of 1 second
timer_ = createTimer(ros::Duration(1), std::bind(&RobotNode::timerCallback, this));
Finally, add a timerCallback function to execute periodically:
// Timer function to show the changes in max_speed
void timerCallback() {
// Store current max speed
last_max_speed_ = max_speed_;
// Get the speed parameter again to check for changes
ros::param::get("/robot_node/max_speed", max_speed_);
// Print new max speed
if (max_speed_ != last_max_speed_) {
ROS_INFO("My NEW max speed is %.1f", max_speed_);
}
}
Compile your package and launch the node with Foxglove open. In a new terminal, run $ rosparam set /robot_node/max_speed 2.0 to change the max_speed parameter of the node.
The node will now print the updated max_speed, which you can also see in Foxglove.
Summary
ROS 1 parameters make the same node work in different situations, making it possible to reuse your code to add capabilities. We hope this tutorial helped you better understand how you might use parameters in the larger scheme of your robot’s architecture.
For a reference to all the code covered in this post, check out our foxglove/tutorials GitHub repo.
As always, feel free to reach out to the Foxglove team in our Discord community to ask questions, give us feedback, and request a topic for the next tutorial!