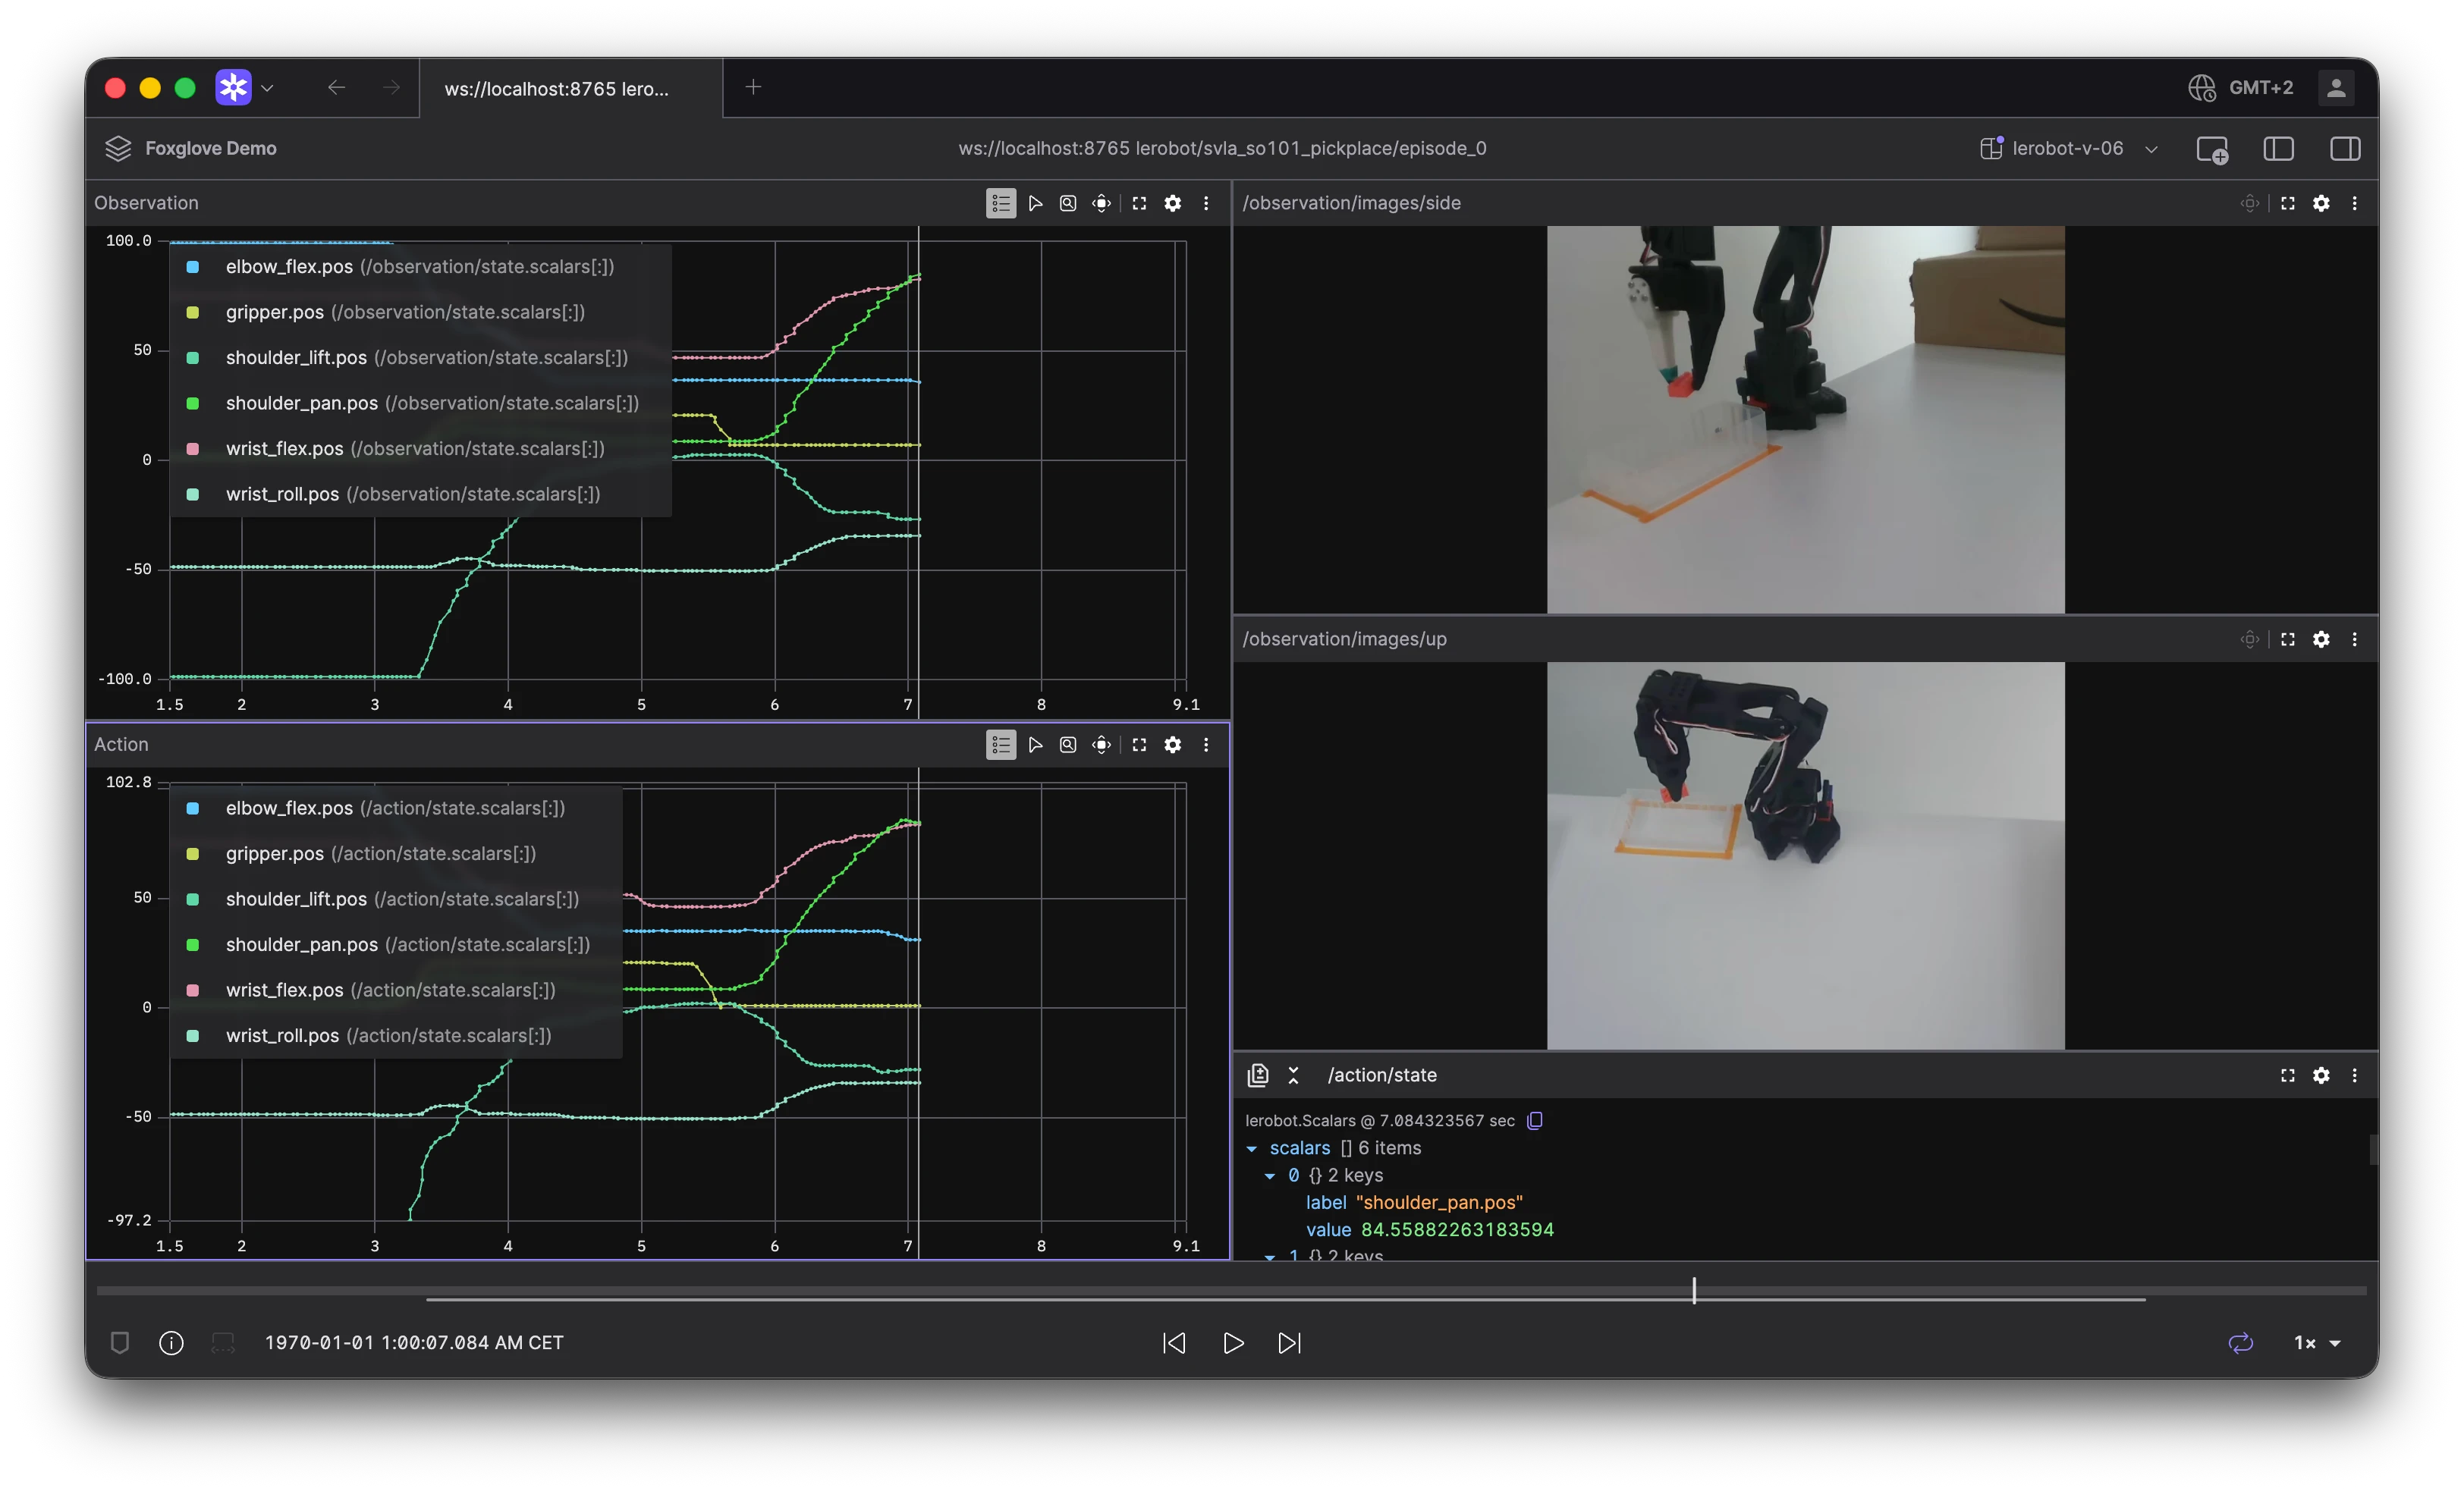
Visualizing LeRobot (SO-100) using Foxglove


Over 3,000 participants joined the LeRobot Worldwide Hackathon that took place on June 13th-15th. Our team members have been closely following this project, and we could not help but join-in on some fun prototyping activities.
SO-100 and SO-101 by RobotStudio are 3D-printable robot arms that are great entry-point hardware for working with LeRobot.
The Simulation directory contains a URDF file for both the SO-100 and SO-101 arm. In this tutorial, we assume an SO-100 follower arm but you can apply the same concepts to SO-101 or any other robot arm.
In this tutorial, we will create a Foxglove layout to show the state of the SO-100 arm.
Installing dependencies.
First, let’s make sure to install LeRobot following this guide. In this tutorial, we will be reusing the same miniconda environment as LeRobot. After installing LeRobot, make sure that the Feetech SDK is installed by running the following command in the root of the lerobot workspace:
pip install -e ".[feetech]"Next the Foxglove SDK:
pip install foxglove-sdkyourdpyf:
pip install yourdfpylastly, scipy:
pip install scipyURDF visualization.
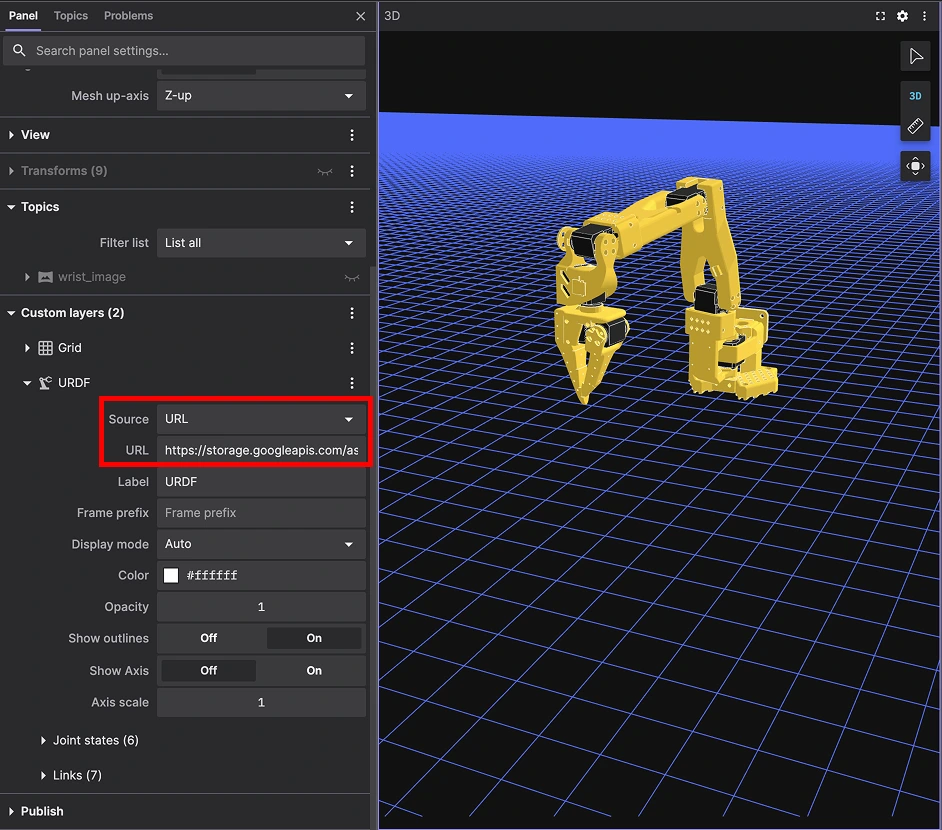
Let’s start by visualizing the urdf of our robot. First, launch Foxglove and open a connection to websocket url ws://localhost:8765. If there is no 3D panel in your default layout, add it, then go to Settings>Scene and make sure Mesh up-axis is set to Z-up. Note: if it’s not set to Z-up select it and restart Foxglove:
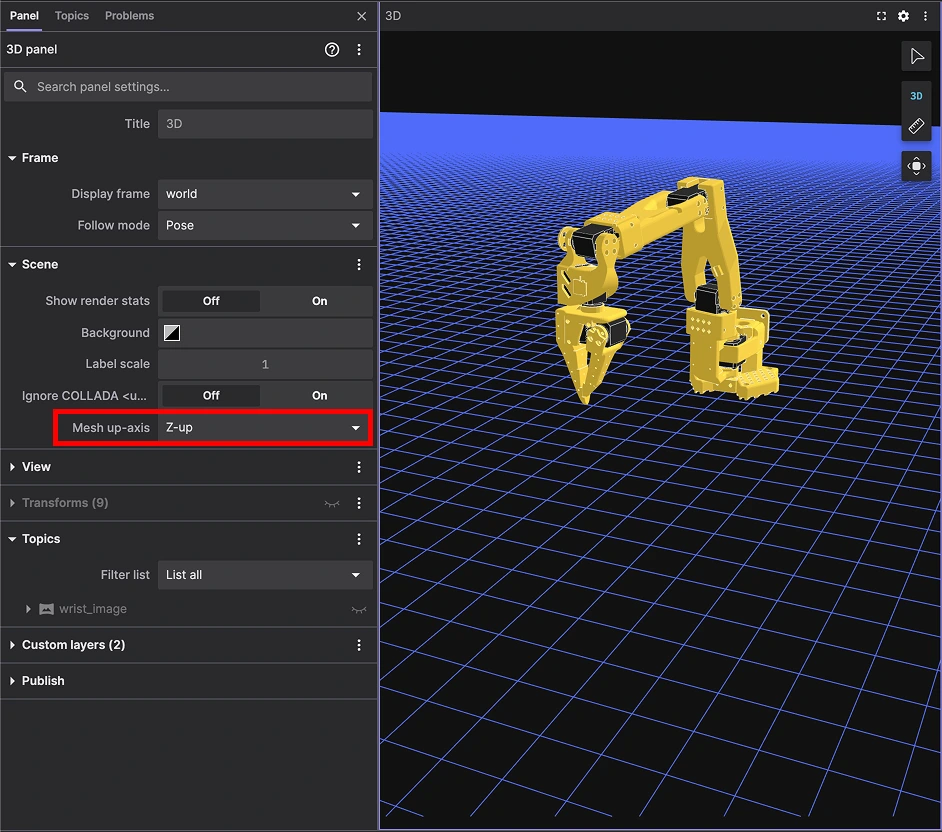
Once the mesh up-axis is set, go to Custom layers, and add a URDF layer using this URL to see the URDF of the robot in the 3D panel:
Note: if you are developing locally, and you would like to use an existing file, such as SO-101, you can run a local server as follows (requires npm):
npx http-server . -p 8000 --corsNow, let’s take the first leap and start publishing a single transform to change our robot visualization.
Let’s start by importing all dependencies:
import foxglove
import time
import logging
import numpy as np
import math
#import datetime

from lerobot.robots.so100_follower import SO100Follower, SO100FollowerConfig

from foxglove.schemas import (
    RawImage,
    FrameTransforms,
    FrameTransform,
    Vector3,
    Quaternion,
)
from foxglove.channels import RawImageChannel

from lerobot.cameras import ColorMode, Cv2Rotation
from lerobot.cameras.opencv import OpenCVCamera, OpenCVCameraConfig
from yourdfpy import URDF

from scipy.spatial.transform import Rotation as R
If you haven’t already, pull the official SO-100 Simulation directory to be on the same level as your script.
With all the imports working, let’s add some source code:
import foxglove
import time
import logging
import numpy as np
import math
#import datetime

from lerobot.robots.so100_follower import SO100Follower, SO100FollowerConfig

from foxglove.schemas import (
    RawImage,
    FrameTransforms,
    FrameTransform,
    Vector3,
    Quaternion,
)
from foxglove.channels import RawImageChannel

from lerobot.cameras import ColorMode, Cv2Rotation
from lerobot.cameras.opencv import OpenCVCamera, OpenCVCameraConfig
from yourdfpy import URDF

from scipy.spatial.transform import Rotation as R

WORLD_FRAME_ID = "world"
BASE_FRAME_ID = "base"
RATE_HZ = 30.0
URDF_FILE = "SO100/so100.urdf"

def main():
    foxglove.set_log_level(logging.INFO)

    # Load the URDF model of the robot
    robot = URDF.load(URDF_FILE)

    # Start the Foxglove server
    server = foxglove.start_server()

    # Define initial joint positions (all zeros for now)
    joint_positions = {}
    for joint in robot.robot.joints:
        joint_positions[joint.name] = 0.0

    print(f"Available joints: {list(joint_positions.keys())}")

    # Initialize time for sine movement
    start_time = time.time()

    try:
        while True:
            # Calculate elapsed time for sine movement
            elapsed_time = time.time() - start_time

            joint_positions["shoulder_pan"] = (math.pi / 2) * math.sin(2 * math.pi * elapsed_time / 4.0)

            # Compute forward kinematics with updated joint positions
            robot.update_cfg(joint_positions)

            transforms = []
            # World -> Base
            transforms.append(
                FrameTransform(
                    parent_frame_id=WORLD_FRAME_ID,
                    child_frame_id=BASE_FRAME_ID,
                    translation=Vector3(x=0.0, y=0.0, z=0.0),
                    rotation=Quaternion(x=0.0, y=0.0, z=0.0, w=1.0)
                )
            )
            # Per-joint transforms
            for joint in robot.robot.joints:
                parent_link = joint.parent
                child_link = joint.child
                T_local = robot.get_transform(frame_to=child_link, frame_from=parent_link)
                trans = T_local[:3, 3]
                quat = R.from_matrix(T_local[:3, :3]).as_quat()
                transforms.append(
                    FrameTransform(
                        parent_frame_id=parent_link,
                        child_frame_id=child_link,
                        translation=Vector3(x=float(trans[0]), y=float(trans[1]), z=float(trans[2])),
                        rotation=Quaternion(x=float(quat[0]), y=float(quat[1]), z=float(quat[2]), w=float(quat[3]))
                    )
                )

            foxglove.log(
                "/tf",
                FrameTransforms(transforms=transforms)
            )

            time.sleep(1.0 / RATE_HZ)

    except KeyboardInterrupt:
        print("\nShutting down Foxglove viewer...")
        server.stop()

if __name__ == "__main__":
    main()
Here are some highlights on what we introduced in the code:
- The line robot =
URDF.load(URDF_FILE)loads the URDF file and we will use it later to produce forward kinematics. server = foxglove.start_server()starts the Foxglove server.joint_positions["shoulder_pan"] = (math.pi / 2) * math.sin(2 * math.pi * elapsed_time / 4.0)assigns a value to the first joint position.- The loop for joint in
robot.joints: loops through all the joints fetched from the URDF and builds a TF structure. - Finally, the
foxglove.log("/tf", FrameTransforms(transforms=transforms)) logs our FrameTransforms for Foxglove to display it.
If you open Foxglove now, and establish a connection to the server you just started at the address ws://localhost:8765, you should see our robot arm moving:
Feel free to introduce a similar behavior to all other joints read from the URDF!
LeRobot API
Since we can visualize the state of our robot now, we can use LeRobot API to read the joint angles.
To proceed with the next step, you need to make sure your robot is calibrated. Note that 0 positions for the URDF differ from 0 positions convention in lerobot. To have an accurate representation of the robot state in our visualization, you will have to set 0 position in the calibration step that is close to the default URDF position of the robot when we are not publishing TF data.
Here are the code snippets we will add to send valid TF data:
ROBOT_NAME = "foxglove_so100" # The name of the robot given during lerobot calibration
ROBOT_PORT = "/dev/ttyUSB0"
The name of the robot is the name that you’ve provided during the calibration process. The ROBOT_PORT is the USB port your servo board is attached to (use lerobot find_ports.py to find it if needed).
config = SO100FollowerConfig(port=ROBOT_PORT, id=ROBOT_NAME, use_degrees=True)
follower = SO100Follower(config)
follower.connect(calibrate=False)
if not follower.is_connected:
    print("Failed to connect to SO-100 Follower arm. Please check the connection.")
    return
print("SO-100 Follower arm connected successfully.")
follower.bus.disable_torque() # Disable torque to be able to move the arm freely
Here, we instantiate the follower config. We disable the torque, because we want to be able to move the robot by hand.
Inside our while loop:
joint_positions["shoulder_pan"] = math.radians(obs.get("shoulder_pan.pos", 0.0)) * -1.
joint_positions["shoulder_lift"] = math.radians(obs.get("shoulder_lift.pos", 0.0))
joint_positions["elbow_flex"] = math.radians(obs.get("elbow_flex.pos", 0.0))
joint_positions["wrist_flex"] = math.radians(obs.get("wrist_flex.pos", 0.0))
joint_positions["wrist_roll"] = math.radians(obs.get("wrist_roll.pos", 0.0))
# Convert gripper percent (0-100) to radians (0 to pi)
joint_positions["gripper"] = ((obs.get("gripper.pos", 0.0) -10)/ 100.0) * math.pi

print(f"Joint positions: {joint_positions}")

# Compute forward kinematics with updated joint positions
fk_poses = robot.link_fk(cfg=joint_positions)
Here, we convert the joint angles we receive as the follower observations, and convert them to radians. Then we build the TF structure as we already did and publish the state of the robot which then cause our URDF shown in Foxglove to move as we are moving the robot arm:
Streaming camera images.
Now that we are able to stream joint data, let’s add a camera feed. We will start by declaring the wrist camera id:
WRIST_CAM_ID = 4;, where the ID is found using lerobot find_cameras.py script. Then, we will create a camera configuration and instantiation:
cam_config = OpenCVCameraConfig(
  (index_or_path = WRIST_CAM_ID),
  (fps = 30),
  (width = 640),
  (height = 480),
  (color_mode = ColorMode.RGB),
  (rotation = Cv2Rotation.NO_ROTATION)
);
camera = OpenCVCamera(cam_config);
camera.connect();
, making sure the fps, width and height are supported by the camera that we connected.
We will also create a Foxglove channel for our camera feed:
image_channel = RawImageChannel((topic = 'wrist_image'));With that piping, the only remaining thing to do is to capture the image frame, and convert it to Foxglove RawImage schema and log it on our newly created channel:
frame = camera.async_read((timeout_ms = 200));
img_msg = RawImage(
  (data = frame.tobytes()),
  (width = frame.shape[1]),
  (height = frame.shape[0]),
  (step = frame.shape[1] * 3),
  (encoding = 'rgb8')
);
image_channel.log(img_msg);
And with that, we can add an image panel in Foxglove and subscribe to our image topic:
You now know how you can leverage the Foxglove SDK to show SO-100 Arm state thanks to the LeRobot API. You will find the full source code for this tutorial in our tutorial repository.