Autonomous Navigation with LeKiwi — Part 2
Collision-protected teleop, waypoint patrols, and keepout zones with Nav2 and Foxglove
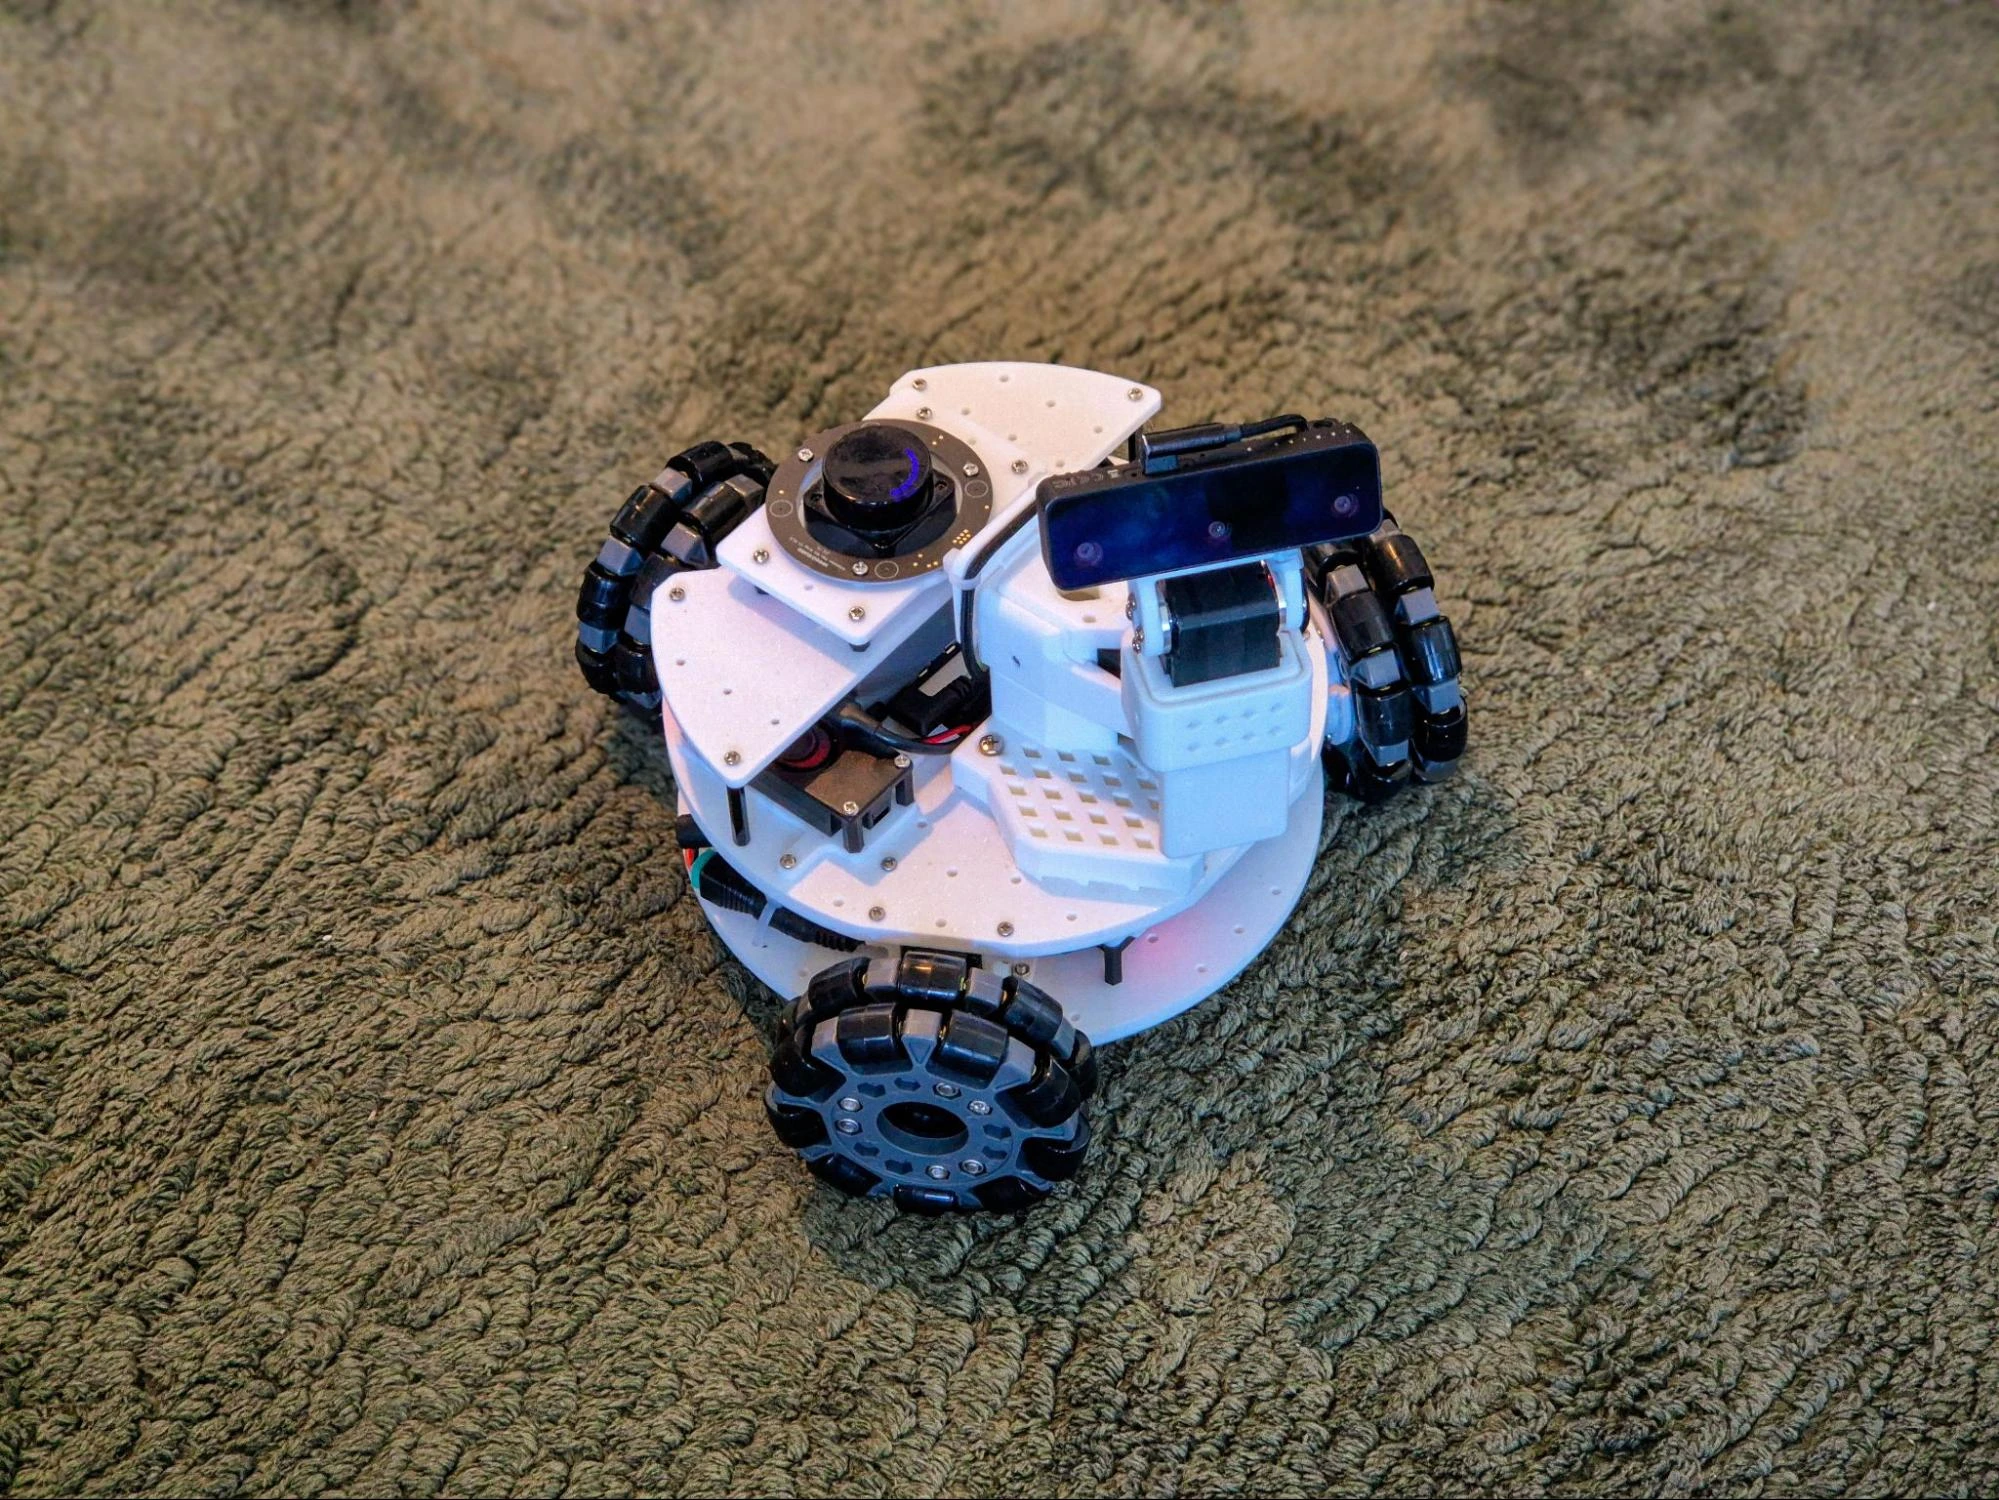

tl;dr As a follow-up to Autonomous Navigation with LeKiwi, I worked on three features in this post: I first rewired collision_monitor so that teloperation gets the same collision protection as autonomous mode with Nav2. Next, I built a waypoint recorder that lets the robot patrol a route of waypoints on its own - with controls to add waypoints and start/pause patrolling, straight from Foxglove. Finally, I added keepout and speed-limited zones to the map that Nav2 actually routes around or slows down in, respectively.
This is the next chapter in my ongoing series of building a ROS 2-powered autonomous mobile robot based on the LeKiwi platform. Last time, I got a simple Nav2 configuration running end-to-end - mapping, localization, and point-to-point navigation, all visualized on Foxglove’s 3D panel - good enough to navigate to single targets, but it left a few things unfinished.
The most glaring issue: LeKiwi’s autonomous mode with Nav2 had collision protection, but the moment I switched to teleoperation, that safety net was gone. I could drive it straight into an obstacle, and the robot would happily comply. Alongside a fix for this issue, this post also covers two other features: waypoint following/patrolling so the robot can loop a route without the need to manually provide a fresh goal each time, and keepout / speed-limited zones painted onto the map so that the robot can stay away or slow down in areas where it might get stuck.
As always, the work covered in this post lives in the lekiwi_ros2 GitHub repository, which includes the full ROS 2 stack implementation for the LeKiwi platform.
Assisted Teleop and Collision Protection
My robot has two driving modes: autonomous navigation using Nav2, and manual teleoperation, and I can switch between them using twist_switch_node, a custom script that I wrote. In autonomous mode, Nav2’s collision_monitor watches the LiDAR scan and stops the robot before a collision. This is a really useful safety feature that unfortunately does not exist in teleop mode - if I drive the robot manually into a wall, it will happily keep going until it hits the wall. I wanted to fix that.
My original idea was to use Nav2’s built-in AssistedTeleop behavior - a behavior_server plugin that forward-simulates a teleop velocity and scales it down before a collision. It looked like a pure config change at first, since my joystick already publishes to /cmd_vel_teleop, matching AssistedTeleop’s expected input topic. Digging deeper, I realized that this does not work with my two-mode setup because AssistedTeleop is a behavior that runs only while Nav2 is active — it’s designed to let you steer the robot manually during an ongoing Nav2 session, not to protect standalone teleop.
I wanted to keep teleop and autonomous modes completely separate, so I had to think of a different approach. So I looked into collision_monitor instead - it structurally does the same job as AssistedTeleop, just with a zone-based check (FootprintApproach) rather than forward simulation. My original Nav2 configuration (the recommended method) places it upstream of twist_switch_node, so it only ever sees Nav2’s own commands. I moved it downstream instead, so it works irrespective of which mode - teleop or Nav2 - is currently active. This means the teleop mode is now protected by the same collision monitor as autonomous navigation, and the autonomous mode is unaffected. The wiring change looks like this:
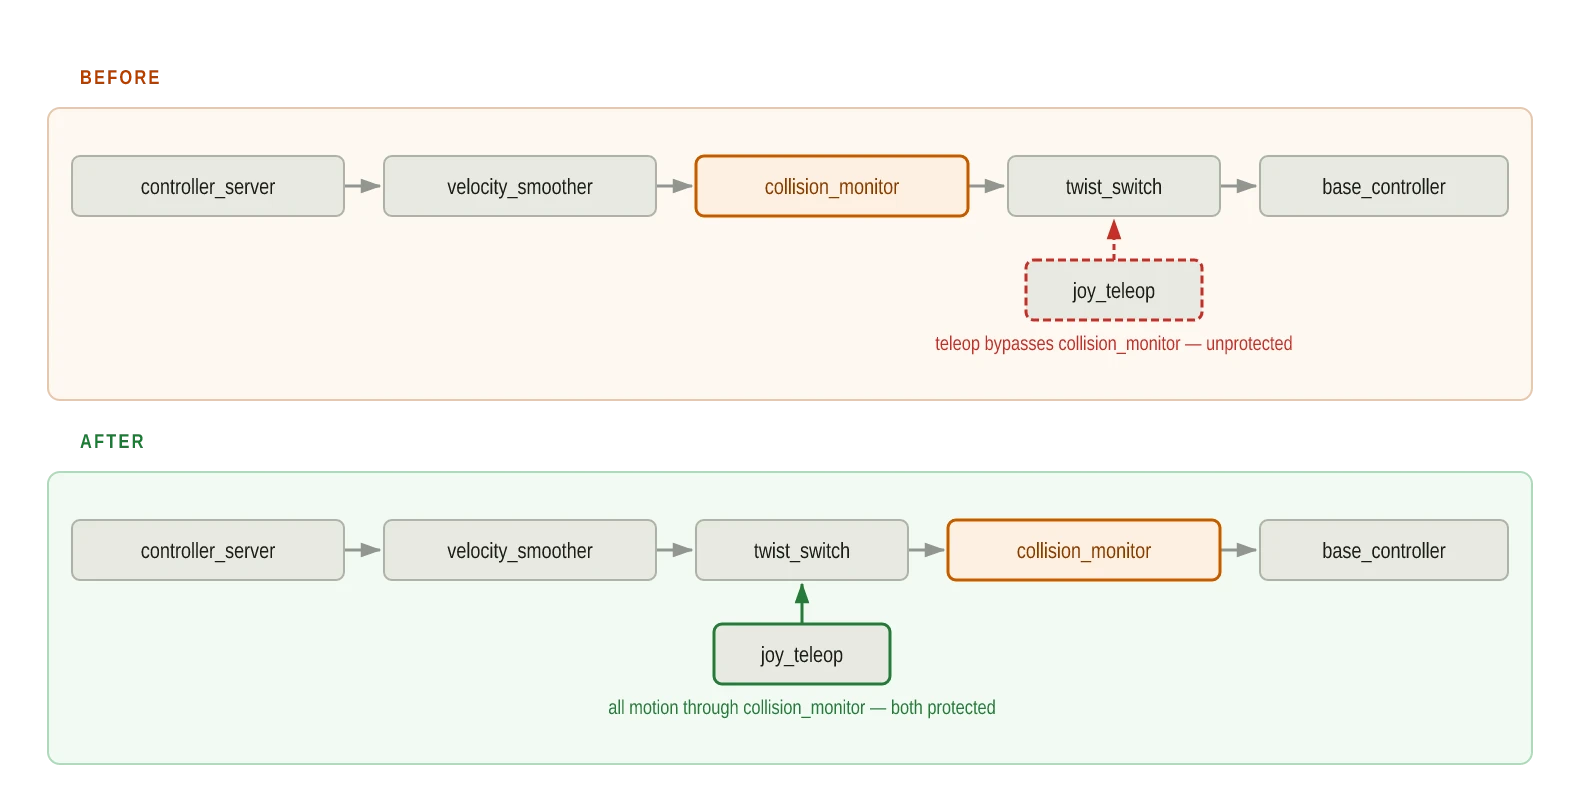
This was much simpler than making AssistedTeleop work in teleop, and it doesn’t interfere with autonomous navigation at all - zero new nodes, just collision_monitor rewired. The only downside is that FootprintApproach’s zone check is a bit more conservative than AssistedTeleop’s forward-simulation, so the robot may stop a little earlier than necessary, which, for the LeKiwi, is not an issue at all. As you can see in the video below, it works as expected - the robot slows down as it approaches an obstacle, eventually stopping before hitting it.
One issue came up during testing: I drove into a tight spot where collision_monitor stopped the robot, and then blocked every direction I tried on the joystick, leaving it completely stuck. To prevent this from happening again, I added a manual override: collision_toggle_node. This node sets collision_monitor’s FootprintApproach.enabled parameter to false when a preconfigured button is held down, and back to true when the button is released. It subscribes directly to /joy, with the button configured via a node parameter - R1 in my setup. Now, if I’m ever stuck like that again, I can just hold R1 to back away and release it to regain protection.
Waypoint Recording and Patrolling
In my previous Nav2 post, I was able to send the robot a single navigate_to_pose goal and watch it go there, but I had no way to make it work through a list of waypoints on its own. Each new target required a manual goal to be sent from Foxglove, which is tedious and not very autonomous. I wanted to be able to record a route of waypoints and have the robot patrol through them on its own.
Nav2 already ships nav2_waypoint_follower, a lifecycle node that drives the existing navigate_to_pose action once per waypoint in a loop - no new behavior tree required.
What it doesn’t ship is any convenient way to trigger it - the only interface is its FollowWaypoints action, which is callable only via an unwieldy ros2 action send_goal, with no direct way to trigger it from Foxglove. So I wrote waypoint_recorder_node, exposing three std_srvs/srv/SetBool services I can either bind to gamepad buttons via joy_teleop, or call from my Button extension on Foxglove. The three services are:
/record_waypoint: captures the robot’s current pose as a waypoint, published as avisualization_msgs/msg/MarkerArrayso the whole route shows up as arrows in Foxglove’s 3D panel/waypoint_follow: starts or resumes the patrol - a toggle, so a single button can alternate between starting/resuming and pausing the patrol/reset_waypoints: clears the route and all waypoints
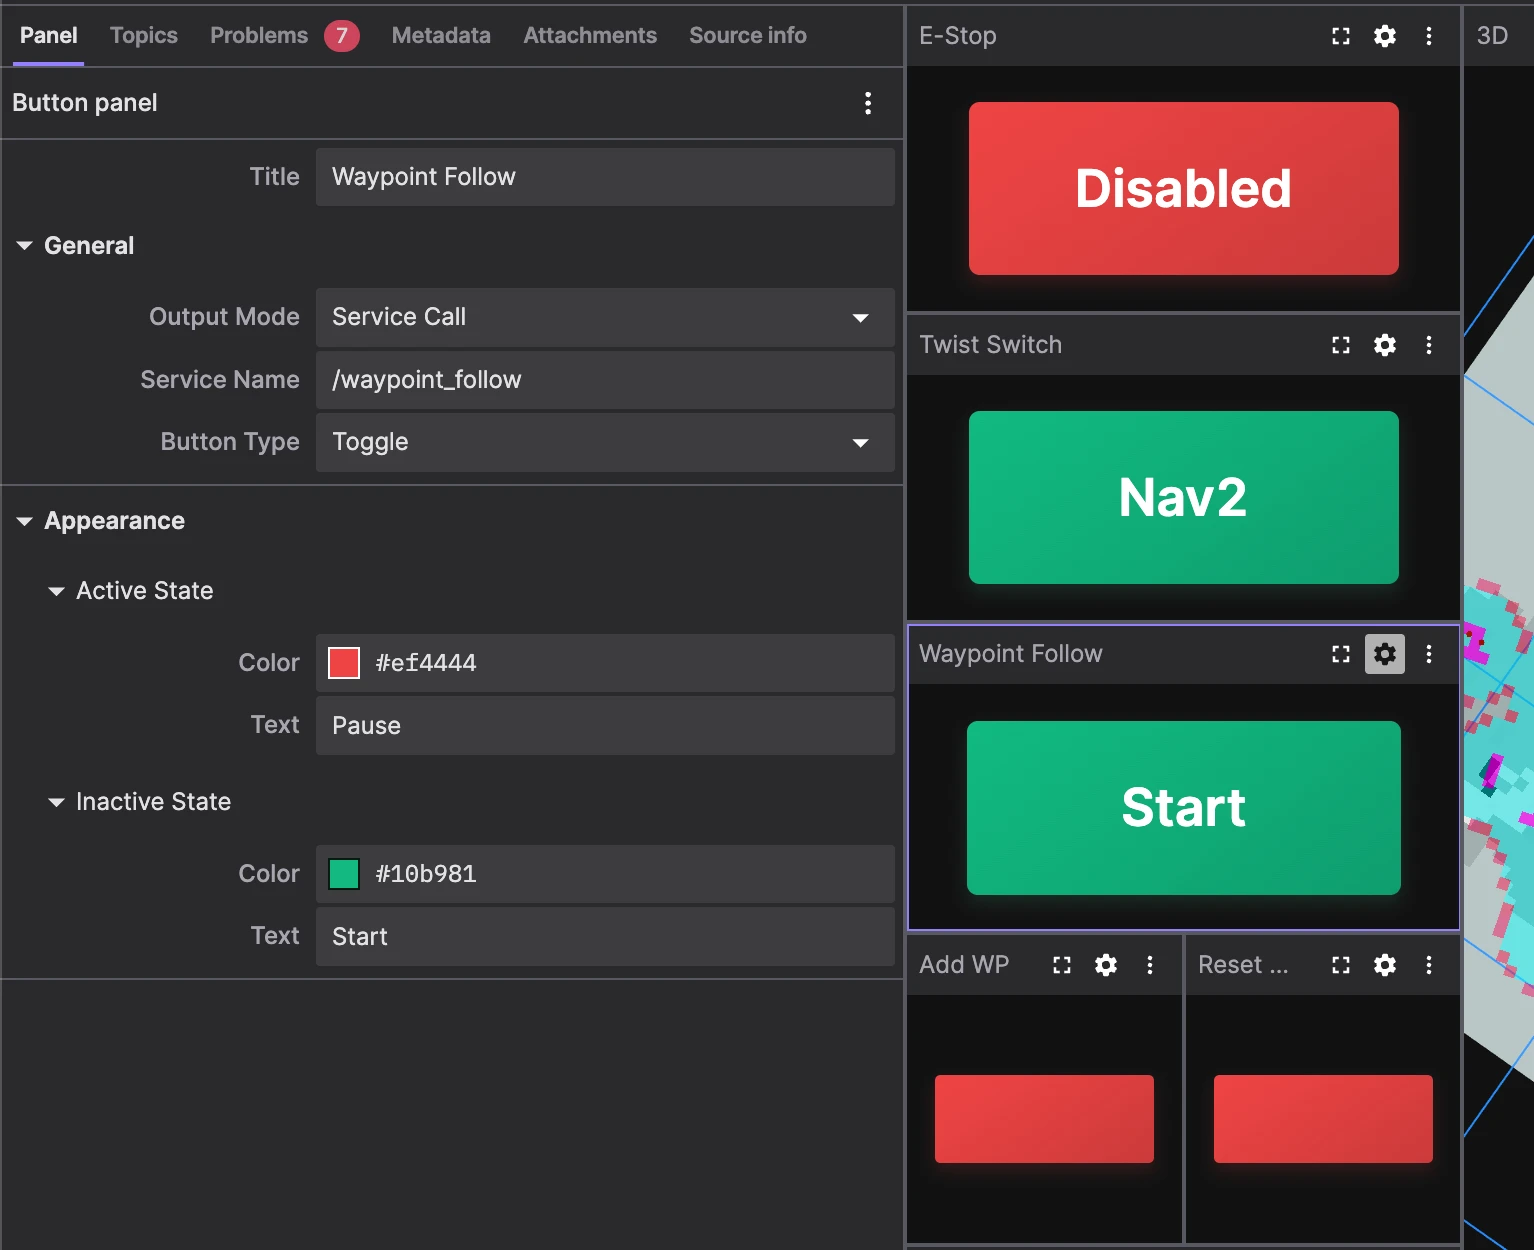
In this new node, the waypoints are stored as a vector of geometry_msgs/msg/PoseStamped and sent to nav2_waypoint_follower via its FollowWaypoints action. Since that’s an ordered list with a FollowWaypoints.Goal.goal_index, the patrol can pause and resume mid-route instead of always restarting from the beginning.
Another feature I added is the ability to send manual navigate_to_pose goals while a patrol is running. In this case, the patrol treats it as a detour rather than a failure - go to the commanded target, then carry on following the original patrol route. Another feature where knowing the goal index is advantageous.
The number_of_loops parameter controls how many times the patrol repeats - 0 (the default) loops forever, any positive number stops the patrol after exactly that many passes. I also implemented the ability to add new waypoints while a patrol is running - they queue up and join the route at the start of the next loop instead of splicing in immediately, which avoids preemption issues and keeps the robot from skipping waypoints.
I added two more features to make the patrol behavior more robust:
- Error Handling: an unreachable waypoint gets retried a bounded number of times before being dropped from the route entirely, so the patrol keeps going instead of stalling forever.
- Progress Reporting: the patrol’s current loop, current leg, ETA, and recovery count are published on
/patrol_diagnosticsas adiagnostic_msgs/msg/DiagnosticArraymessage, readable from Foxglove’s Diagnostics panel once configured to subscribe to/patrol_diagnostics, no custom message type needed.
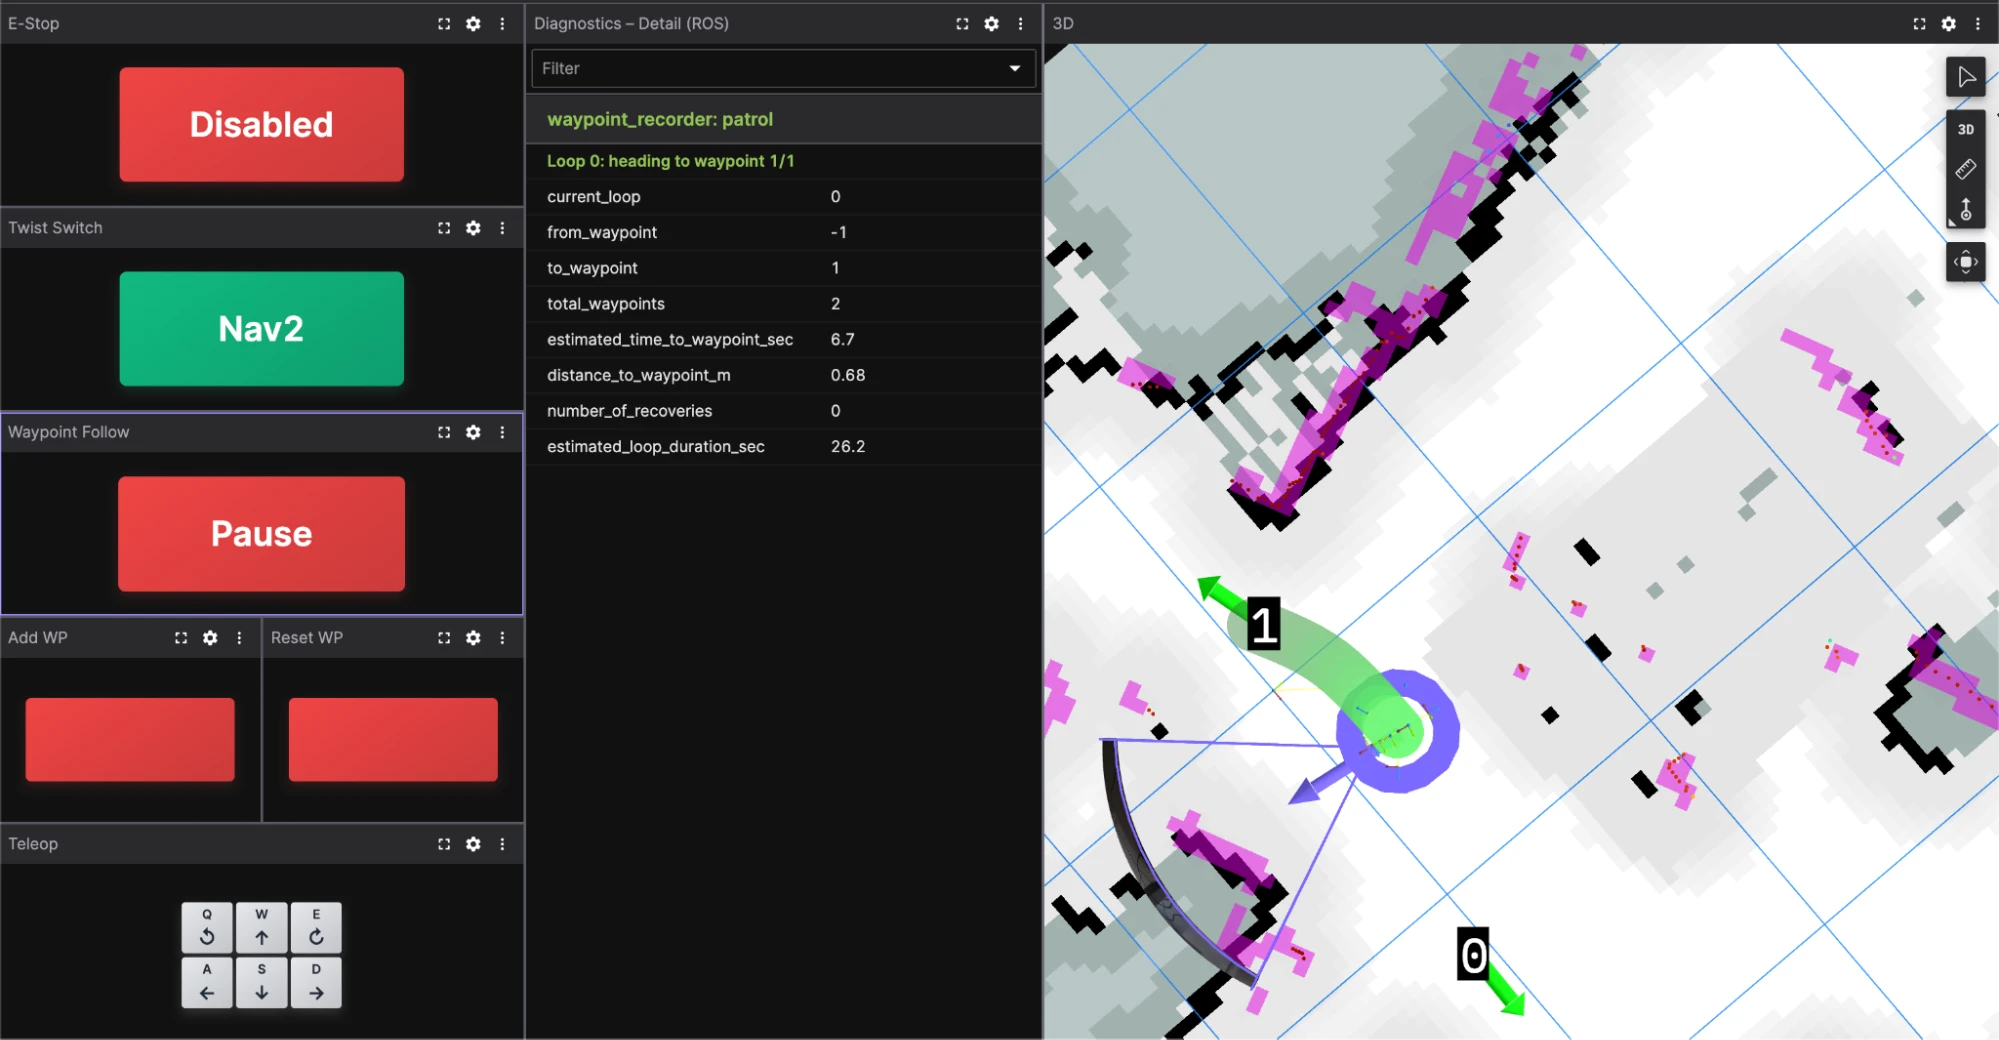
This was a big addition - I can set up a patrol route, watch it run, and adjust it on the fly, all from Foxglove or a gamepad. That said, waypoint_recorder_node is nowhere near a polished solution - it’s a messy, partly vibe-coded proof-of-concept, and I plan to refine it iteratively. For now, if you want to use it yourself, proceed with caution and expect breaking changes.
Keepout and Speed-Limited Zones
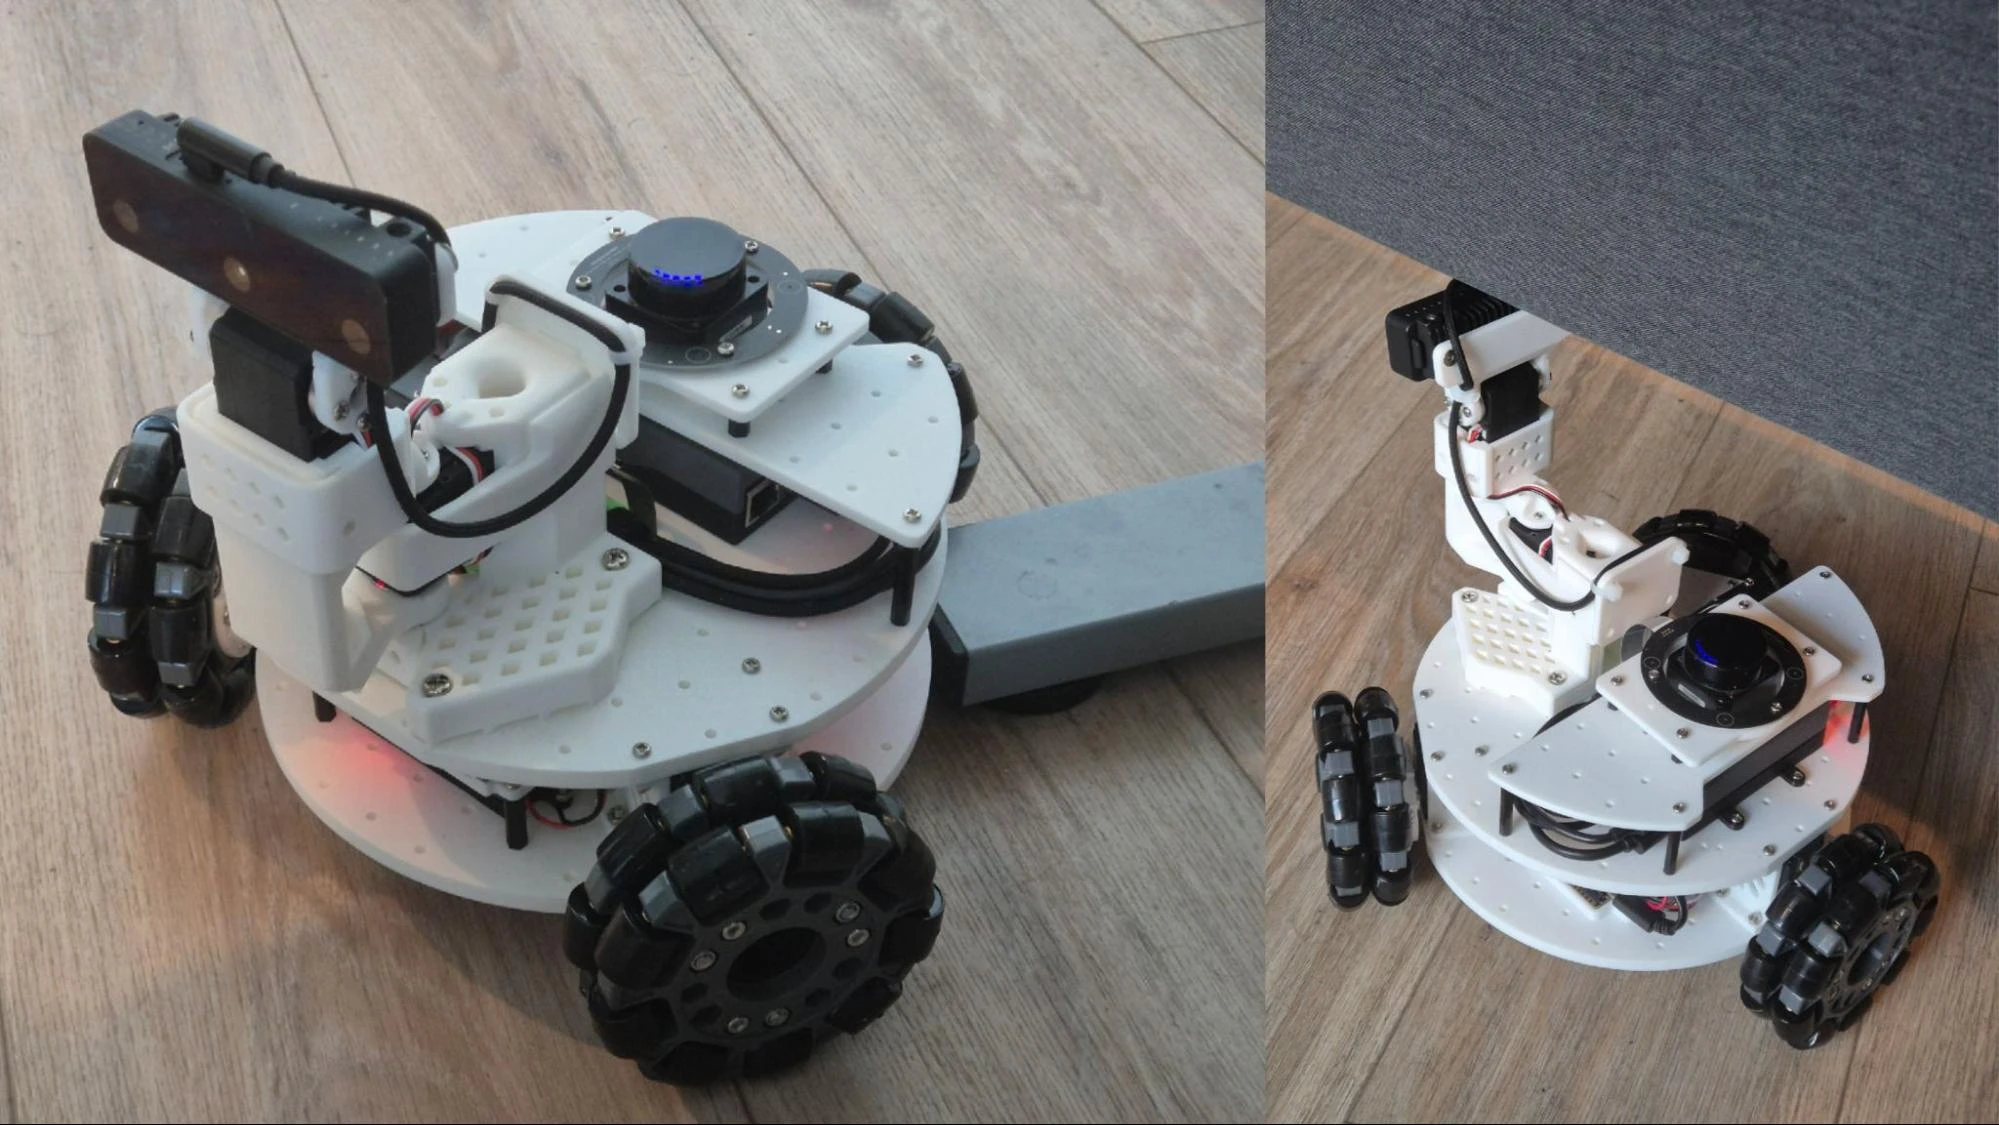
This feature was born out of necessity. While testing my standard Nav2 config, I found a few areas in my apartment that the robot couldn’t navigate through safely. For example, my couch has a high clearance, so the LiDAR sees free space underneath it, but the pan-tilt mechanism gets stuck since it is taller than the clearance. Another example is my standing desk, which has a base that is lower than what the LiDAR sees, so the robot would collide if it tried to go under. I needed a way to tell Nav2 to avoid these areas.
While at it, I also decided to experiment with speed-limited zones, where the robot would slow down in certain areas. Not something I need right now, but a fun feature to play with. I wanted to be able to draw these zones on the map and have Nav2 respect them during navigation.
For both these features, I followed the handy tutorials in the Nav2 docs: Keepout Zones and Speed-Limited Zones. Both use a separate grayscale mask image layered on top of the navigation map, but they work differently:
-
KeepoutFiltermarks any cell where the mask has a black pixel as a no-go zone in the costmap - the planner treats it as an obstacle and routes around it. I havekeepout_filterrunning on both the global and local costmaps, so neither the planner nor the controller will enter those cells regardless of where the goal is.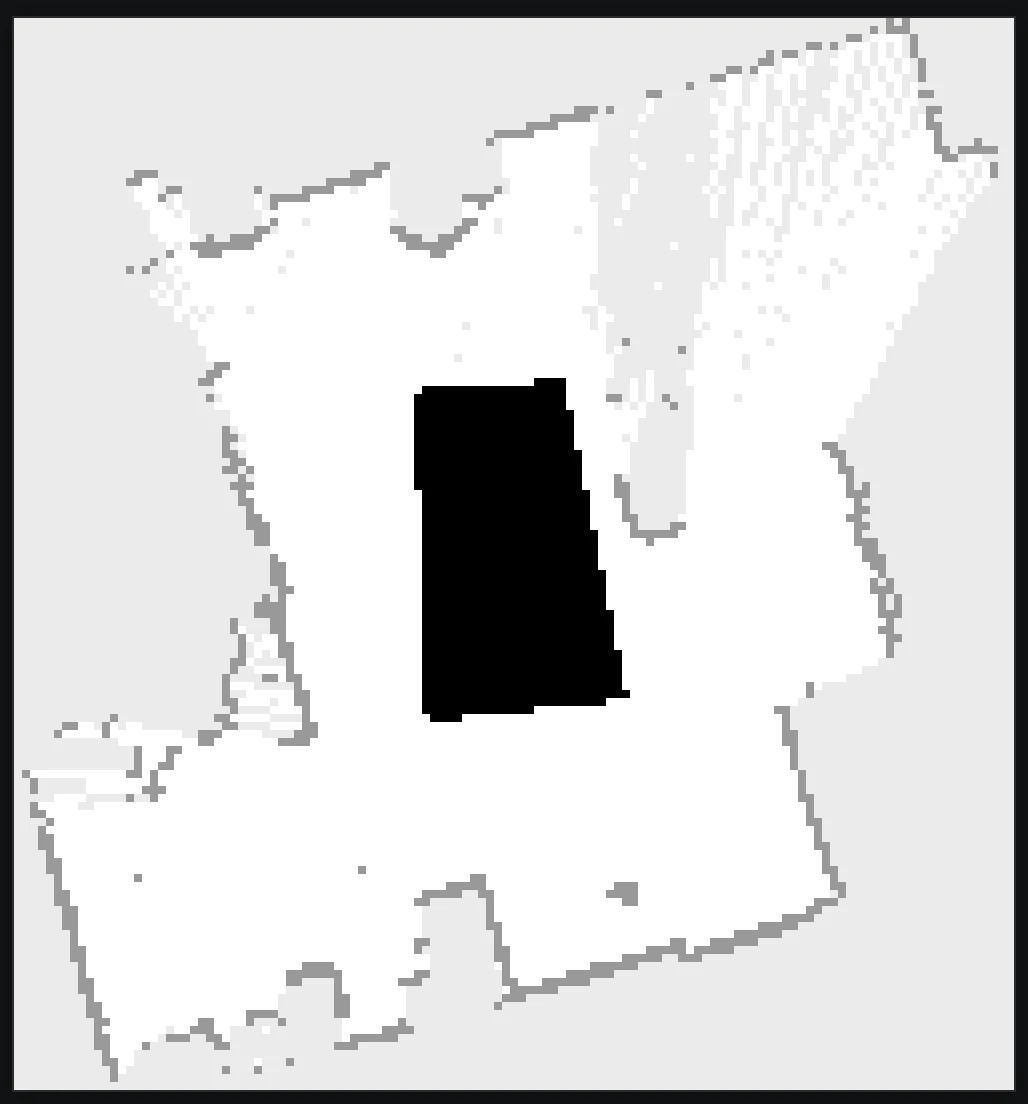
-
SpeedFiltermaps pixel brightness to a speed limit percentage instead - white means full speed, black means stop, and grays scale proportionally in between. In the image below, the two grey blobs are speed-limited zones, with the darker one indicating a lower speed limit than the lighter grey section.SpeedFilteronly runs on the local costmap - it affects what the controller does in real time, but the global planner generates routes without accounting for it. This also means that if a keepout zone overlaps a speed-limited zone, the keepout zone takes precedence, since the global planner will never route a path through it.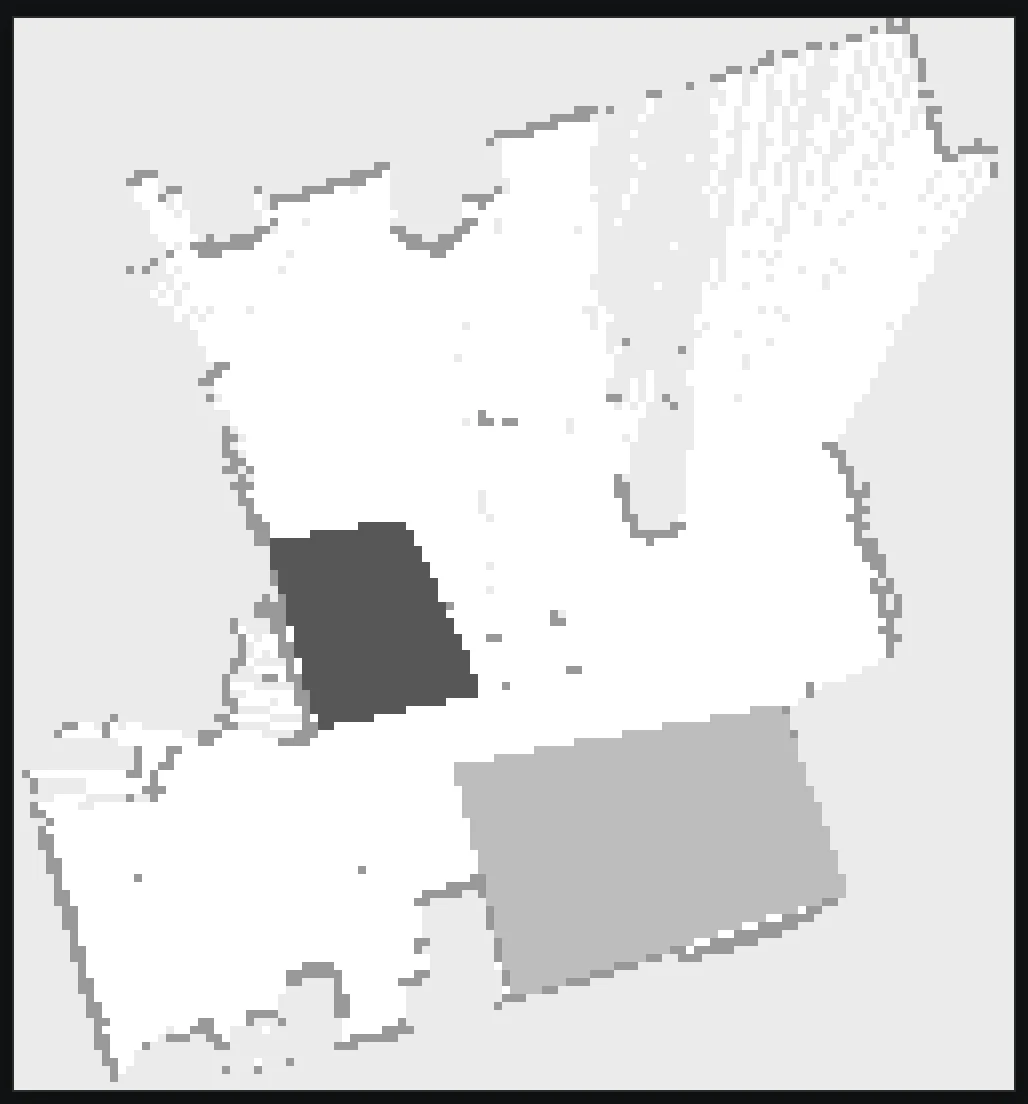
The main challenge here was the recommended method for creating these masks: create a .pgm file in an image editor with the same size as the map, then overlay the map on top of it as a guide and draw the zones. I updated the map_saver_node script to handle the first part: it now saves all-white .pgm placeholders sized to match the map alongside the rest of the map files, so there’s no need to create a correctly sized canvas from scratch.
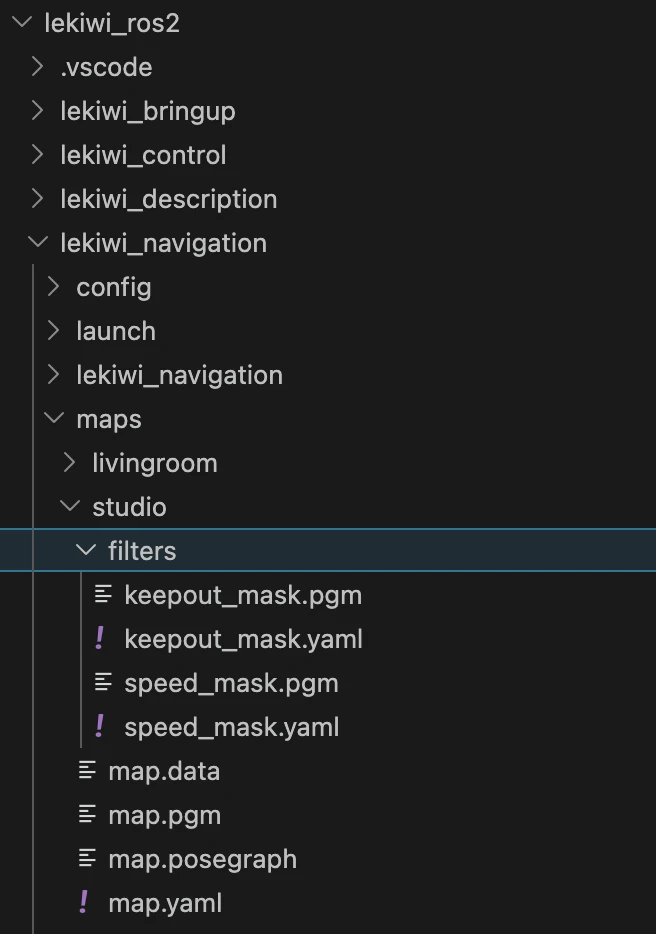
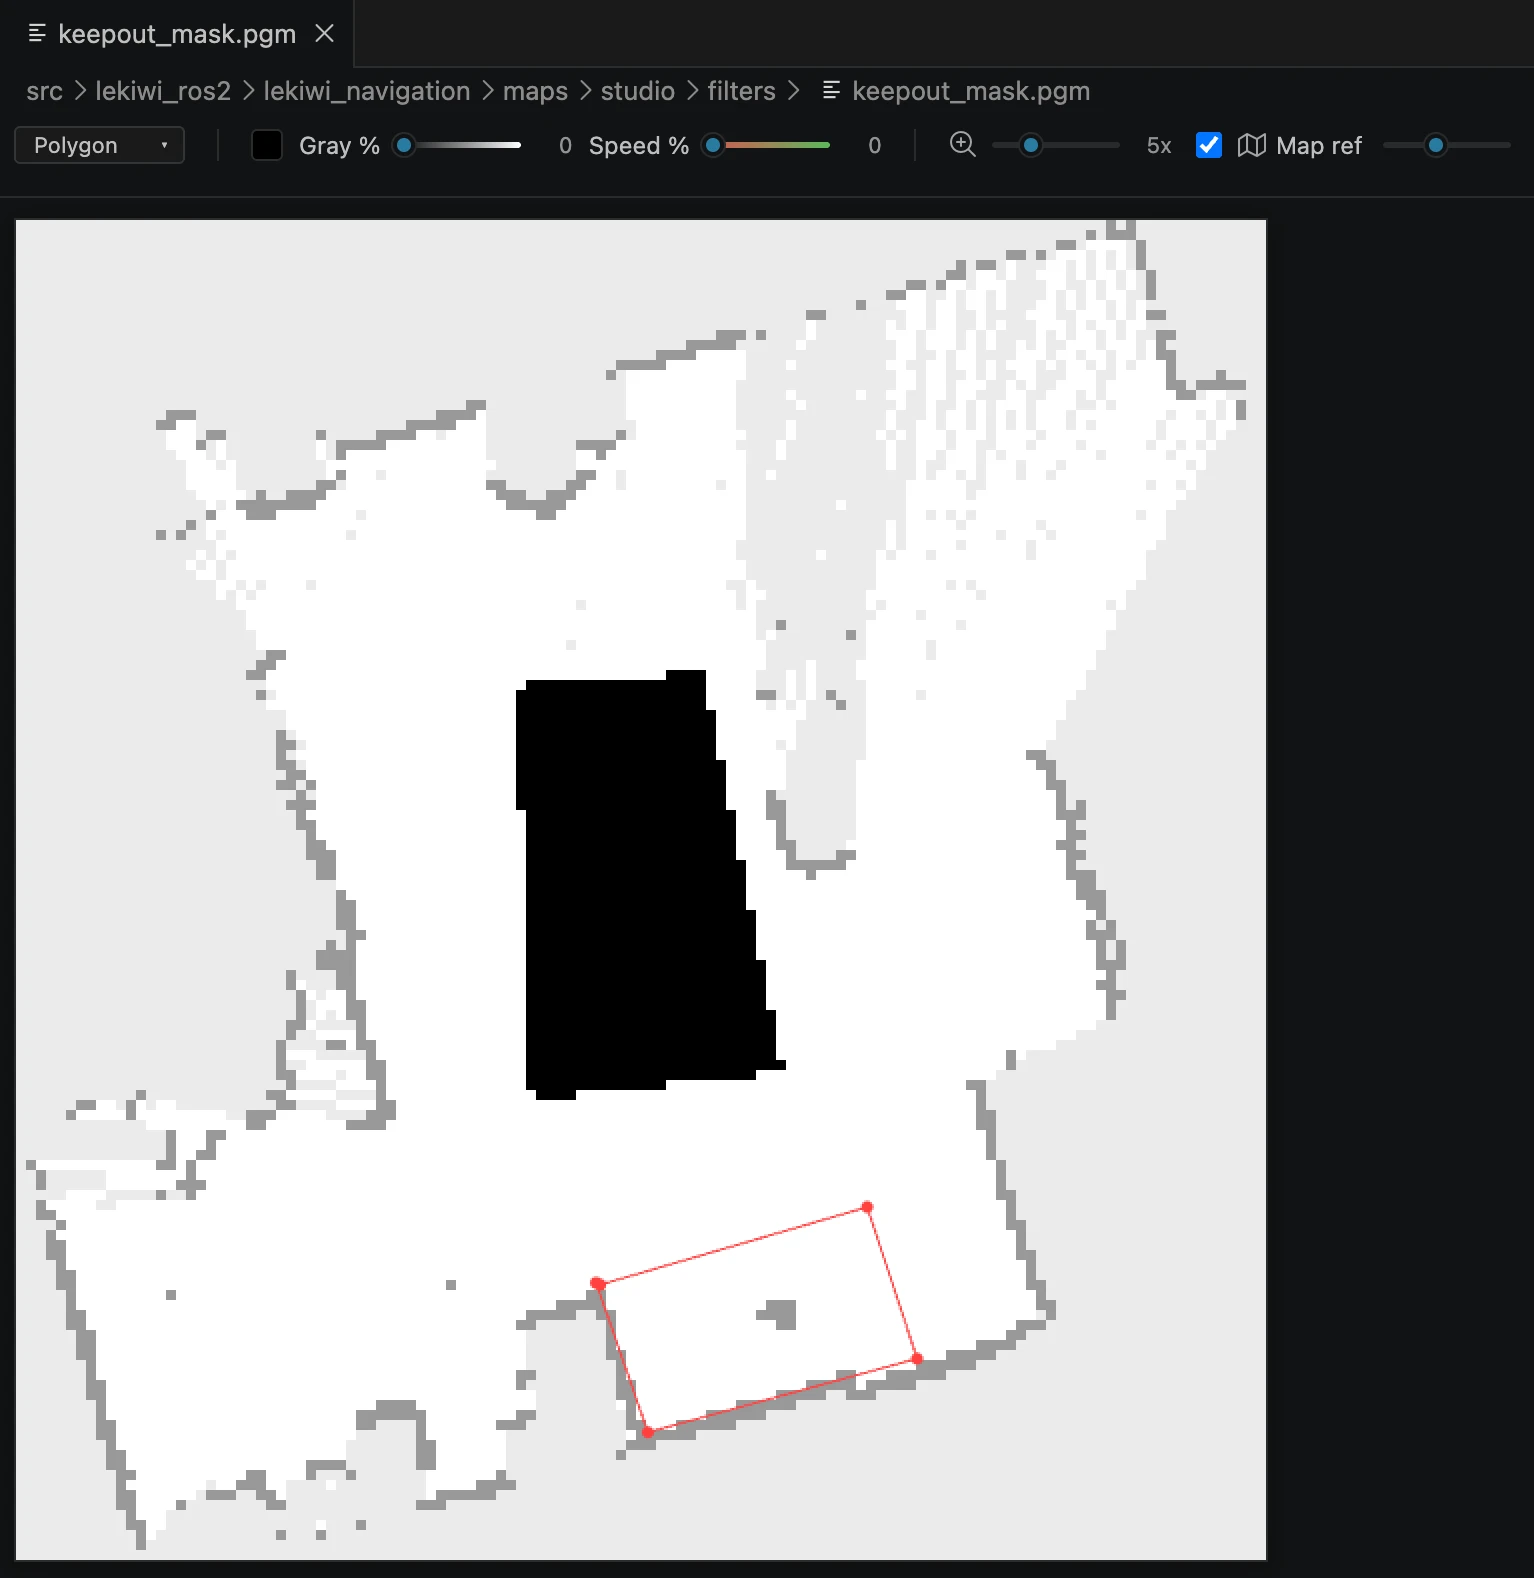
However, to update these masks, I decided to look for a way to do it directly in VS Code, since I am already using it for development. I handed it off to Claude, and less than an hour later, I had a rudimentary PGM Editor extension that lets me open a blank .pgm file, draw shapes on it, and save it as a filter. In the image below, the black blob is a zone I’ve already drawn, and the red polygon is a new keepout zone being drawn. It is very basic, but it works for my needs. It is available on the VSCode Extensions Marketplace. Feel free to check it out and clone it to make it your own.
With the masks ready, I updated the Nav2 config and the launch file to include the costmap filter plugins and tested it out. Like before, using the Foxglove Bridge, I could visualize the costmaps remotely in Foxglove running on my laptop and see both the keepout and speed-limited zones in the 3D panel, as shown in the image below. Both masks are rendered as standard costmaps in Foxglove, so the colors are fixed, but you can switch to custom costmap layers if you want to pick your own.
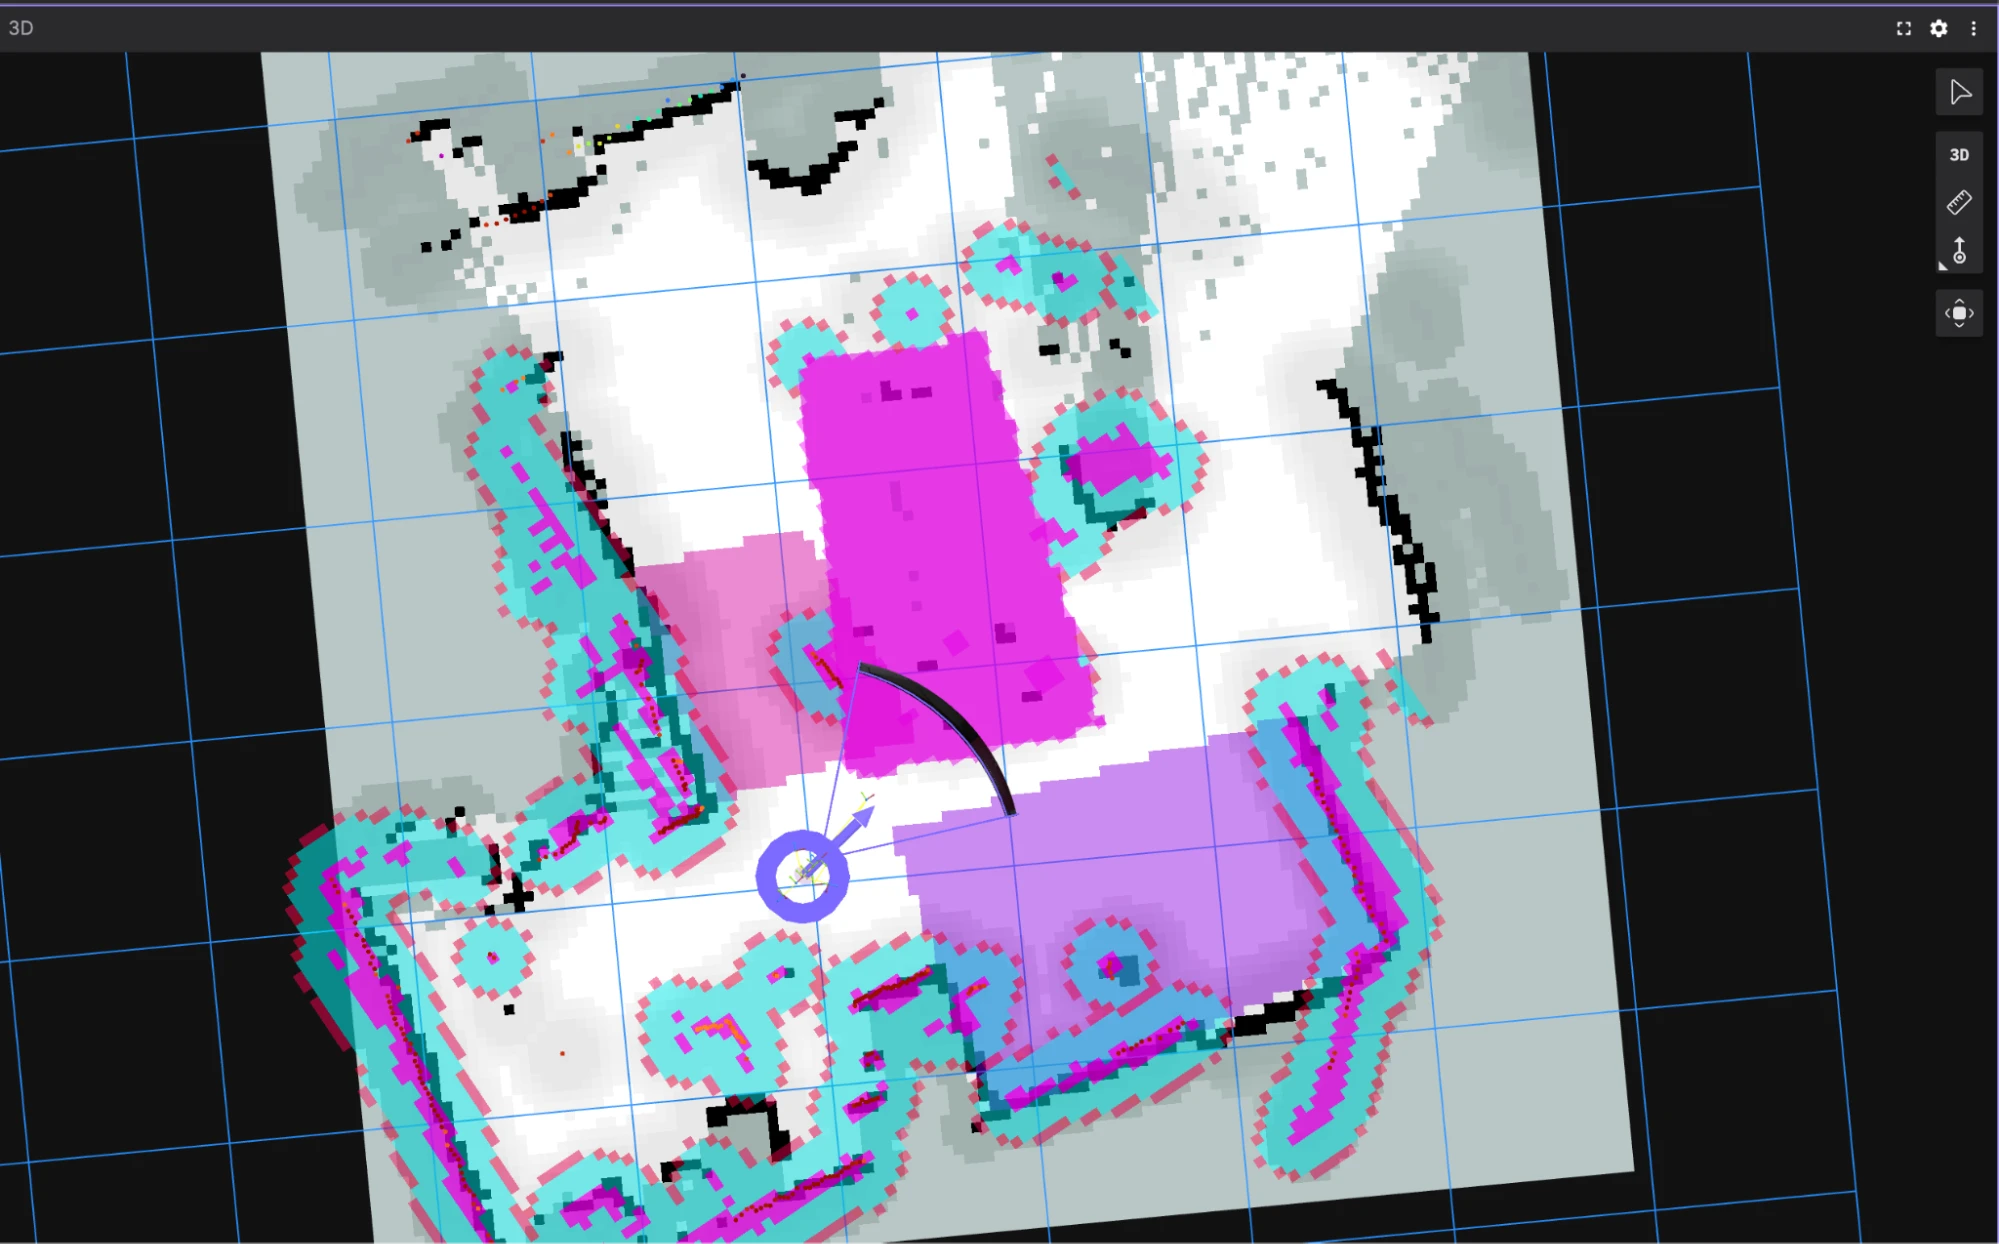
Once the visualization was verified, I tested the robot’s behavior in the real world. The keepout zone worked as expected - the planner never routed the robot into the zone, always routing around it. The speed-limited zones also worked - the robot slowed down according to the speed limit set in the mask and returned to its original speed once it exited the zone. You can see both of these zones in action in the video below. I am super happy with how this feature turned out and relieved that it was so easy to implement.
Wrapping up
With these three features in place, the LeKiwi’s Nav2 setup is starting to feel complete. And like with everything else, Foxglove was one of the instrumental tools that really sped up my development process. From visualization to teleop and now the new navigation features, it works seamlessly whether I’m sitting at my laptop or holding the Steam Deck.
Beyond Nav2, the next major thing I want to tackle is a docking station: somewhere the robot can autonomously navigate to and charge. That breaks down into a few intermediate goals: tracking fiducial markers with the on-board OAK-D S2 camera, writing a custom docking behavior using Behavior Trees, and on the hardware side, designing the docking mechanism and finding a battery monitoring solution that can tell the robot when it’s running low. The hardware will probably take the longest, and might end up being a custom design if nothing off-the-shelf fits.
As for the planner and controller tuning that I promised in the previous post, it is still ongoing. I’ve been fine-tuning it iteratively as I use the robot, but it’s not the kind of thing that makes for an interesting blog post, so I will leave those changes in lekiwi_ros2 with the rest of the LeKiwi ROS 2 stack. As always, this is a work in progress, so expect regular updates and breaking changes at times. Feedback and contributions are always welcome!